Flask Angular CRUD
Here you will see Python REST APIs + Flask + Angular CRUD Example. I will use the existing tutorial on Python REST API CRUD Example using Flask and MySQL for server side and I will introduce Angular on UI (user Interface) or front-end side. So go through the mentioned tutorial before proceeding further down.
Recommended reading:
Python web application CRUD example using Flask and MySQL
Prerequisites
Python REST API CRUD Example using Flask and MySQL
Python 3.11.5, Flask 2.3.3, Angular 8/17
Setting up Angular project
Please make sure you go through the tutorial How to create new Angular project on Windows.
Create a project called angularjs-python (Angular 8) or angular-flask (Angular 17) in your desired directory by executing the following command in cmd window:
ng new angularjs-python
Or
ng new angular-flaskOnce your project downloads the necessary libraries, make sure your newly created project compiles and opens in browser successfully. To check this navigate to the project’s root directory angularjs-python or angular-flask and execute the following command:
ng serve --open
Now stop the server and create the required modules for CRUD (Create, Read, Update and Delete) operations. We will perform CRUD operations on user management.
To know more about Angular style guide, check it here.
Execute below commands one by one when you are on the angularjs-python (Angular 8) directory in cmd window:
ng g c user-list --routing=true
ng g c user-add --routing=true
ng g c user-edit --routing=true
ng g c user-detail --routing=true
For Angular 17, the –routing==true option won’t work, so you need to generate components only without –routing==true option and later you need to specify routes manually. So the commands become as follows:
ng g c user-list
ng g c user-add
ng g c user-edit
ng g c user-detail
The above commands will create required directory structures under src/app folder.
If you open src/app/app.module.ts file, you will see entries for all new modules are also added to this file.
Make sure your src/app/app.component.html file has the following entry in order to work routing fine.
<router-outlet></router-outlet>
Routes
You need to create routes for navigating through your application. For example, you want to create new user, so you will click on a link – New User. You may update existing user, so you may click on Edit link and so on.
The following routing configuration is done for Angular 17 in the file src/app/app.routes.ts file:
import { Routes } from '@angular/router';

import {UserListComponent} from './user-list/user-list.component';
import {UserAddComponent} from './user-add/user-add.component';
import {UserEditComponent} from './user-edit/user-edit.component';
import {UserDetailComponent} from './user-detail/user-detail.component';

export const routes: Routes = [
	{ path: '', redirectTo: '/user', pathMatch: 'full' },
	{ path: 'user', component: UserListComponent },
	{ path: 'detail/:id', component: UserDetailComponent },
	{ path: 'edit/:id', component: UserEditComponent },
	{ path: 'add', component: UserAddComponent }
];
The following routing configuration is done for Angular 8:
Create a file src/app/app-routing.module.ts with below source code:
import { NgModule }             from '@angular/core';
import { RouterModule, Routes } from '@angular/router';

import { UserListComponent } from './user-list/user-list.component';
import { UserAddComponent } from './user-add/user-add.component';
import { UserEditComponent } from './user-edit/user-edit.component';
import { UserDetailComponent } from './user-detail/user-detail.component';

const routes: Routes = [
  { path: '', redirectTo: '/user', pathMatch: 'full' },
  { path: 'user', component: UserListComponent },
  { path: 'detail/:id', component: UserDetailComponent },
  { path: 'edit/:id', component: UserEditComponent },
  { path: 'add', component: UserAddComponent }
];

@NgModule({
  imports: [ RouterModule.forRoot(routes) ],
  exports: [ RouterModule ]
})
export class AppRoutingModule {}
Additional modules
The following app.module.ts file exists for Angular version below 17. So, you don’t need to configure additional modules for Angular 17.
Open your src/app/app.module.ts and add few more modules for the application, such as, import FormsModule, HttpClientModule and AppRoutingModule. Make sure you have the same source code as below:
import { BrowserModule } from '@angular/platform-browser';
import { NgModule } from '@angular/core';

import { FormsModule }    from '@angular/forms';
import { HttpClientModule }    from '@angular/common/http';
import { AppRoutingModule } from './app-routing.module';

import { AppComponent } from './app.component';
import { UserListComponent } from './user-list/user-list.component';
import { UserAddComponent } from './user-add/user-add.component';
import { UserEditComponent } from './user-edit/user-edit.component';
import { UserDetailComponent } from './user-detail/user-detail.component';

@NgModule({
  declarations: [
    AppComponent,
    UserListComponent,
    UserAddComponent,
    UserEditComponent,
    UserDetailComponent
  ],
  imports: [
    BrowserModule,
	FormsModule,
	AppRoutingModule,
	HttpClientModule
  ],
  providers: [],
  bootstrap: [AppComponent]
})
export class AppModule { }
If you now open your application by executing command ng serve --open in cmd window you won’t redirect to the http://localhost:4200/user though I have redirected to the home path /user in src/app/app-routing.module.ts file.
You will see the path in browser as http://localhost:4200/user but you will also see the output on the browser from src/app/app.component.html file.
Therefore, remove everything from app.component.html file and put only <router-outlet></router-outlet> in this file and now save the file. You should now see the output as “user-list works!” on home page.
Model class
I will perform CRUD operations on user information, so I need to have user model class. Create src/app/user.ts file with below source code.
If you want to generate this file using command then you can use the command ng g cl user --skip-tests for Angular 17 and ng g cl user --type==model --skip-tests for Angular 8.
For Angular 17, the class is given below:
export class User {
	id?: number;
	name: string | null | undefined;
	email: string | null | undefined;
	pwd: string | null | undefined;
}
For Angular 8, the class is given below:
export class User {
  id?: number;
  name: string;
  email: string;
  pwd: string;
}
Here in the above class, notice I have put id? to indicate optional value for id field during adding new user information.
Service class
You need a central class that will be used by all modules in Angular to interact with server either to fetch the data or send the data to server when required for our example Python REST APIs + Flask + Angular CRUD Exmple.
Create below service class – src/app/user.service.ts – that will list down CRUD operation methods.
You can use the command ng g s user to generate a service class.
For Angular 17 use the following class:
import { Injectable } from '@angular/core';

import { HttpClient, HttpHeaders } from '@angular/common/http';

import { Observable, of } from 'rxjs';
import { catchError, map, tap } from 'rxjs/operators';

import { User } from './user';

const httpOptions = {
  headers: new HttpHeaders({ 'Content-Type': 'application/json' })
};

@Injectable({
  providedIn: 'root'
})
export class UserService {

  //private userUrl = 'http://localhost:5000';  // URL to REST API
  private userUrl = 'http://127.0.0.1:5000';

  constructor(private http: HttpClient) { }

  /** GET users from the server */
  getUsers(): Observable<User[]> {
    return this.http.get<User[]>(this.userUrl + '/users');
  }

  /** GET user by id. Will 404 if id not found */
  getUser(id: number): Observable<any> {
    const url = `${this.userUrl}/user/${id}`;
    return this.http.get<User>(url);
  }

  /** POST: add a new user to the server */
  addUser(user: User) {
	//console.log(user);
    return this.http.post(this.userUrl + '/add', user, httpOptions);
  }

  /** PUT: update the user on the server */
  updateUser(user: User): Observable<any> {
    return this.http.put(this.userUrl + '/update', user, httpOptions);
  }

  /** DELETE: delete the user from the server */
  deleteUser(user: User | number) {
	  if (confirm("Are you sure to delete?")) {
		const id = typeof user === 'number' ? user : user.id;
		const url = `${this.userUrl}/delete/${id}`;
		return this.http.delete(url, httpOptions);
	  }
	  return of({});
  }

}
For Angular 8 use the following class:
import { Injectable } from '@angular/core';
import { HttpClient, HttpHeaders } from '@angular/common/http';

import { Observable, of } from 'rxjs';
import { catchError, map, tap } from 'rxjs/operators';

import { User } from './user';

const httpOptions = {
  headers: new HttpHeaders({ 'Content-Type': 'application/json' })
};

@Injectable({ providedIn: 'root' })
export class UserService {

  private userUrl = 'http://localhost:5000';  // URL to REST API

  constructor(private http: HttpClient) { }

  /** GET users from the server */
  getUsers(): Observable<User[]> {
    return this.http.get<User[]>(this.userUrl + '/users');
  }

  /** GET user by id. Will 404 if id not found */
  getUser(id: number): Observable<any> {
    const url = `${this.userUrl}/user/${id}`;
    return this.http.get<User>(url);
  }

  /** POST: add a new user to the server */
  addUser(user: User) {
	//console.log(user);
    return this.http.post(this.userUrl + '/add', user, httpOptions);
  }

  /** PUT: update the user on the server */
  updateUser(user: User): Observable<any> {
    return this.http.put(this.userUrl + '/update', user, httpOptions);
  }

  /** DELETE: delete the user from the server */
  deleteUser(user: User | number) {
	  if (confirm("Are you sure to delete?")) {
		const id = typeof user === 'number' ? user : user.id;
		const url = `${this.userUrl}/delete/${id}`;
		return this.http.delete(url, httpOptions);
	  }
	  return of({});
  }

}
In the above class we have defined methods for CRUD operations for users.
Now let’s see how I have given user options through the UI to add new user, update existing user, fetching exiting users and deleting existing users for our Python REST APIs + Flask + Angular CRUD Example.
Retrieving Users
First you will see how to fetch all users information from server. So modify the file src/app/user-list/user-list.component.ts to perform required operations.
For Angular 17 use the following code:
import { Component, OnInit } from '@angular/core';

import { ActivatedRoute } from '@angular/router';
import { User } from '../user';
import { UserService } from '../user.service';

import { CommonModule } from "@angular/common";

import { RouterLink } from '@angular/router';

@Component({
  selector: 'app-user-list',
  standalone: true,
  imports: [CommonModule, RouterLink],
  templateUrl: './user-list.component.html',
  styleUrl: './user-list.component.css'
})
export class UserListComponent implements OnInit {

	users: User[] = [];

	constructor(private route: ActivatedRoute, private userService: UserService) { }

	ngOnInit() {
		this.getUsers();
	}

	getUsers(): void {
		this.userService.getUsers().subscribe(users => this.users = users);
	}

	delete(user: User): void {
		this.userService.deleteUser(user).subscribe(success=> {this.getUsers();});
	}

}
For Angular 8 use the following code:
import { Component, OnInit } from '@angular/core';

import { ActivatedRoute } from '@angular/router';
import { User } from '../user';
import { UserService } from '../user.service';

@Component({
  selector: 'app-user-list',
  templateUrl: './user-list.component.html',
  styleUrls: ['./user-list.component.css']
})
export class UserListComponent implements OnInit {

	users: User[] = [];

	constructor(private route: ActivatedRoute, private userService: UserService) { }

	ngOnInit() {
		this.getUsers();
	}

	getUsers(): void {
		this.userService.getUsers().subscribe(users => this.users = users);
	}

	delete(user: User): void {
		this.userService.deleteUser(user).subscribe(success=> {this.getUsers();});
	}

}
In the above class, I have imported required modules. I fetch all users and populate the users[].
I have also defined our delete() method to perform delete operation. I don’t have separate module for delete operation because I don’t need separate page for this.
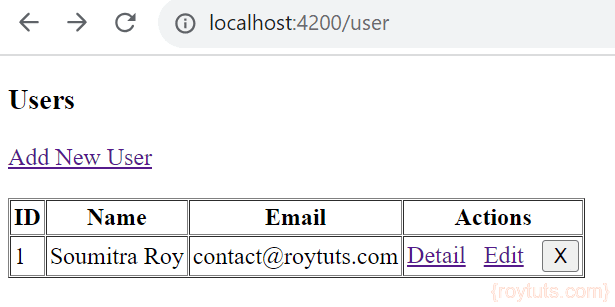
Now edit src/app/user-list/user-list.component.html file to show users information on page:
<h3>Users</h3>
<div>
	<a routerLink="/add">
		Add New User
	</a>
</div>
<table>
  <tr>
    <th>ID</th>
    <th>Name</th>
    <th>Email</th>
	<th>Actions</th>
  </tr>
  <tr *ngFor="let user of users">
    <td>{{user.id}}</td>
    <td>{{user.name}}</td>
    <td>{{user.email}}</td>
	<td>
		<a routerLink="/detail/{{user.id}}">Detail</a>

		<a routerLink="/edit/{{user.id}}">Edit</a>

		<button title="delete user" (click)="delete(user)">x</button>
	</td>
  </tr>
</table>
Here I am showing users information on HTML table and I have attached Detail, Edit and Delete operations for each row of the table.
One problem you will face when you run the server and client applications – CORS error.
So you need to install CORS module on server side code, i.e., Python REST API CRUD Example using Flask and MySQL using the following command in cmd window as an Administrator.
pip install -U flask-cors
Now once you are done successfully with installation then you can modify your app.py file as below:
from flask import Flask
from flask_cors import CORS

app = Flask(__name__)
CORS(app)
You need to update two queries in rest.py script:
For route ‘/users’, change the query as
SELECT user_id id, user_name name, user_email email, user_password pwd FROM tbl_userFor route ‘user/<int:id>’, change the query as
SELECT user_id id, user_name name, user_email email, user_password pwd FROM tbl_user WHERE user_id=%sThe above changes are required to sync the above model class User in src/app/user.ts.
Now run the angularjs-python or angular-flask application, you will be able to see the page with one user information, provided the user information exists in the table.
If you try to see detail or want to edit, you won’t be able to do that (you will only see default message appearing in the html page in respective modules) because those functionalities do not exist yet.
If you try to delete on clicking on the X button then you will be but I won’t delete now because I need to implement functionalities to perform other actions. When you try to delete you will be prompted with alert box for delete confirmation.
User Details
Now you will see how to show user detail information when you click on Detail link.
Open src/app/user-detail/user-detail.component.ts file and update the file with below source code.
For Angular 17 use the following code:
import { Component, OnInit } from '@angular/core';

import { Location, CommonModule } from '@angular/common';
import { ActivatedRoute } from '@angular/router';

import { User } from '../user';
import { UserService } from '../user.service';

@Component({
  selector: 'app-user-detail',
  standalone: true,
  imports: [CommonModule],
  templateUrl: './user-detail.component.html',
  styleUrl: './user-detail.component.css'
})
export class UserDetailComponent implements OnInit {

	user?: User;

	constructor(private route: ActivatedRoute, private userService: UserService, private location: Location) { }

	ngOnInit() {
		this.getUser();
	}

	getUser(): void {
		const id = + Number(this.route.snapshot.paramMap.get('id'));
		this.userService.getUser(id).subscribe(user => this.user = user);
	}

	goBack(): void {
		this.location.back();
	}

}
For Angular 8 use the following code:
import { Component, OnInit } from '@angular/core';
import { Location } from '@angular/common';
import { ActivatedRoute } from '@angular/router';

import { User } from '../user';
import { UserService } from '../user.service';

@Component({
  selector: 'app-user-detail',
  templateUrl: './user-detail.component.html',
  styleUrls: ['./user-detail.component.css']
})
export class UserDetailComponent implements OnInit {

	user: User;

	constructor(private route: ActivatedRoute, private userService: UserService, private location: Location) { }

	ngOnInit() {
		this.getUser();
	}

	getUser(): void {
		const id = + this.route.snapshot.paramMap.get('id');
		this.userService.getUser(id).subscribe(user => this.user = user);
	}

	goBack(): void {
		this.location.back();
	}

}
Here in the above class I fetch the user detail for a given user id as a path parameter. I also provide goBack() function to give user option when a user wants to go to the previous page.
Now open src/app/user-detail/user-detail.component.html file to update with below code.
For Angular 17 use the following code:
<div *ngIf="user">
  <h2>{{user!.name | uppercase}} Details</h2>
  <div><span>Id: </span>{{user!.id}}</div>
  <div>
    <p>
		Name: {{user!.name}}
    </p>
	<p>
		Email: {{user!.email}}
    </p>
  </div>
  <button (click)="goBack()">Go Back</button>
</div>
For Angular 8 use the following code:
<div *ngIf="user">
  <h2>{{user.name | uppercase}} Details</h2>
  <div><span>Id: </span>{{user.id}}</div>
  <div>
    <p>
		Name: {{user.name}}
    </p>
	<p>
		Email: {{user.email}}
    </p>
  </div>
  <button (click)="goBack()">go back</button>
</div>
Now when you click on Detail link, you will see below details on browser:

Update User Details
Now I will implement functionality for updating existing user.
Open the file src/app/user-edit/user-edit.component.ts and update as below.
For Angular 17 use the following code:
import { Component, OnInit, Input } from '@angular/core';
import { Location } from '@angular/common';
import { ActivatedRoute } from '@angular/router';
import { FormsModule } from '@angular/forms';
import { CommonModule } from "@angular/common";

import { User } from '../user';
import { UserService } from '../user.service';

@Component({
  selector: 'app-user-edit',
  standalone: true,
  imports: [FormsModule, CommonModule],
  templateUrl: './user-edit.component.html',
  styleUrl: './user-edit.component.css'
})
export class UserEditComponent implements OnInit {

	@Input() user: User = { id: 0, name: '', email: '', pwd:'' };

	constructor(private route: ActivatedRoute, private userService: UserService, private location: Location) { }

	ngOnInit() {
		this.getUser();
	}

	getUser(): void {
		const id = + Number(this.route.snapshot.paramMap.get('id'));
		this.userService.getUser(id).subscribe(user => this.user = user);
	}

	save(): void {
		this.userService.updateUser(this.user).subscribe(success=> {this.goBack();});
	}

	goBack(): void {
		this.location.back();
	}

}
For Angular 8 use the following code:
import { Component, OnInit, Input } from '@angular/core';
import { Location } from '@angular/common';
import { ActivatedRoute } from '@angular/router';

import { User } from '../user';
import { UserService } from '../user.service';

@Component({
  selector: 'app-user-edit',
  templateUrl: './user-edit.component.html',
  styleUrls: ['./user-edit.component.css']
})
export class UserEditComponent implements OnInit {

	@Input() user: User;

	constructor(private route: ActivatedRoute, private userService: UserService, private location: Location) { }

	ngOnInit() {
		this.getUser();
	}

	getUser(): void {
		const id = + this.route.snapshot.paramMap.get('id');
		this.userService.getUser(id).subscribe(user => this.user = user);
	}

	save(): void {
		this.userService.updateUser(this.user).subscribe(success=> {this.goBack();});
	}

	goBack(): void {
		this.location.back();
	}

}
I fetch the user details first and these values will be used to populate the input fields on HTML form so that user can understand what was the previous value for a field.
Now open src/app/user-edit/user-edit.component.html file to update as below:
<div *ngIf="user">
  <h2>{{user.name | uppercase}} Details</h2>
  <div><span>Id: </span>{{user.id}}</div>
  <div>
    <p>
		Name: <input [(ngModel)]="user.name" placeholder="User Name">
    </p>
	<p>
		Email: <input [(ngModel)]="user.email" placeholder="User Email">
    </p>
  </div>
  <button (click)="goBack()">go back</button>

  <button (click)="save()">save</button>
</div>
When you click on Edit link in the user list page then you will see below output on browser:
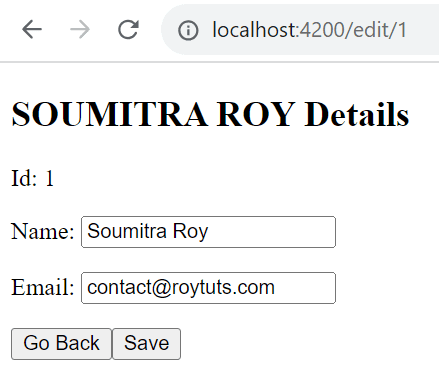
Now you can change the value and save the updated value.
Note: If you face problem regarding “http status 405 – method not allowed”, then you can change the method from POST to PUT for route /update in server side code on rest.py script.
...
@app.route('/update', methods=['PUT'])
...
if _name and _email and _password and _id and request.method == 'PUT':
...
Add User Details
Next I will implement functionality for adding new user information. Open the file src/app/user-add/user-add.component.ts and update with below code.
For Angular 17, use the following code:
import { Component, OnInit, Input } from '@angular/core';
import { Location } from '@angular/common';
import { FormsModule } from '@angular/forms';

import { User } from '../user';
import { UserService } from '../user.service';

@Component({
  selector: 'app-user-add',
  standalone: true,
  imports: [FormsModule],
  templateUrl: './user-add.component.html',
  styleUrl: './user-add.component.css'
})
export class UserAddComponent implements OnInit {

	@Input() user: User = { name: '', email: '', pwd:'' };

	constructor(private userService: UserService, private location: Location) { }

	ngOnInit() {
	}

	save(): void {
		this.userService.addUser(this.user).subscribe(() => this.goBack());
	}

	goBack(): void {
		this.location.back();
	}

}
For Angular 8 use the following code:
import { Component, OnInit, Input } from '@angular/core';
import { Location } from '@angular/common';

import { User } from '../user';
import { UserService } from '../user.service';

@Component({
  selector: 'app-user-add',
  templateUrl: './user-add.component.html',
  styleUrls: ['./user-add.component.css']
})
export class UserAddComponent implements OnInit {

	@Input() user: User = { name: '', email: '', pwd:'' };

	constructor(private userService: UserService, private location: Location) { }

	ngOnInit() {
	}

	save(): void {
		this.userService.addUser(this.user).subscribe(() => this.goBack());
	}

	goBack(): void {
		this.location.back();
	}

}
Update the file src/app/user-add/user-add.component.html as below:
<div>
  <h2>Add User Detail</h2>
  <div>
    <p>
		<label>Name:
			<input [(ngModel)]="user.name" placeholder="User Name"/>
		</label>
    </p>
	<p>
		<label>Email:
			<input [(ngModel)]="user.email" placeholder="User Email"/>
		</label>
    </p>
	<p>
		<label>Password:
			<input type="password" [(ngModel)]="user.pwd" placeholder="User Password"/>
		</label>
    </p>
  </div>
  <button (click)="goBack()">go back</button>

  <button (click)="save()">save</button>
</div>
Now you can input and save the information for new user:

Delete User Details
Now if you click on the X link to delete a user, let’s say you want to delete the user with ID 1. You will get confirmation alert and you need to click Yes for deletion.
Note: If you get http status error – 405 => method not allowed. Add method DELETE to route /delete/<int:id> as shown below:
@app.route('/delete/<int:id>', methods=['DELETE'])
That’s all. Hope you got idea on Python REST APIs + Flask + Angular CRUD Example.
Recommended reading:
Python web application CRUD example using Flask and MySQL