Configuring Multiple Instances
Now let’s say we want to run forex-microservice on two instances, so configure the instances in application.properties file under src/main/resources of currency-conversion-microservice. The entire application.properties file looks as below:
server.port=9090
spring.application.name=currency-conversion-microservice
spring.jackson.default-property-inclusion=NON_NULL
forex-microservice.ribbon.listOfServers=localhost:8080,localhost:8085
It’s obvious from the above file that our forex-microservice will run on localhost:8080 and localhost:8085. So we have to configure forex-microservice to run on 8085 port because the forex-microservice already running on port 8080.
Configuring Forex Microservice
Do right click on the spring-boot-reactive-forex-microservice and select Run As -> Run Configurations…
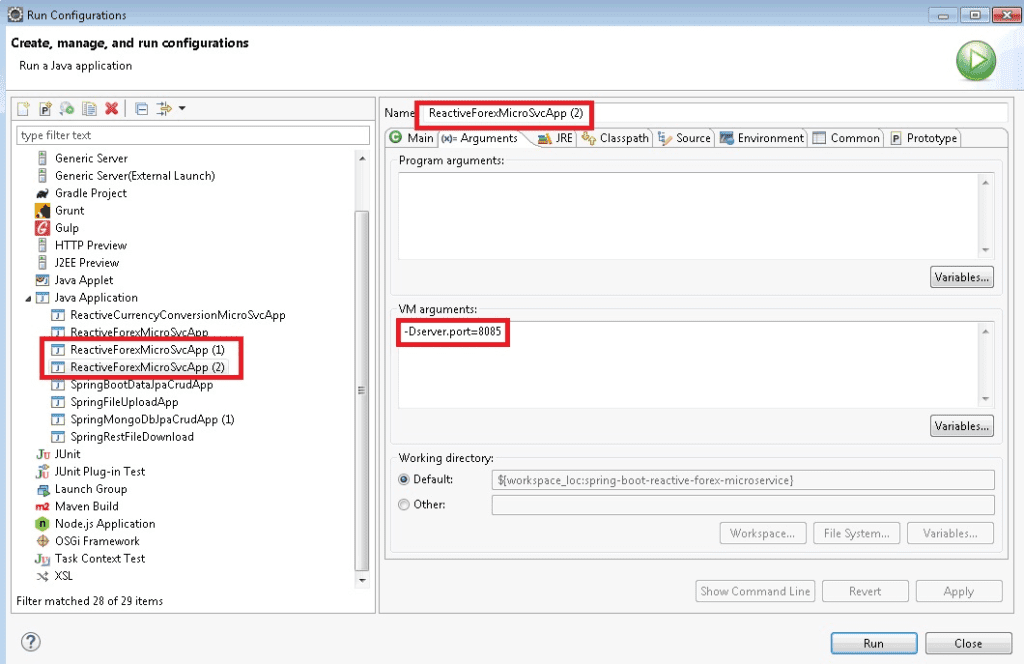
When a popup window opens, under the Java Application, search ReactiveForexMicroSvcApp or ReactiveForexMicroSvcApp(1) and do right click on this and click on Duplicate.
Now put server port under VM arguments: section under Arguments tab as shown in below image:

Now run two instances of forex-microservice and one instance of currency-conversion-microservice by executing main class.
So forex-microservice instances are up on 8080 and 8085 ports, whereas currency-conversion-microservice instance is up on port 9090.
Testing the Microservices
USD to INR Amount
Request Method – GET
Request URL – http://localhost:9090/currency-exchange/from/USD/to/INR/quantity/25
Response
{"id":"5d24b085f352a76d529c0b8f","fromCur":"USD","toCur":"INR","rateCur":70.0,"quantity":25,"totalAmount":1750.0}The above response comes from the currency-conversion-microservice through forex-microservice that runs on port 8080. It does not mean that the above response always will come from the same server running on 8080.
EUR to INR Amount
Request Method – GET
Request URL – http://localhost:9090/currency-exchange/from/EUR/to/INR/quantity/25
Response
{"id":"5d25cc66a17f66da6a7ab88e","fromCur":"EUR","toCur":"INR","rateCur":80.0,"quantity":25,"totalAmount":2000.0}The above response comes from the currency-conversion-microservice through forex-microservice that runs on port 8085. It does not mean that the above response always will come from the same server running on 8085.
We are using Ribbon to distribute the load between the two instances of forex-service.
However, we are hardcoding the URLs of both instances of forex-microservice in currency-conversion-microservice. Therefore every time if there is a new instance of forex-microservice, we need to change the configuration of currency-conversion-microservice and it’s not what we want.
So we will use Eureka Naming Server to fix this problem.
Configuring Eureka Server
Creating Spring Boot Project
Now we will create another Spring Boot project in Eclipse. So create gradle based project in Eclipse with the name spring-boot-reactive-microservice-eureka-server-config.
Updating Build Script
Modify the build.gradle script to include Eureka server.
buildscript {
    ext {
        springBootVersion = '2.1.6.RELEASE'
    }
    repositories {
        mavenCentral()
    }
    dependencies {
        classpath("org.springframework.boot:spring-boot-gradle-plugin:${springBootVersion}")
    }
}
plugins {
    id "io.spring.dependency-management" version "1.0.8.RELEASE"
}
apply plugin: 'java'
apply plugin: 'org.springframework.boot'
sourceCompatibility = 1.8
targetCompatibility = 1.8
repositories {
    mavenCentral()
}
dependencies {
    implementation("org.springframework.cloud:spring-cloud-starter-netflix-eureka-server")
}
dependencyManagement {
    imports {
        mavenBom 'org.springframework.cloud:spring-cloud-dependencies:Greenwich.RELEASE'
    }
}
Creating Configuration File
Now add below content to src/main/resources/application.properties to include some configurations.
The eureka server will run on port 8761.
server.port=8761
spring.application.name=eureka-server-config
eureka.client.register-with-eureka=false
eureka.client.fetch-registry=false
Notice we have added two properties with false value. If we do not make them false (as by default they are true), you may face following exception while running Eureka server:
com.netflix.discovery.shared.transport.TransportException: Cannot execute request on any known servereureka.client.register-with-eureka=false : if we make this property true then while the server starts the inbuilt client will try to register itself with the Eureka server.
eureka.client.fetch-registry=false : if we make this property true then the inbuilt client will try to fetch the Eureka registry, which is not yet available. As a result, we would get TransportException.
Creating Main Class
Create below main class in order to deploy application into embedded eureka server on port 8761.
package com.roytuts.spring.boot.reactive.microservice.eureka.server.config.app;
import org.springframework.boot.SpringApplication;
import org.springframework.boot.autoconfigure.SpringBootApplication;
import org.springframework.cloud.netflix.eureka.server.EnableEurekaServer;
@EnableEurekaServer
@SpringBootApplication
public class ReactiveEurekaConfigMicroSvcApp {
	public static void main(String[] args) {
		SpringApplication.run(ReactiveEurekaConfigMicroSvcApp.class, args);
	}
}
Running the Application
Now run the main class to deploy eureka-server-config application. Your eureka server starts on port 8761.
If you hit the URL http://localhost:8761 in the browser, you will get a Spring Eureka page.
You will see that currently there is no instance running on eureka server.
Configuring Eureka on Microservices
Now we will connect forex-microservice and currency-conversion-microservice using eureka server.
Now add below dependency to both of the build scripts – forex-microservice and currency-conversion-microservcie.
Make sure you stop the microservices before you add to build script and later build the microservices.
implementation("org.springframework.cloud:spring-cloud-starter-netflix-eureka-client")Configuring Eureka URL on Microservices
Next we need to configure eureka URL into application.properties file of both microservices – forex-microservice and currency-conversion-microservice:
eureka.client.service-url.default-zone=http://localhost:8761/eurekaEnabling DiscoveryClient on Microservices
Now put @EnableDiscoveryClient annotation on main classes of forex-microservice and currency-conversion-microservice. We need this annotation to register with eureka server. The @EnableDiscoveryClient activates the Netflix Eureka Discovery Client implementation.
Running Microservices
Now run two instances of forex-microservice and one instance of currency-conversion-microservice.
Refreshing Eureka Server Page
Now refresh the eureka server page URL – http://localhost:8761, you will see one instance of currency-conversion-microservice and two instances of forex-microservice are up and running.
We have now created two microservices – forex-microservice & currency-conversion-microservice and established communication between them.
We are using Ribbon to distribute load between the two instances of forex-microservice and Eureka as the naming server.
When we launch new instances of forex-microservice, you would see that load is automatically distribute to them.
Now you can continue the same tests you performed before we created eureka-server-config application.
That’s all on how to create Spring MongoDB Functional Reactive Microservices example.
Source Code
Thanks for reading.