File Upload
File upload example using Spring REST Controller will show you how to upload a file when selected for uploading from any client (browser or any client) and Spring REST service is used as a server side technology for uploading the file. The file may be any type, i.e., such as excel, text, word, pdf etc. HereIe will create Spring Boot application as it reduces the most of the efforts in project configurations.
Related Posts:
- Junit Testing of File Upload and Download in Spring REST Controllers
- File download example using Spring REST Controller
Prerequisites
Java 8/12/19, Gradle 6.1.1 – 6.7.1, Maven 3.6.3/3.8.5, Spring Boot 2.2.5 – 2.4.3/3.1.5
Project Setup
As a prerequisite I have to first setup the project environment so that I would be able to write the required code for uploading file into server and process the file data for our application’s need. Create below build.gradle script to add the required project dependencies. I have also specified the JDK version I will be using for this application.
For spring boot 3, use the following pom.xml file for your project:
<?xml version="1.0" encoding="UTF-8"?>

<project xmlns="http://maven.apache.org/POM/4.0.0"
	xmlns:xsi="http://www.w3.org/2001/XMLSchema-instance"
	xsi:schemaLocation="http://maven.apache.org/POM/4.0.0 http://maven.apache.org/xsd/maven-4.0.0.xsd">
	<modelVersion>4.0.0</modelVersion>

	<groupId>com.roytuts</groupId>
	<artifactId>spring-rest-file-upload</artifactId>
	<version>0.0.1-SNAPSHOT</version>

	<properties>
		<project.build.sourceEncoding>UTF-8</project.build.sourceEncoding>
		<maven.compiler.source>19</maven.compiler.source>
		<maven.compiler.target>19</maven.compiler.target>
	</properties>

	<parent>
		<groupId>org.springframework.boot</groupId>
		<artifactId>spring-boot-starter-parent</artifactId>
		<version>3.1.5</version>
	</parent>

	<dependencies>
		<dependency>
			<groupId>org.springframework.boot</groupId>
			<artifactId>spring-boot-starter-web</artifactId>
		</dependency>
	</dependencies>

	<build>
		<plugins>
			<plugin>
				<groupId>org.springframework.boot</groupId>
				<artifactId>spring-boot-maven-plugin</artifactId>
			</plugin>
		</plugins>
	</build>
</project>
For spring boot 2 you can use either build.gradle or pom.xml file below:
buildscript {
	ext {
		springBootVersion = '2.2.5.RELEASE' to 2.4.3
	}
    repositories {
        mavenCentral()
    }
    dependencies {
        classpath("org.springframework.boot:spring-boot-gradle-plugin:${springBootVersion}")
    }
}

plugins {
    id 'java-library'
    id 'org.springframework.boot' version "${springBootVersion}"
}

sourceCompatibility = 12
targetCompatibility = 12

repositories {
    mavenCentral()
}

dependencies {
    implementation("org.springframework.boot:spring-boot-starter-web:${springBootVersion}")
}
If you are creating maven based project then you can use below pom.xml file:
<project xmlns="http://maven.apache.org/POM/4.0.0"
	xmlns:xsi="http://www.w3.org/2001/XMLSchema-instance"
	xsi:schemaLocation="http://maven.apache.org/POM/4.0.0 http://maven.apache.org/xsd/maven-4.0.0.xsd">
	<modelVersion>4.0.0</modelVersion>

	<groupId>com.roytuts</groupId>
	<artifactId>spring-rest-file-upload</artifactId>
	<version>0.0.1-SNAPSHOT</version>

	<parent>
		<groupId>org.springframework.boot</groupId>
		<artifactId>spring-boot-starter-parent</artifactId>
		<version>2.2.5.RELEASE to 2.4.3</version>
	</parent>

	<properties>
		<project.build.sourceEncoding>UTF-8</project.build.sourceEncoding>
                <maven.compiler.source>12</maven.compiler.source>
		<maven.compiler.target>12</maven.compiler.target>
	</properties>

	<dependencies>
		<dependency>
			<groupId>org.springframework.boot</groupId>
			<artifactId>spring-boot-starter-web</artifactId>
		</dependency>
	</dependencies>

    <build>
        <plugins>
			<plugin>
				<groupId>org.apache.maven.plugins</groupId>
				<artifactId>maven-compiler-plugin</artifactId>
				<version>3.8.1</version>
			</plugin>
		</plugins>
	</build>
</project>
application.properties
I am creating below application.properties file under classpath directory src/main/resources to override default file upload size 2MB. So maximum file size that I can upload is 10MB. Now you can upload a file with maximum size up to 10MB.
#multipart max size
spring.http.multipart.max-file-size=10MB
spring.http.multipart.max-request-size=10MB
Spring REST Controller
Create below class that will be used in file upload example using Spring REST Controller to receive the selected file from client.
I have the below method with http method POST request and request file parameter file which I will be used for uploading file from client.
I use the data type as MultipartFile to upload the file (multipart/form-data).
In the controller method I check whether file has been uploaded or not and if uploaded then I extract the file information and log using Java’s built-in logger API.
Finally I send the file name as the response to the client. In real application, ideally you would process the file data in Service layer code after receiving the file in Spring REST Controller but here I have just shown the idea how to upload a file using Spring REST service.
package com.roytuts.spring.rest.file.upload.controller;

@RestController
public class FileUploadRestController {

	private static final Logger logger = Logger.getLogger(FileUploadRestController.class.getName());

	@PostMapping("/upload")
	public ResponseEntity<String> uploadData(@RequestParam("file") MultipartFile file) throws Exception {

		if (file == null) {
			throw new RuntimeException("You must select the a file for uploading");
		}

		InputStream inputStream = file.getInputStream();
		String originalName = file.getOriginalFilename();
		String name = file.getName();
		String contentType = file.getContentType();
		long size = file.getSize();

		logger.info("inputStream: " + inputStream);
		logger.info("originalName: " + originalName);
		logger.info("name: " + name);
		logger.info("contentType: " + contentType);
		logger.info("size: " + size);

		// Do processing with uploaded file data in Service layer
		return new ResponseEntity<String>(originalName, HttpStatus.OK);
	}

}
Spring Boot Main Class
Create below Spring Boot main class in order to see the file upload example using Spring REST Controller in action. This main class deploys the application in embedded Tomcat server and runs on port 8080.
package com.roytuts.spring.rest.file.upload;

@SpringBootApplication
public class App {

	public static void main(String[] args) {
		SpringApplication.run(App.class, args);
	}

}
Testing the File Upload Application
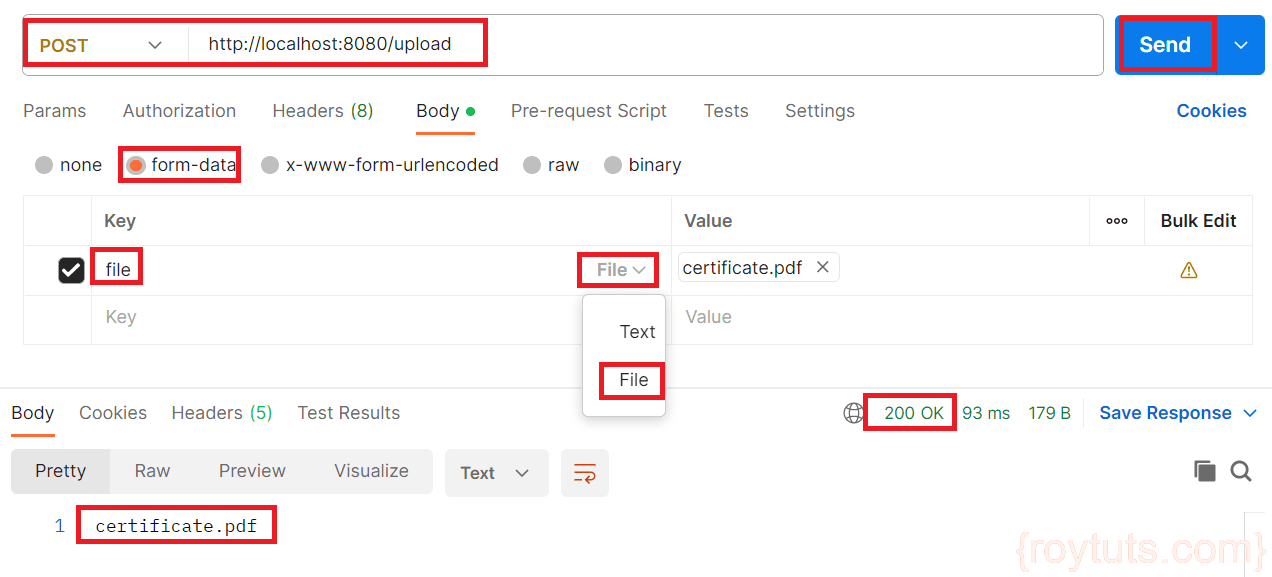
Now it’s time to test our file upload example application. You can test this application using REST client, i.e., using Postman and you don’t need any fancy UI for that.
Now open Postman REST client and upload any file and check the output in the console logger.
You need to do the following steps:
- Choose http method as POST
- Choose form-data in the body option
- Put the value for key as file
- Choose File instead of Text
- Browse and select a file
- Click on Send button.
Console Output
The console output will display about the file information:
829+05:30  INFO 10060 --- [nio-8080-exec-5] c.r.s.r.f.u.c.FileUploadRestController   : inputStream: sun.nio.ch.ChannelInputStream@3d6334a5
830+05:30  INFO 10060 --- [nio-8080-exec-5] c.r.s.r.f.u.c.FileUploadRestController   : originalName: certificate.pdf
830+05:30  INFO 10060 --- [nio-8080-exec-5] c.r.s.r.f.u.c.FileUploadRestController   : name: file
830+05:30  INFO 10060 --- [nio-8080-exec-5] c.r.s.r.f.u.c.FileUploadRestController   : contentType: application/pdf
830+05:30  INFO 10060 --- [nio-8080-exec-5] c.r.s.r.f.u.c.FileUploadRestController   : size: 459579
That’s all. Hope you got idea on file upload example using Spring REST Controller.