Introduction
We will see how to create annotation based Spring application or annotation based configuration in Spring application. We will use here H2 database to perform database activities using Spring JDBC Template. We will not use any XML configuration here or zero XML configuration. We will also see how to run this stand-alone Spring application using main method. This application is totally Java based configuration.
If you want you can also convert this application as web based application using Spring framework.
Prerequisites
Spring 5.1.7, JDk 1.8, Eclipse 4.9, H2 1.4.196, Gradle 4.10.2
Example with Source Code
We will create stand alone Spring application to show how annotation based application works in Spring framework.
Creating Project
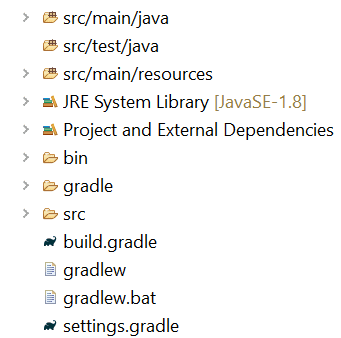
Create Gradle based project called spring-annotation in Eclipse and the project structure should looks as similar to below figure:
Updating Build Script – build.gradle
Make sure to have the following build script:
buildscript {
	ext {
		springVersion = '5.1.7.RELEASE'
	}
    repositories {
    	mavenLocal()
    	mavenCentral()
    }
    dependencies {
    	classpath("io.spring.gradle:dependency-management-plugin:1.0.7.RELEASE")
    }
}
apply plugin: 'java'
apply plugin: 'application'
apply plugin: 'io.spring.dependency-management'
sourceCompatibility = 1.8
targetCompatibility = 1.8
repositories {
    mavenLocal()
    mavenCentral()
}
dependencies {
	compile("org.springframework:spring-core:${springVersion}")
	compile("org.springframework:spring-beans:${springVersion}")
	compile("org.springframework:spring-context:${springVersion}")
	compile("org.springframework:spring-jdbc:${springVersion}")
	runtime("com.h2database:h2:1.4.196")
}
In the above build script we have added required dependencies.
Creating SQL Scripts
We need to create SQL scripts to create table and insert some data into the table so that we can test the application using H2 in-memory database.
You may like to read why we need in-memory database like H2.
Creating Table Script
Create below table SQL script – create-table.sql and put it under src/main/resources/sql directory.
CREATE TABLE `item` (
  `item_id` int(10) NOT NULL AUTO_INCREMENT,
  `item_name` varchar(45) NOT NULL,
  `item_desc` text,
  `item_price` double NOT NULL DEFAULT '0',
  PRIMARY KEY (`item_id`)
);
Creating Insert Script
Create below insert-data.sql script and put it under src/main/resources/sql directory.
insert into `item`(`item_id`,`item_name`,`item_desc`,`item_price`)
values (1,'CD','CD is a compact disk',100),
(2,'DVD','DVD is larger than CD in size',150),
(3,'ABC','ABC test description',24),
(4,'XYZ','XYZ test description',25.32),
(5,'CD Player','CD player is used to play CD',30.02),
(6,'New Item1','New Item1 Desc',125);
Creating Spring Config Class
Create Spring configuration class to create datasource, jdbc template, configuration for base package etc.
package com.roytuts.spring.tx.config;
import javax.sql.DataSource;
import org.springframework.context.annotation.Bean;
import org.springframework.context.annotation.ComponentScan;
import org.springframework.context.annotation.Configuration;
import org.springframework.jdbc.core.JdbcTemplate;
import org.springframework.jdbc.datasource.embedded.EmbeddedDatabase;
import org.springframework.jdbc.datasource.embedded.EmbeddedDatabaseBuilder;
import org.springframework.jdbc.datasource.embedded.EmbeddedDatabaseType;
@Configuration
@ComponentScan(basePackages = "com.roytuts.spring.tx")
public class Config {
	@Bean
	public DataSource dataSource() {
		EmbeddedDatabaseBuilder builder = new EmbeddedDatabaseBuilder();
		EmbeddedDatabase db = builder.setType(EmbeddedDatabaseType.H2) // .H2 or .DERBY, etc.
				.addScript("sql/create-table.sql").addScript("sql/insert-data.sql").build();
		return db;
	}
	@Bean
	public JdbcTemplate jdbcTemplate(DataSource dataSource) {
		JdbcTemplate jdbcTemplate = new JdbcTemplate(dataSource);
		return jdbcTemplate;
	}
}
In the above class we have used annotation @Configuration to indicate it is a configuration class.
We have configured our base package to let Spring container know where our annotated classes reside.
We have created two beans – Datasource and JdbcTemplate, which are required to perform our database operations.
Creating Model Class
We need to represent each row by Java class and class attributes, so create the following Item class.
package com.roytuts.spring.tx.model;
public class Item {
	private Long itemId;
	private String itemName;
	private String itemDesc;
	private Double itemPrice;
	public Long getItemId() {
		return itemId;
	}
	public void setItemId(Long itemId) {
		this.itemId = itemId;
	}
	public String getItemName() {
		return itemName;
	}
	public void setItemName(String itemName) {
		this.itemName = itemName;
	}
	public String getItemDesc() {
		return itemDesc;
	}
	public void setItemDesc(String itemDesc) {
		this.itemDesc = itemDesc;
	}
	public Double getItemPrice() {
		return itemPrice;
	}
	public void setItemPrice(Double itemPrice) {
		this.itemPrice = itemPrice;
	}
	@Override
	public String toString() {
		return "Item [itemId=" + itemId + ", itemName=" + itemName + ", itemDesc=" + itemDesc + ", itemPrice="
				+ itemPrice + "]";
	}
}
Generally the above class should not contain such toString() method but here we used to print the object in readable way.
Creating Row Mapper Class
We need to map table column data to Java attribute, so we need below Row Mapper class.
package com.roytuts.spring.tx.row.mapper;
import java.sql.ResultSet;
import java.sql.SQLException;
import org.springframework.jdbc.core.RowMapper;
import com.roytuts.spring.tx.model.Item;
public class ItemRowMapper implements RowMapper<Item> {
	@Override
	public Item mapRow(ResultSet rs, int rowNum) throws SQLException {
		Item item = new Item();
		item.setItemId(rs.getLong("item_id"));
		item.setItemName(rs.getString("item_name"));
		item.setItemDesc(rs.getString("item_desc"));
		item.setItemPrice(rs.getDouble("item_price"));
		return item;
	}
}
Notice how did we map the data types as well otherwise you will get compiler error or runtime exception.
Creating Spring Repository Class
We need to create Spring reposiroty or DAO class to interact and perform operations on database. Ideally we should write code to interfaces to make the components loosely coupled but for this example we will create only class.
We have used annotation @Repository to auto-pickup by container. You can also use @Component annotation if you don’t want to use @Repository.
package com.roytuts.spring.tx.dao;
import java.util.ArrayList;
import java.util.List;
import org.springframework.beans.factory.annotation.Autowired;
import org.springframework.jdbc.core.JdbcTemplate;
import org.springframework.stereotype.Repository;
import com.roytuts.spring.tx.model.Item;
import com.roytuts.spring.tx.row.mapper.ItemRowMapper;
@Repository
public class ItemDao {
	@Autowired
	private JdbcTemplate jdbcTemplate;
	public List<Item> getItems() {
		String sql = "SELECT * FROM item";
		List<Item> items = new ArrayList<>();
		items = jdbcTemplate.query(sql, new ItemRowMapper());
		return items;
	}
}
In the above class we are only selecting all records from the table. You may also perform other operations.
Creating Spring Service
Create below Spring service class to perform business logic. We annotated the class using @Service to indicate it as a service class.
package com.roytuts.spring.tx.service;
import java.util.List;
import org.springframework.beans.factory.annotation.Autowired;
import org.springframework.stereotype.Service;
import com.roytuts.spring.tx.dao.ItemDao;
import com.roytuts.spring.tx.model.Item;
@Service
public class ItemService {
	@Autowired
	private ItemDao itemDao;
	public List<Item> getItems() {
		return itemDao.getItems();
	}
}
Creating Main Class
We need main class that will run stand-alone application. If you have web application then you don’t need such main class to run the application.
package com.roytuts.spring.tx;
import java.util.List;
import org.springframework.context.annotation.AnnotationConfigApplicationContext;
import com.roytuts.spring.tx.config.Config;
import com.roytuts.spring.tx.model.Item;
import com.roytuts.spring.tx.service.ItemService;
public class Application {
	public static void main(String[] args) {
		AnnotationConfigApplicationContext context = new AnnotationConfigApplicationContext();
		context.register(Config.class);
		context.refresh();
		ItemService service = context.getBean(ItemService.class);
		System.out.println("----Available Items----");
		List<Item> items = service.getItems();
		items.forEach(i -> System.out.println(i));
		context.close();
	}
}
In the above class we used AnnotationConfigApplicationContext to load our component classes. We load Config class as we have declared the base package on this class and this class itself is annotated with @Configuration. Therefore we will get all required beans from this class.
We have retrieved the service bean to fetch all items and displaying them on console.
Running the Application
When you run the above main class as a Java Application, then you will see the following output:
----Available Items----
Item [itemId=1, itemName=CD, itemDesc=CD is a compact disk, itemPrice=100.0]
Item [itemId=2, itemName=DVD, itemDesc=DVD is larger than CD in size, itemPrice=150.0]
Item [itemId=3, itemName=ABC, itemDesc=ABC test description, itemPrice=24.0]
Item [itemId=4, itemName=XYZ, itemDesc=XYZ test description, itemPrice=25.32]
Item [itemId=5, itemName=CD Player, itemDesc=CD player is used to play CD, itemPrice=30.02]
Item [itemId=6, itemName=New Item1, itemDesc=New Item1 Desc, itemPrice=125.0]
That’s all. Hope you found how to create annotation based Spring application.
Source Code
Thanks for reading.
Quiet interesting articles !
Do you have Tutorial series on SpringBoot?