Table of Contents
Introduction
In this tutorial I will show you how to integrate Angular into Spring Boot using Gradle build tool. So, let’s say you have two different projects – Angular application and Spring Boot application and you do not want to build them manually by executing commands in separate CLI window, but you want those projects will be built using a single CLI. Also, once Angular project gets build you do not want to copy the production ready Angular app from dist folder to your Spring Boot’s classpath folder, instead you want the production ready Angular app should be copied from dist folder to Spring Boot’s classpath folder through Gradle tool once build is successfully done. This is the example where I am going to show you how to build the Angular app and copy the production ready Angular files through Gradle build tool.
Integrating Angular app through Spring Boot application through single build command will speed up your build process and it will also automate the deployment process without manual intervention. Hence your efforts for the build and deployment process will be effectively less and in a single war file your application will be deployed into any server.
Prerequisites
Angular 13.2.5, Node 16.12.0, Npm 8.1.0, Spring Boot 2.6.2, Gradle 7.2, Java 11 – 16
Angular Project
First I have created a Gradle based project and later I have created the Angular project in this existing gradle based project. The project root directory is angular-ui.
Once gradle based project is created, I have executed the command ng new angular-ui --directory=./ to create the Angular project in the same directory.
The build.gradle script has the following configuration for this angular-ui project:
plugins {
  id "com.moowork.node" version "1.3.1"
}

node {
   /*version = 16.12.0
   npmVersion = 8.1.0
   download = true*/
   workDir = file("${project.buildDir}/node")
   nodeModulesDir = file("${project.projectDir}")
}

task buildApp(type: NpmTask) {
   args = ['run', buildOption]
}

buildApp.dependsOn(npm_install)
The plugin com.moowork.node is a gradle plugin for executing node scripts (supports NPM, Yarn, Grunt and Gulp).
The task buildApp{…} will execute the npm install and npm run build commands for your Angular app.
It is assumed that Npm and Node are already available in your system and if these are not available then you need to change the node {…} as follows. So, Npm and Node will also be downloaded for your Angular app during build process.
node {
   version = 16.12.0
   npmVersion = 8.1.0
   download = true
   workDir = file("${project.buildDir}/node")
   nodeModulesDir = file("${project.projectDir}")
}
Settings
The settings.gradle file contains the project name:
rootProject.name = 'angular-ui'Gradle Properties
The gradle.properties file contains the following content:
buildOption = buildThe gradle properties file contains the variables that can be used in build.gradle file. As you see I have used buildOption variable in the build.gradle file.
Spring Boot Project
Next I am going to create a simple Spring Boot project and Gradle build tool is used for this project. The name of the project is spring-frontend-backend-project.
The settings.gradle script contains the project name as rootProject.name = ‘spring-frontend-backend-project’.
As I am going to integrate Angular application into Spring Boot application, so I am also including the Angular project into Spring Boot’s settings.gradle script as follows:
include 'angular-ui'
project(":angular-ui").projectDir = file("../angular-ui")
The whole content for the settings.gradle file is given below:
rootProject.name = 'spring-frontend-backend-project'

include 'angular-ui'
project(":angular-ui").projectDir = file("../angular-ui")
You can find details about how to include a gradle project into another gradle project.
The build.gradle script has the following dependencies and configurations:
buildscript {
  ext {
    springBootVersion = '2.6.2'
  }

  repositories {
    mavenCentral()
  }

  dependencies {
    classpath "org.springframework.boot:spring-boot-gradle-plugin:${springBootVersion}"
  }
}

plugins {
    id 'java-library'
    id 'org.springframework.boot' version "${springBootVersion}"
}

sourceCompatibility = 16
targetCompatibility = 16

repositories {
    mavenCentral()
}

dependencies {
              implementation("org.springframework.boot:spring-boot-starter-web:${springBootVersion}")
}

task copyPublicResources(type: Copy) {
              from '../angular-ui/dist/angular-ui/'
              into 'src/main/resources/static/'
}

copyPublicResources.dependsOn(':angular-ui:buildApp')
processResources.dependsOn(copyPublicResources)
The build script contains required dependencies and classpath settings and the important thing here is the copy Angular files from dist folder to the class path folder of the Spring Boot application.
In this example, I am copying the Angular production ready files into static folder under src/main/resources class path folder. This copy process happens using the processResources task of the gradle tool.
The Spring Boot app has the following main class:
@SpringBootApplication
public class App {

	public static void main(String[] args) {
		SpringApplication.run(App.class, args);
	}

}
Build App
Now execute the command gradlew clean build on Spring Boot app in CLI. You will see your Angular app will be built from this CLI.
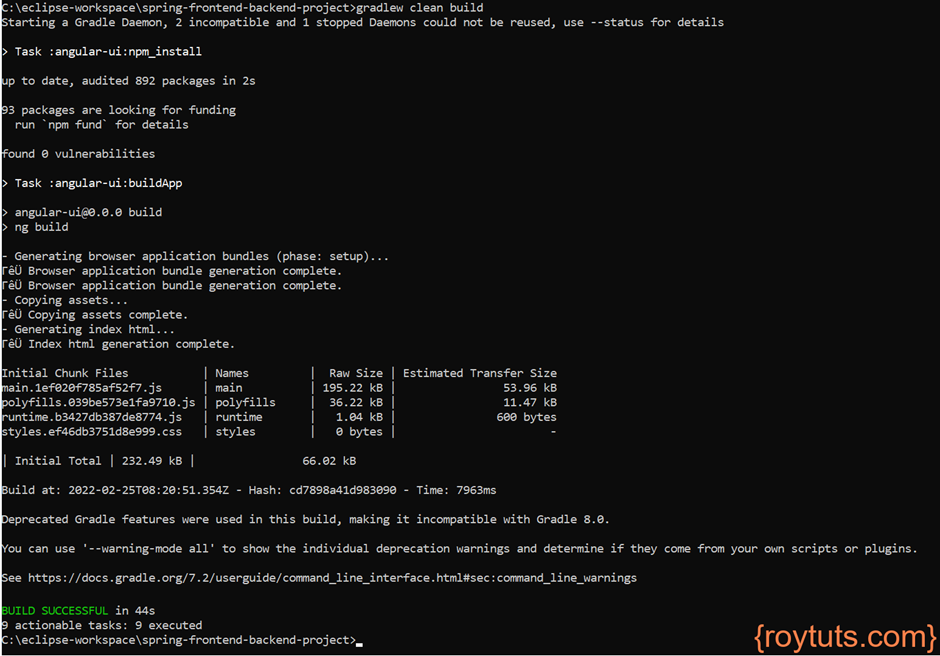
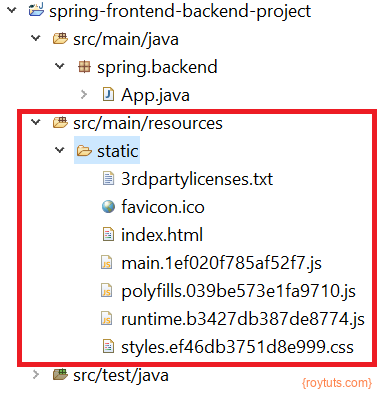
Now you will find Angular project files will be copied under src/main/resources/static folder:
Testing Spring Boot Angular Integration
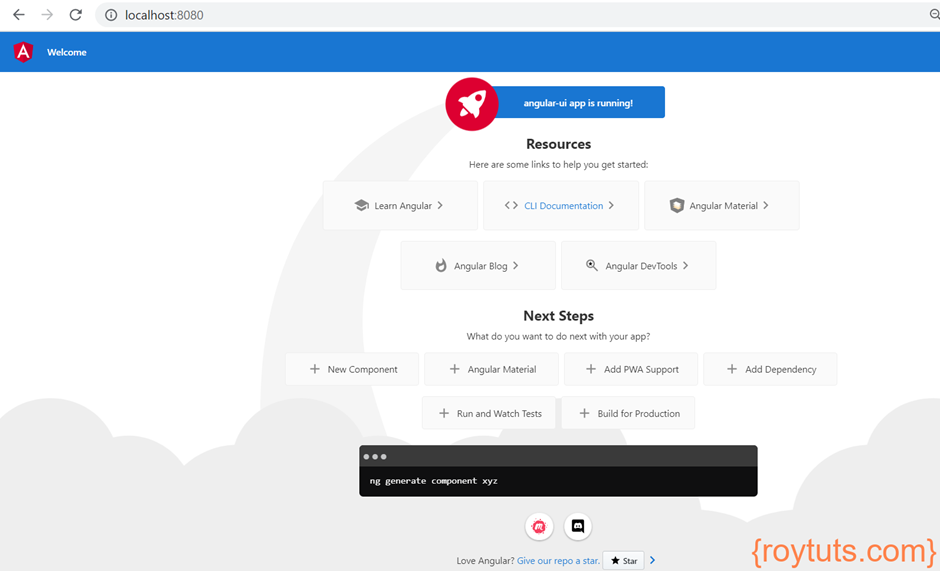
Once you run the Spring Boot main class, your application will be deployed into Tomcat server that comes with Spring Boot framework.
Now hit the URL http://localhost:8080/ in the browser and you will find the output as shown in the following image:
You will also find the Angular files are copied into the Spring Boot jar file:

Hope you built Angular Spring Boot project using Gradle sucessfully.