Introduction
In this post we will see how to secure REST API with JWT authentication using Python Flask. JWT is an acronym for JSON Web Token. In previous example we have seen how to secure REST API using HTTP Basic Authentication which is not recommended for most of the time.
Recommended Reading
- REST API CRUD Example using Python Flask and MySQL
- REST API CRUD Example using Python Flask and MongoDB
Prerequisites
Python 3.8.1, Flask 1.1.1, Flask-JWT 0.3.2, Flask-MySQL 1.4.0, flasker 0.1.45, MySQL 8.0.17
Setting Up Environment
Make sure you have the required environment setup by installing Python, Flask (pip install flask), Flask-JWT (pip install Flask-JWT) and Flask-MySQL (pip install Flask-MySQL).
Create MySQL Table
We will create a table called user under roytuts database in MySQL server.
CREATE TABLE `user` (
  `id` int NOT NULL AUTO_INCREMENT,
  `username` varchar(45) DEFAULT NULL,
  `password` varchar(255) DEFAULT NULL,
  PRIMARY KEY (`id`)
) ENGINE=InnoDB AUTO_INCREMENT=1 DEFAULT CHARSET=utf8mb4 COLLATE=utf8mb4_unicode_ci;
We will dump an entry into the above table to test our application. The password value is encrypted here and the human redable value of password field is roy.
insert into `user`(`username`, `password`)
values ('roy', 'pbkdf2:sha256:150000$k1Ud5dzh$d0347f416e89ea486b33c988c9be65730329b2dd6d712f73c9920103a006a82e');
Creating Project Directory
We will create a project directory called python-flask-rest-api-jwt-auth.
We may not mention the name of the project root directory in subsequent sections while creating files. So we will assume that we are going to create with respect to the project root directory.
Configuring Flask
Create file app.py with the following code.
In this code snippets we create an instance of Flask which will be used for building REST services using Flask.
You need to configure a secret key as well otherwise you will get the error TypeError: Expecting a string- or bytes-formatted key while generating token using username and password.
from flask import Flask

app = Flask(__name__)
app.config['SECRET_KEY'] = 'secret-key'
Configuring MySQL with Flask
We create the below db.py script to configure the Flask and MySQL database for connecting to database. We need to import the required modules and setup the MySQL configuration with flask module.
from app import app
from flaskext.mysql import MySQL

mysql = MySQL()

# MySQL configurations
app.config['MYSQL_DATABASE_USER'] = 'root'
app.config['MYSQL_DATABASE_PASSWORD'] = 'root'
app.config['MYSQL_DATABASE_DB'] = 'roytuts'
app.config['MYSQL_DATABASE_HOST'] = 'localhost'
mysql.init_app(app)
JWT Authentication with REST Endpoint
Using JWT Flask extension, we would need to do less work since the extension already provides some sort of integrations with Flask itself.
We have defined an endpoint /rest-auth which is accessible upon successful user’s authentication.
We secure the endpoint using @jwt_required() decorator.
We have defined two functions – authenticate() and identity() – to authenticate the user and to identify the user from the token, respectively.
We query the table user in MySQL server under database roytuts to fetch the user information for the given username and password in authenticate() function and return the user object.
identity() function gives us user details for a logged in user.
import pymysql
from app import app
from db_conf import mysql
from flask import jsonify
from flask_jwt import JWT, jwt_required, current_identity
from werkzeug.security import generate_password_hash, check_password_hash

class User(object):
	def __init__(self, id, username):
		self.id = id
		self.username = username

	def __str__(self):
		return "User(id='%s')" % self.id

@app.route('/rest-auth')
@jwt_required()
def get_response():
	return jsonify('You are an authenticate person to see this message')

def authenticate(username, password):
	if username and password:
		conn = None;
		cursor = None;
		try:
			conn = mysql.connect()
			cursor = conn.cursor(pymysql.cursors.DictCursor)
			cursor.execute("SELECT id, username, password FROM user WHERE username=%s", username)
			row = cursor.fetchone()

			if row:
				if check_password_hash(row['password'], password):
					return User(row['id'], row['username'])
			else:
				return None
		except Exception as e:
			print(e)
		finally:
			cursor.close()
			conn.close()
	return None

def identity(payload):
	if payload['identity']:
		conn = None;
		cursor = None;
		try:
			conn = mysql.connect()
			cursor = conn.cursor(pymysql.cursors.DictCursor)
			cursor.execute("SELECT id, username FROM user WHERE id=%s", payload['identity'])
			row = cursor.fetchone()

			if row:
				return (row['id'], row['username'])
			else:
				return None
		except Exception as e:
			print(e)
		finally:
			cursor.close()
			conn.close()
	else:
		return None

jwt = JWT(app, authenticate, identity)

if __name__ == "__main__":
    app.run()
Related posts:
Running the Application
Just execute the above file from command line tool using command by navigating to the project root directory python rest.py.
Your server will be started on host – localhost and port – 5000.
Accessing the REST API
Now if you try to access the REST API (http://localhost:5000/rest-auth), let’s say using Postman tool then you will get Unauthorized Access.
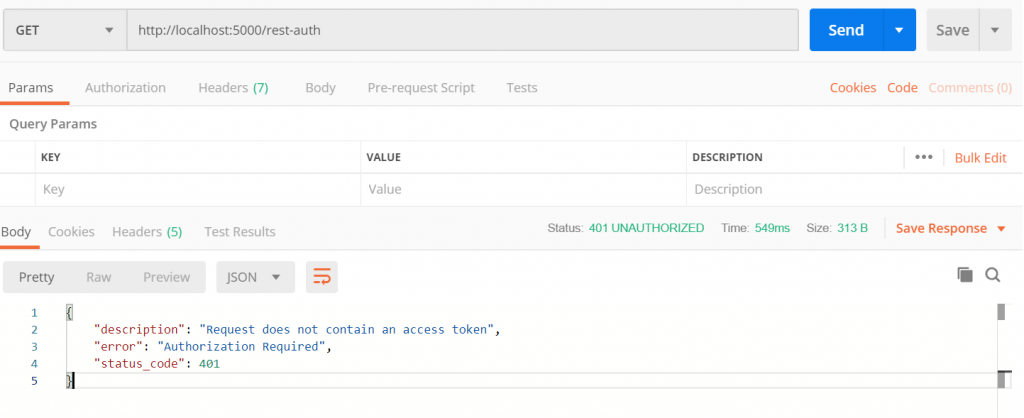
In the next section we will see how to authenticate user using JWT.
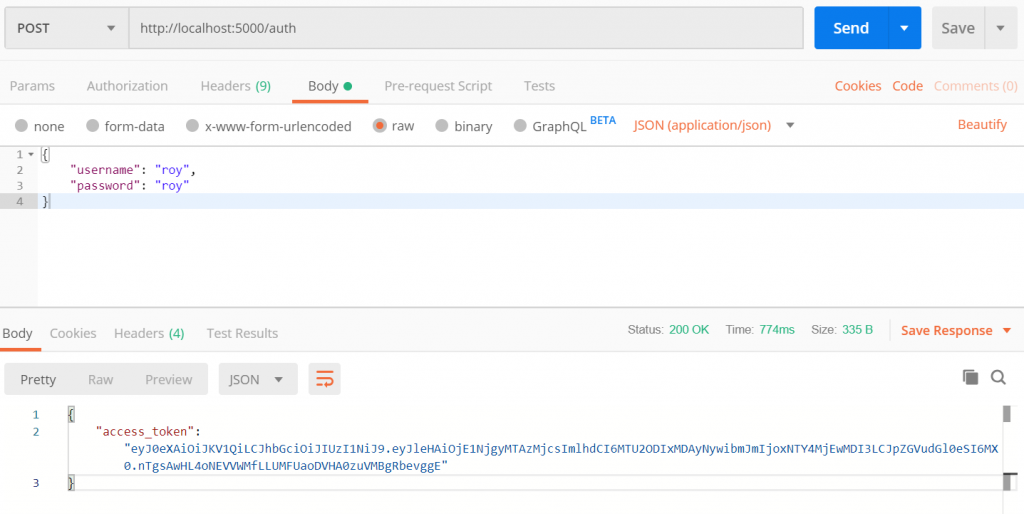
Generating Token
The Flask-JWT extension has built-in API endpoint /auth and we will call this API endpoint by passing username and password via JSON payload and this endpoint returns access_token which is the JSON Web Token we can use for user authentication.
Method – POST
URL – http://localhost:5000/auth
Body
{
	"username": "roy",
	"password": "roy"
}
Response
{
    "access_token": "eyJ0eXAiOiJKV1QiLCJhbGciOiJIUzI1NiJ9.eyJleHAiOjE1NjgyMTAzMjcsImlhdCI6MTU2ODIxMDAyNywibmJmIjoxNTY4MjEwMDI3LCJpZGVudGl0eSI6MX0.nTgsAwHL4oNEVVWMfLLUMFUaoDVHA0zuVMBgRbevggE"
}
The same has been shown in the below image using Postman tool:
Accessing Endpoint using JWT
We have got the JWT (JSON Web Token) in the above step, so we will now access the REST API endpoint /rest-auth by passing the JWT in header.

So now using the JWT we are able to access the secured REST service as shown in the above image.
Source Code
Thanks for reading.