This tutorial will show you how to use VM Transport with HTTP Connector in Mule based application.
What is VM Transport
The VM transport is nothing but an in-memory transport. Therefore when a message has to be passed through a VM endpoint, i.e., the message is being transferred from one endpoint to another endpoint in memory. So the VM transport can be used for intra-JVM communication between Mule flows. It can be used only in single Mule application and cannot be used to communicate between two or more Mule applications. This transport by default uses in-memory queues but can optionally be configured to use persistent queues. However, VM file persistency does not work on clusters.
By default VM transport is synchronous – messages pass through VM transport are delivered in a point-to-point fashion.
Prerequisites
Mule Studio 3.x(Anypoint Studio) (Download from https://www.mulesoft.com/platform/studio)
Maven 3.2.1 (Download from https://maven.apache.org/download.cgi?Preferred=ftp://mirror.reverse.net/pub/apache/)
JDK 1.7 (Download from http://www.oracle.com/technetwork/java/javase/downloads/index.html)
Configure JDK, Maven and Mule Studio
Step 1. First install JDK
Step 2. Add the Java_Home/bin directory to your system’s PATH.
Step 3. After downloading Maven, extract it to a drive
Step 4. Add the M2_Home/bin directory to your system’s PATH.
Step 5. Download and extract Mule Studio to a drive
Step 6. Now start Mule Studio by clicking on AnypointStudio exe icon in the folder <physical drive>/AnypointStudio
Step 7. Once started, close the startup page
Step 8. In Mule Studio, go to Window -> Preferences. Expand Java, then click on Installed JREs. Add JDK 1.7 and select it. In expanded Java, click on Compiler and select the compiler level as 1.7
Step 9. Now expand Anypoint Studio and click on Maven Settings. Then select appropriate Maven installation home directory using Browse button.
Step 10. If you want you can input Default groupId for new projects, it will save your time every time when you want to create a new project.
Create Mule project in Mule Studio
Now we will see how to create a new project in Mule Studio(Anypoint Studio).
Step 1. In Anypoint Studio, go to File -> New -> Mule Project
Step 2. Input Project Name: mule-3, Runtime is by default selected, tick on Use Maven; here the artifactId is automatically picked up from the Project Name:, the Group Id is picked up from the Default groupId for new projects and version is also a default value.
Step 3. Click Next and verify the JDK, mainly select Use default JRE(currently ‘jdk1.7.0_x’)
Step 4. Click on Next and click on Finish.
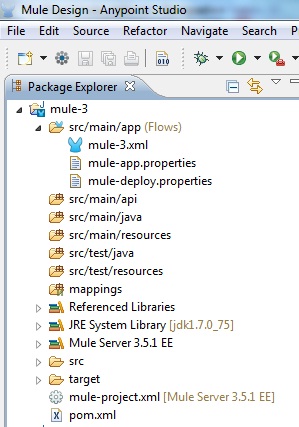
So when the project mule-3 is created in the Anypoint Studio, the project structure looks like below
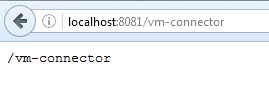
Final Output in the browser
VM example
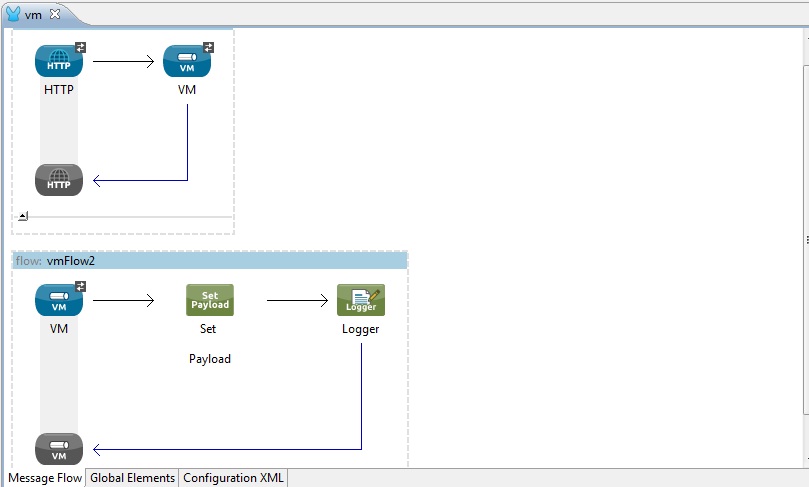
The layout of the VM configuration in the Anypoint Studio visual editor
In this example, if you configure an outbound VM endpoint called vm://vm-path but do not have a corresponding inbound endpoint, Mule will raise an error and explain that this message cannot be routed.
Here the VM transport is configured as a request-response exchange-pattern.
In the above screen-shot we have two Mule flows – vmFlow1 and vmFlow2.
In vmFlow1 we have HTTP and VM connectors. Here the address for VM transport is given as address=”vm://vm-path” (equivalent to path=”vm-path”), see in the below vm.xml configuration.
Here HTTP connector acts as an inbound endpoint and VM acts as an outbound endpoint.
When you type the URL http://localhost:8081/Hello in the browser, the payload “Hello” is routed to vm-path(or vm://vm-path).
In vmFlow2 we have VM connector, Set Payload component and Logger component. Here the path of the VM transport is given as path=”vm-path” (equivalent to address=”vm://vm-path”), see in the below vm.xml configuration.
Here VM transport acts as an inbound endpoint. The VM transport receives the payload from vm://vm-path (or vm-path).
Set Payload component sets the incoming payload coming from VM transport.
Logger component displays the payload coming from Set Payload in the console.
Step 1. You can rename the src/main/app/mule-3.xml file as vm.xml file.
Step 2. Open the vm.xml file and click on Configuration XML view in the Editor
Step 3. Modify the vm.xml file as shown below
<?xml version="1.0" encoding="UTF-8"?>
<mule xmlns:vm="http://www.mulesoft.org/schema/mule/vm" xmlns:http="http://www.mulesoft.org/schema/mule/http"
    xmlns:tracking="http://www.mulesoft.org/schema/mule/ee/tracking" xmlns="http://www.mulesoft.org/schema/mule/core"
    xmlns:doc="http://www.mulesoft.org/schema/mule/documentation"
    xmlns:spring="http://www.springframework.org/schema/beans" version="EE-3.5.1"
    xmlns:xsi="http://www.w3.org/2001/XMLSchema-instance"
    xsi:schemaLocation="http://www.springframework.org/schema/beans http://www.springframework.org/schema/beans/spring-beans-current.xsd
http://www.mulesoft.org/schema/mule/core http://www.mulesoft.org/schema/mule/core/current/mule.xsd
http://www.mulesoft.org/schema/mule/http http://www.mulesoft.org/schema/mule/http/current/mule-http.xsd
http://www.mulesoft.org/schema/mule/vm http://www.mulesoft.org/schema/mule/vm/current/mule-vm.xsd
http://www.mulesoft.org/schema/mule/ee/tracking http://www.mulesoft.org/schema/mule/ee/tracking/current/mule-tracking-ee.xsd">
    <vm:connector name="memory" />
    <flow name="vmFlow1" doc:name="vmFlow1">
        <http:inbound-endpoint exchange-pattern="request-response"
            host="localhost" port="8081" doc:name="HTTP" />
        <vm:outbound-endpoint exchange-pattern="request-response"
            address="vm://vm-path" doc:name="VM" />
    </flow>
    <flow name="vmFlow2" doc:name="vmFlow2">
        <vm:inbound-endpoint exchange-pattern="request-response"
            path="vm-path" doc:name="VM" />
        <set-payload value="#[message.payload]" doc:name="Set
        Payload" />
        <logger message="#[message.payload]" level="INFO" doc:name="Logger" />
    </flow>
</mule>
In the above vm.xml configuration you can use either address or path or ref in VM transport.
Running the application
Now do a right-click on the stdio.xml file or on the mule-3 project and click on Run As -> Mule Application. Then you will see something like below in Console when the application runs
INFO  2016-06-21 08:49:14,478 [main] org.mule.DefaultMuleContext:
**********************************************************************
* Application: mule-3                                                *
* OS encoding: Cp1252, Mule encoding: UTF-8                          *
*                                                                    *
* Agents Running:                                                    *
*   DevKit Extension Information                                     *
*   Batch module default engine                                      *
*   Clustering Agent                                                 *
*   JMX Agent                                                        *
**********************************************************************
INFO  2016-06-21 08:49:14,478 [main] org.mule.module.launcher.MuleDeploymentService:
++++++++++++++++++++++++++++++++++++++++++++++++++++++++++++
+ Started app 'mule-3'                                     +
++++++++++++++++++++++++++++++++++++++++++++++++++++++++++++
INFO  2016-06-21 08:49:14,481 [main] org.mule.module.launcher.DeploymentDirectoryWatcher:
++++++++++++++++++++++++++++++++++++++++++++++++++++++++++++
+ Mule is up and kicking (every 5000ms)                    +
++++++++++++++++++++++++++++++++++++++++++++++++++++++++++++
Console output
INFO  2016-06-21 08:50:04,393 [[mule-3].connector.http.mule.default.receiver.02] org.mule.lifecycle.AbstractLifecycleManager: Initialising: 'memory.dispatcher.32653765'. Object is: VMMessageDispatcher
INFO  2016-06-21 08:50:04,394 [[mule-3].connector.http.mule.default.receiver.02] org.mule.lifecycle.AbstractLifecycleManager: Starting: 'memory.dispatcher.32653765'. Object is: VMMessageDispatcher
INFO  2016-06-21 08:50:04,443 [[mule-3].connector.http.mule.default.receiver.02] org.mule.api.processor.LoggerMessageProcessor: /vm-connector
Thanks for reading.