Real Time Face Detection in Webcam using Python
Face Detection
The example Real time face detection in webcam using Python will show you how your working webcam detects your face and draws a rectangle around your face.
In my previous tutorial you might have seen how you see yourself in webcam using Python.The similar tutorial you will use here to detect your face and draw a rectangle around it to indicated your face. Make sure you do have the camera installed in your system (laptop/Desktop) in order to see yourself in webcam. Here in this example we will use OpenCv to capture the video and display into a frame. When you wish to close the video window you need to press either ESC key or ‘q’ from your keyboard.
Prerequisites
Python 3.8.1/3.12.5, OpenCV 4.2.0/4.12.0, imutils 0.5.3/0.5.4
You need an XML file for detecting face – haarcascade_frontalface_alt.xml. To download the file please go to the URL https://opencv.org/releases.html. Make sure you download the zip archive (Sources).
The haarcascade_frontalface_alt.xml file can be found at the path opencv-4.xx.xx\samples\winrt\FaceDetection\FaceDetection\Assets.
Implementation
Preparing workspace
Preparing your workspace is one of the first things that you can do to make sure that you start off well. The first step is to check your working directory.
When you are working in the Python terminal, you need first navigate to the directory, where your file is located and then start up Python, i.e., you have to make sure that your file is located in the directory where you want to work from.
I have created a directory real-time-face-detection where I have to create Python script for implementing the example “real time face detection in webcam using Python”.
Creating Python Script
Now I will create the Python script and see how to implement real time face detection in webcam using Python.
In the below Python script you first import the required module OpenCv called cv2. Then you need to grab the reference to the webcam. Note that here I am using Laptop’s built-in webcam. Make sure your webcam works fine in your system.
Notice I have created the cascade and initialize it with the face cascade. This loads the face cascade into memory so it’s ready for use. Remember, the cascade is just an XML file that contains the data to detect faces.
To initialize you must download these XML file from the given link above. Once you download the zip file, extract and look for the desired file and copy the XML file under the C:\real-time-face-detection where you have created below python script face_detection.py.
If you do not copy that XML file into the desired directory then you may get below error while you try to execute the below python script:
faces = faceCascade.detectMultiScale(frame)
cv2.error: OpenCV(3.4.2) \opencv\modules\objdetect\src\cascadedetect.cpp:1698: error: (-215:Assertion failed) !empty() in function ‘cv::CascadeClassifier::detectMultiScale’
Then you need to grab the reference to the webcam. Next you need to read frame by frame the video captures.
The detectMultiScale() function is a general function that detects objects. Since I am calling it on the face cascade, that’s what it detects.
The function returns a list of rectangles in which it believes it found a face. Next, I will loop over where it thinks it found something.
This function returns 4 values: the x and y location of the rectangle, and the rectangle’s width and height (w , h).
I use these values to draw a rectangle using the built-in rectangle() function.
Finally we show it in frame. When you press either ESC key or “q” from keyboard, frame will disappears.
import cv2

faceCascade = cv2.CascadeClassifier('haarcascade_frontalface_alt.xml')

# grab the reference to the webcam
vs = cv2.VideoCapture(0)

# keep looping
while True:
	# grab the current frame
	ret, frame = vs.read()

	# if we are viewing a video and we did not grab a frame,
	# then we have reached the end of the video
	if frame is None:
		break

	faces = faceCascade.detectMultiScale(frame)

	for (x, y, w, h) in faces:
		cv2.rectangle(frame, (x, y), (x+w, y+h), (255,0,0), 2)

	# show the frame to our screen
	cv2.imshow("Video", frame)
	key = cv2.waitKey(1) & 0xFF

	# if the 'q' or ESC key is pressed, stop the loop
	if key == ord("q") or key == 27:
		break

# close all windows
cv2.destroyAllWindows()
Testing the application
Now it’s time to test the application by executing the following command in the cmd prompt:
C:\real-time-face-detection>face-detection.py
Once the script gets executed successfully, you will be able to see yourself in the frame and a rectangle is drawn around your face as shown in below image.
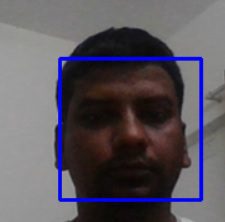
To exit you should press either ESC key or q from your keyboard.
No comments
Leave a comment