Table of Contents
Introduction
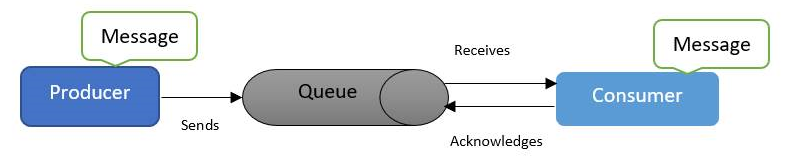
In this tutorial I will show you how to build producer consumer example using Spring Boot and RabbitMQ. This is also called point-to-point messaging model as there are only one producer or sender and only one consumer or receiver.
RabbitMQ is a message broker; it accepts, stores and forwards binary data or messages. A message producer, a message consumer and a queue participate in this message processing event.
A message producer sends the message to the consumer through queue. A message is stored inside a queue. A queue is bound by host’s memory and disk limit. So, it’s a large memory buffer.
Many producers can send messages to a single queue and many consumers can consume messages from a single queue.
It is not necessary that producer, consumer and broker will reside on the same host. Even an application can be both producer and consumer.
In this example tutorial, I am going to use spring amqp library and a producer that sends a single message and a consumer that receives a single message from the queue & prints it out in the console.
Related Posts:
- RabbitMQ Spring Boot Publish Subscribe Example
- RabbitMQ Spring Boot Work Queues Example
- RabbitMQ Spring Boot Routing Example
- RabbitMQ Spring Boot Message Pattern Example
- RabbitMQ Spring Boot RPC Example
- RabbitMQ Spring Boot Retry and Error Handling
Prerequisites
Java 1.8+, Maven 3.8.2, Spring Boot 2.6.2, Spring Boot AMQP 2.6.2, RabbitMQ Server 3.9.4 – 3.9.13
Project Setup
I am going to create maven based project for this example and the following pom.xml file can be used for your project too.
<?xml version="1.0" encoding="UTF-8"?>

<project xmlns="http://maven.apache.org/POM/4.0.0"
	xmlns:xsi="http://www.w3.org/2001/XMLSchema-instance"
	xsi:schemaLocation="http://maven.apache.org/POM/4.0.0 http://maven.apache.org/xsd/maven-4.0.0.xsd">
	<modelVersion>4.0.0</modelVersion>

	<groupId>com.roytuts</groupId>
	<artifactId>spring-rabbitmq-producer-consumer</artifactId>
	<version>0.0.1-SNAPSHOT</version>

	<properties>
		<project.build.sourceEncoding>UTF-8</project.build.sourceEncoding>
		<maven.compiler.source>16</maven.compiler.source>
		<maven.compiler.target>16</maven.compiler.target>
	</properties>

	<parent>
		<groupId>org.springframework.boot</groupId>
		<artifactId>spring-boot-starter-parent</artifactId>
		<version>2.6.2</version>
	</parent>

	<dependencies>
		<dependency>
			<groupId>org.springframework.boot</groupId>
			<artifactId>spring-boot-starter</artifactId>
		</dependency>

		<dependency>
			<groupId>org.springframework.boot</groupId>
			<artifactId>spring-boot-starter-amqp</artifactId>
		</dependency>

		<dependency>
			<groupId>org.springframework.boot</groupId>
			<artifactId>spring-boot-devtools</artifactId>
		</dependency>
	</dependencies>

	<build>
		<plugins>
			<plugin>
				<groupId>org.springframework.boot</groupId>
				<artifactId>spring-boot-maven-plugin</artifactId>
			</plugin>
		</plugins>
	</build>

</project>
application.properties
The application.properties file has the queue name declaration and this file is kept in the class path folder src/main/resources.
queue.name=roytuts.queueProducer
A Producer or Sender class that sends a message to a queue.
package com.roytuts.spring.rabbitmq.producer;

import org.springframework.amqp.core.Queue;
import org.springframework.amqp.rabbit.core.RabbitTemplate;
import org.springframework.beans.factory.annotation.Autowired;
import org.springframework.stereotype.Component;

@Component
public class Producer {

	@Autowired
	private Queue queue;

	@Autowired
	private RabbitTemplate rabbitTemplate;

	public void sendMsg(final String msg) {
		rabbitTemplate.convertAndSend(queue.getName(), msg);
		System.out.println("Sent: " + msg);
	}

}
The above class has a method sendMsg() that takes a string as an argument and sends it to the broker or queue. To send the message I have used RabbitTemplate and Queue.
Consumer
A Consumer or Receiver class that consumes message from the broker or queue upon arrival.
package com.roytuts.spring.rabbitmq.consumer;

import org.springframework.amqp.rabbit.annotation.RabbitHandler;
import org.springframework.amqp.rabbit.annotation.RabbitListener;
import org.springframework.stereotype.Component;

@Component
@RabbitListener(queues = "${queue.name}")
public class Consumer {

	@RabbitHandler
	public void receiveMsg(final String msg) {
		System.out.println("Received: " + msg);
	}

}
The above class uses annotation @RabbitListener with queue name, so once a message arrives in the queue, the message will be consumed by the consumer.
Configuration
A Config class that configures beans for Queue, Producer (if required) and Consumer (if required).
package com.roytuts.spring.rabbitmq.producer.consumer.config;

import org.springframework.amqp.core.Queue;
import org.springframework.beans.factory.annotation.Value;
import org.springframework.context.annotation.Bean;
import org.springframework.context.annotation.Configuration;

import com.roytuts.spring.rabbitmq.consumer.Consumer;
import com.roytuts.spring.rabbitmq.producer.Producer;

@Configuration
public class Config {

	@Value("${queue.name}")
	private String queueName;

	@Bean
	public Queue queue() {
		return new Queue(queueName);
	}

	// @Bean
	public Producer producer() {
		return new Producer();
	}

	// @Bean
	public Consumer consumer() {
		return new Consumer();
	}

}
If you are not using @Component annotation on Producer and Consumer classes then you can declare them as beans using @Bean annotation (omit the comment) in the Config class.
Spring Boot RabbitMQ Main Class
A class that has a main method and @SpringBootApplication annotation will deploy the application in embedded Tomcat server.
package com.roytuts.spring.rabbitmq;

import org.springframework.beans.factory.annotation.Autowired;
import org.springframework.boot.CommandLineRunner;
import org.springframework.boot.SpringApplication;
import org.springframework.boot.autoconfigure.SpringBootApplication;

import com.roytuts.spring.rabbitmq.producer.Producer;

@SpringBootApplication
public class RabbitMqProducerConsumerApp implements CommandLineRunner {

	@Autowired
	private Producer producer;

	public static void main(String[] args) {
		SpringApplication.run(RabbitMqProducerConsumerApp.class, args);
	}

	@Override
	public void run(String... args) throws Exception {
		producer.sendMsg("This message passes through RabbitMQ broker");
	}

}
The above class uses CLI interface to run the application because I am not using anything for the web application.
Testing Producer Consumer App
Once you run the above main class, you will see that the producer sent a message and consumer received a message:
Sent: This message passes through RabbitMQ broker
Received: This message passes through RabbitMQ broker
The following queue gets created in the RabbitMQ server:

Hope you got an idea how to work with point-to-point messaging model using RabbitMQ broker.