I am going to show you an example on Angular CodeIgniter 4 REST API MySQL CRUD. CRUD is an acronym and stands for Create, Read, Update and Delete operations. REST or RESTful is a Representational State Transfer which defines an architectural style in software engineering. The REST API works on HTTP or HTTPS protocol.
The Angular framework will be used in this example for representing the UI (User Interface) where end users will perform CRUD operations.
Prerequisites
Angular 10, CodeIgniter 4, npm 6.14.6, node v12.18.3, MySQL 8.0.17, CodeIgniter 4 REST API, MySQL CRUD Example
Project Setup
Create a new project in Angular using the command ng new <project name>. The name of the project for this example is angular-codeigniter-rest-api-crud.
I am also creating four different components for performing CRUD operations using the following commands.
Having separate components for each operation will give you more control over managing the source code and project structure. The respective directories and files will be created accordingly under src/app folder.
ng g c product-list
ng g c product-add
ng g c product-edit
ng g c product-detail
If you open src/app/app.module.ts file, you will see entries for all new modules are also added to this file.
Routing
Angular routing determines the navigation for your application and it is recommended to have a user friendly page navigation.
For example, you want to create new product, so you will click on a link – New Product. You may update existing product, so you may click on Edit link and so on.
Edit file src/app/app-routing.module.ts to have below source code.
I am importing the required modules and components and at the end I exported the class for using into different components.
I have defined paths for routing, such as, when you hit the root URL in the browser, it will redirect to the /products path, or when you want to perform other operations – create, update, delete or fetch detail for a particular product.
import { NgModule } from '@angular/core';
import { Routes, RouterModule } from '@angular/router';

import { ProductListComponent } from './product-list/product-list.component';
import { ProductAddComponent } from './product-add/product-add.component';
import { ProductEditComponent } from './product-edit/product-edit.component';
import { ProductDetailComponent } from './product-detail/product-detail.component';

const routes: Routes = [
	{ path: '', redirectTo: '/products', pathMatch: 'full' },
	{ path: 'products', component: ProductListComponent },
	{ path: 'product/:id/detail', component: ProductDetailComponent },
	{ path: 'product/:id/update', component: ProductEditComponent },
	{ path: 'product/add', component: ProductAddComponent }
];

@NgModule({
  imports: [RouterModule.forRoot(routes)],
  exports: [RouterModule]
})
export class AppRoutingModule { }
Adding Additional Modules
Open your src/app/app.module.ts and add few required modules for the application, such as, FormsModule, HttpClientModule and AppRoutingModule. Other components and modules are added automatically into this file.
FormsModule is required to define your HTML form, HttpClientModule is required for preforming data exchange over HTTP protocol and AppRoutingModule is required for defining routes used for navigation in the application.
import { BrowserModule } from '@angular/platform-browser';
import { NgModule } from '@angular/core';

import { FormsModule }    from '@angular/forms';
import { HttpClientModule }    from '@angular/common/http';

import { AppRoutingModule } from './app-routing.module';
import { AppComponent } from './app.component';
import { ProductListComponent } from './product-list/product-list.component';
import { ProductAddComponent } from './product-add/product-add.component';
import { ProductEditComponent } from './product-edit/product-edit.component';
import { ProductDetailComponent } from './product-detail/product-detail.component';

@NgModule({
  declarations: [
    AppComponent,
    ProductListComponent,
    ProductAddComponent,
    ProductEditComponent,
    ProductDetailComponent
  ],
  imports: [
    BrowserModule,
    AppRoutingModule,
	FormsModule,
	HttpClientModule
  ],
  providers: [],
  bootstrap: [AppComponent]
})
export class AppModule { }
Redirect to /products
If you now try to open your application by executing command ng serve –open in command line tool you won’t be redirected to the http://localhost:4200/products though I have redirected root path to /products in src/app/app-routing.module.ts file.
You will see the path in browser as http://localhost:4200/products but you will also see the output on the browser from src/app/app.component.html file.
Therefore, remove everything from app.component.html file and put only <router-outlet></router-outlet> in this file and now save the file.
Now if you open the application by executing command ng serve --open, then you should see the output as poduct-list works! on home page.
Model Class
The below model class maps the JSON key/value pairs response from the REST APIs.
export class Product {
	id?: string;
	name: string;
	price: string;
	sale_price: string;
	sales_count: string;
	sale_date: string;
}
Here in the above class, notice I have put ? after id field to indicate optional value for id field during adding new product information because the id field is auto-generated value.
Service Class
It is better to create a central class that will be used by all modules or compoenents in Angular to interact with server either to fetch the data or send the data to server.
Create below service class – src/app/product.service.ts – that will list down CRUD operation methods. In the below class you have defined methods for CRUD operations for products.
So you give user options through your UI (User Interface) to add new product, update existing product, fetching exiting products/product and deleting existing product.
Also notice that I have mentioned responseType: ‘text’ as ‘json’. By default, the response type is json and you don’t need to mention response type but, in our server side code produces text response and this response type is not handled by Angular. Therefore, you need to convert to json response to avoid incompatibility issues.
Create ProductService class using the following command on your project’s root directory. This will create the required file product.service.ts file under src/app folder.
ng g s productThe complete source code for performing CRUD operations is given below:
import { Injectable } from '@angular/core';

import { HttpClient, HttpHeaders } from '@angular/common/http';
import { Observable, of } from 'rxjs';
import { catchError, map, tap } from 'rxjs/operators';
import { Product } from './product';

const httpOptions = {
  headers: new HttpHeaders({ 'Content-Type': 'application/json' })
};

@Injectable({
  providedIn: 'root'
})
export class ProductService {

  private productUrl = 'http://localhost:8080';  // Base URL to REST API

  constructor(private http: HttpClient) { }

  /** GET products from the server */
  getProducts(): Observable<Product[]> {
    return this.http.get<Product[]>(this.productUrl + '/product');
  }

  /** GET product by id. Will 404 if id not found */
  getProduct(id: string): Observable<any> {
    const url = `${this.productUrl}/product/${id}`;
    return this.http.get<Product>(url);
  }

  /** POST: add a new product to the server */
  addProduct(product: Product) {
	//console.log(product);
    return this.http.post(this.productUrl + '/product', product, {headers: new HttpHeaders({ 'Content-Type': 'application/json' }), responseType: 'text' as 'json'});
  }

  /** PUT: update the product on the server */
  updateProduct(product: Product): Observable<any> {
    return this.http.put(this.productUrl + '/product/' + product.id, product, {headers: new HttpHeaders({ 'Content-Type': 'application/json' }), responseType: 'text' as 'json'});
  }

  /** DELETE: delete the product from the server */
  deleteProduct(product: Product) {
	  if (confirm("Are you sure to delete?")) {
		console.log(product);

		const options = {
		  headers: new HttpHeaders({
			'Content-Type': 'application/json',
		  }),
		  body: product,
		  responseType: 'text' as 'json'
		};

		return this.http.delete(this.productUrl + '/product/' + product.id, options);
	  }

	  return of({});
  }

}
Retrieving Products
First I am going to write the code how to fetch all products and display on an HTML table.
So modify the file src/app/product-list/product-list.component.ts to write the required code.
ngOnInit() hook initializes the directive/component after Angular first displays the data-bound properties and sets the directive/component’s input properties.
I fetch all products data using getProducts() method and populate the products[] array to display data on the HTML page.
I also define delete() method to delete a particular product from a list of products shown on HTML page.
import { Component, OnInit } from '@angular/core';

import { ActivatedRoute } from '@angular/router';
import { Product } from '../product';
import { ProductService } from '../product.service';

@Component({
  selector: 'app-product-list',
  templateUrl: './product-list.component.html',
  styleUrls: ['./product-list.component.css']
})
export class ProductListComponent implements OnInit {

	products: Product[] = [];

	constructor(private route: ActivatedRoute, private productService: ProductService) { }

	ngOnInit() {
		this.getProducts();
	}

	getProducts(): void {
		this.productService.getProducts().subscribe(products => this.products = products);
	}

	delete(product: Product): void {
		this.productService.deleteProduct(product).subscribe(success => {this.getProducts();});
	}

}
Now edit src/app/product-list/product-list.component.html file to show products information on page.
Here I am showing products information on HTML table and I have attached Detail, Edit and Delete operations for each row of the table data.
<h3>List of Products</h3>
<div>
<a routerLink="/product/add">
Add New Product
</a>
</div>
<table>
<tr>
<th>ID</th>
<th>Name</th>
<th>Price</th>
<th>Sale Price</th>
<th>Sales Count</th>
<th>Sale Date</th>
<th>Actions</th>
</tr>
<tr *ngFor="let product of products">
<td>{{product.id}}</td>
<td>{{product.name}}</td>
<td>{{product.price}}</td>
<td>{{product.sale_price}}</td>
<td>{{product.sales_count}}</td>
<td>{{product.sale_date}}</td>
<td>
<a routerLink="/product/{{product.id}}/detail">Detail</a>
<a routerLink="/product/{{product.id}}/update">Edit</a>
<button title="delete product" (click)="delete(product)">x</button>
</td>
</tr>
</table>I have also applied some basic styles to the HTML table for cell padding and spacing and border around the table and cells. Edit src/app/product-list/product-list.component.css to write the below code.
table, th, td {
  border: 1px solid black;
  border-collapse: collapse;
}
th, td {
  padding: 5px;
}
Retrieving Single Product Detail
Now I will show you how to retrieve single product detail information when you click on Detail link.
Open src/app/product-detail/product-detail.component.ts file and update the file with below source code.
Here in the below class I have fetched the product detail for a given product id as a path parameter. I have also provided goBack() function to give user option when he/she wants to go to the previous page.
import { Component, OnInit } from '@angular/core';

import { Location } from '@angular/common';
import { ActivatedRoute } from '@angular/router';
import { Product } from '../product';
import { ProductService } from '../product.service';

@Component({
  selector: 'app-product-detail',
  templateUrl: './product-detail.component.html',
  styleUrls: ['./product-detail.component.css']
})
export class ProductDetailComponent implements OnInit {

	product: Product;

	constructor(private route: ActivatedRoute, private productService: ProductService, private location: Location) { }

	ngOnInit() {
		this.getProduct();
	}

	getProduct(): void {
		const id = this.route.snapshot.paramMap.get('id');
		this.productService.getProduct(id).subscribe(product => this.product = product);
	}

	goBack(): void {
		this.location.back();
	}

}
Now open src/app/product-detail/product-detail.component.html file to update with below code. This page actually displays the product detail information to the end users.
<div *ngIf="product">
  <h2>{{product.name | uppercase}} Details</h2>
  <div>
	<p>{{product.id}}</p>
    <p>{{product.name}}</p>
    <p>{{product.price}}</p>
	<p>{{product.sale_price}}</p>
	<p>{{product.sales_count}}</p>
	<p>{{product.sale_date}}</p>
  </div>
  <button (click)="goBack()">Go Back</button>
</div>
Updating Product Detail
I will show how to update an existing product information by clicking on the Edit link on the page.
Open the file src/app/product-edit/product-edit.component.ts and update as below.
I fetch the product details first and these values will be used to populate the input fields on HTML form so that user can understand what was the previous value for a field.
import { Component, OnInit, Input } from '@angular/core';

import { Location } from '@angular/common';
import { ActivatedRoute } from '@angular/router';
import { Product } from '../product';
import { ProductService } from '../product.service';

@Component({
  selector: 'app-product-edit',
  templateUrl: './product-edit.component.html',
  styleUrls: ['./product-edit.component.css']
})
export class ProductEditComponent implements OnInit {

	@Input() product: Product;

	constructor(private route: ActivatedRoute, private productService: ProductService, private location: Location) { }

	ngOnInit() {
		this.getProduct();
	}

	getProduct(): void {
		const id = this.route.snapshot.paramMap.get('id');
		this.productService.getProduct(id).subscribe(product => this.product = product);
	}

	save(): void {
		this.productService.updateProduct(this.product).subscribe(success=> {this.goBack();});
	}

	goBack(): void {
		this.location.back();
	}

}
Now open src/app/product-edit/product-edit.component.html file to update as below.
<div *ngIf="product">
  <h2>{{product.name | uppercase}} Details</h2>
  <div>
    <p>
		Name: <input [(ngModel)]="product.name" placeholder="Product Name">
    </p>

	<p>
		Price: <input [(ngModel)]="product.price" placeholder="Product Price">
    </p>

	<p>
		Sale Price: <input [(ngModel)]="product.sale_price" placeholder="Product Sale Price">
    </p>

	<p>
		Sales Count: <input [(ngModel)]="product.sales_count" placeholder="Product Sales Count">
    </p>

	<p>
		Sale Date: <input [(ngModel)]="product.sale_date" placeholder="Product Sale Date">
    </p>
  </div>
  <button (click)="goBack()">Go Back</button>
  <button (click)="save()">Save</button>
</div>
Add Product Detail
Next I will implement functionality for adding new product information. Open the file src/app/product-add/product-add.component.ts and update with below code.
import { Component, OnInit, Input } from '@angular/core';

import { Location } from '@angular/common';
import { Product } from '../product';
import { ProductService } from '../product.service';

@Component({
  selector: 'app-product-add',
  templateUrl: './product-add.component.html',
  styleUrls: ['./product-add.component.css']
})
export class ProductAddComponent implements OnInit {

	@Input() product: Product = { name: '', price: '', sale_price: '', sales_count: '', sale_date: '' };

	constructor(private productService: ProductService, private location: Location) { }

	ngOnInit() {
	}

	save(): void {
		this.productService.addProduct(this.product).subscribe(() => this.goBack());
	}

	goBack(): void {
		this.location.back();
	}

}
Update the file src/app/product-add/product-add.component.html as below.
<div>
  <h2>Add Product Detail</h2>
  <div>
	<p>
		Name: <input [(ngModel)]="product.name" placeholder="Product Name">
    </p>

	<p>
		Price: <input [(ngModel)]="product.price" placeholder="Product Price">
    </p>

	<p>
		Sale Price: <input [(ngModel)]="product.sale_price" placeholder="Product Sale Price">
    </p>

	<p>
		Sales Count: <input [(ngModel)]="product.sales_count" placeholder="Product Sales Count">
    </p>

	<p>
		Sale Date: <input [(ngModel)]="product.sale_date" placeholder="Product Sale Date">
    </p>
  </div>
  <button (click)="goBack()">Go Back</button>
  <button (click)="save()">Save</button>
</div>
Delete Product Detail
Now if you click on the X link to delete a product. You will get confirmation alert and you need to click Yes for deletion.
CORS Issue
Before you start testing please make sure to update the app/Controllers/Product.php file with the following code in CodeIgniter REST API source code otherwise you get CORS error. Also make sure you add this piece of code snippets after the namespace declaration.
header("Access-Control-Allow-Origin: *");
header("Access-Control-Allow-Methods: GET, POST, PUT, DELETE, OPTIONS");
header("Access-Control-Allow-Headers: Origin, Content-Type, Content-Length, Accept-Encoding, X-Requested-With, Accept, Access-Control-Request-Method");

if ( "OPTIONS" === $_SERVER['REQUEST_METHOD'] ) {
    die();
}
Testing the Application
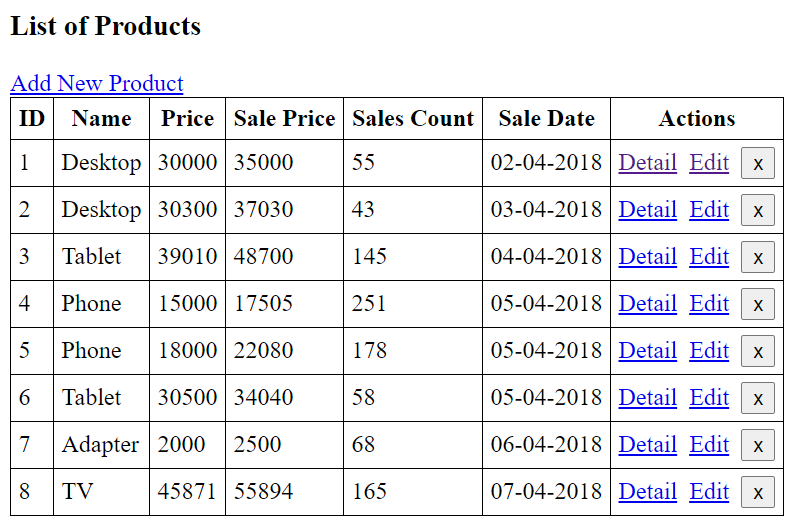
All Products
The home page or root path (http://localhost:4200) of the Angular application redirects to the /products and displays the available products from database. The actual URL becomes http://localhost:4200/products for fetching all available products.
In this page you will see a link for adding new product information, a link for viewing details of each product, a link for updating the existing product information and a link for deleting the existing product information.
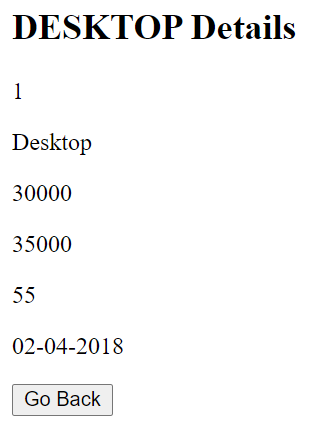
Product Detail
To view product detail you need to click on Detail link (for example, the link becomes – http://localhost:4200/product/1/detail).
Product Update
You can click on Edit link (for example, http://localhost:4200/product/1/update) to update the existing product information. In this example I am only updating price and sale_price, if you need to update other fields then you need to modify the REST API code for updating product information.
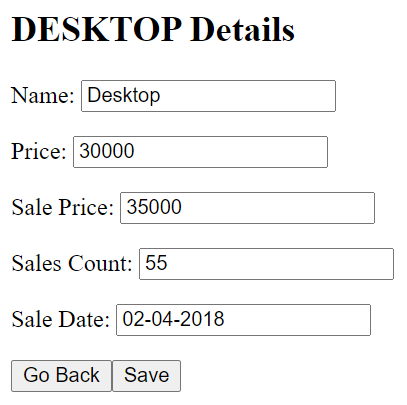
Currently only sale price gets updated using REST API. If you need to update other fields in your database through REST API then you can modify the REST API.
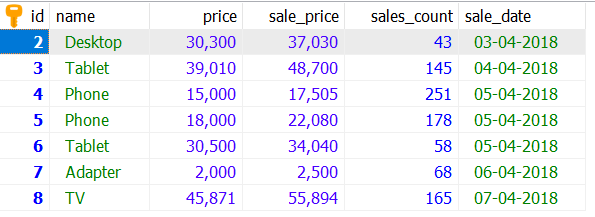
Product Delete
Clicking on the X mark will ask you confirmation before you delete the product from database.

Deleting the product with id 1 will delete from database table and you will see the rest of the product information in the product table as shown in the below image.
Add Product
You can add new product information using the link Add New Product (for example, http://localhost:4200/product/add).
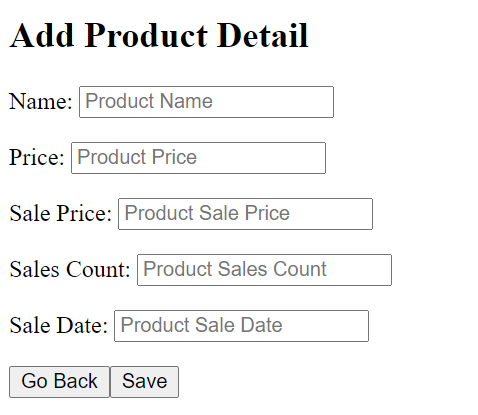
Click on Save button to save the product information into the database.