Introduction
Here I am going to show you how to build an application using Angular for authenticating a user using Okta SSO (Single Sign On) with PKCE. Okta is an enterprise level identity provider that helps you to enable Single Sign-On across applications within an enterprise. Angular is a single page application (SPA) and it is recommended that you use JWT (JSON Web Token) based authentication for your application. This example explains how to enable JWT based SSO authentication with Okta PKCE for an Angular application.
Single page applications offer a great experience as the applications do not need to go through a full transition, but securing SPAs is a challenge since these SPAs are run in browser which is an insecure environment. So, SPAs cannot store a client secret securely.
OAuth 2.0 provides a version of the Authorization Code Flow which makes use of a PKCE. PKCE is an acronym and stands for Proof Key for Code Exchange and useful in the Authorization Code flow to prevent a malicious attacker from exchanging it for a token without the code verifier.
The PKCE-enhanced Authorization Code Flow introduces a secret created by the calling application that can be verified by the authorization server; this secret is called the Code Verifier. Additionally, the calling app creates a transform value of the Code Verifier called the Code Challenge and sends this value over HTTPS to retrieve an Authorization Code. This way, a malicious attacker can only intercept the Authorization Code, and they cannot exchange it for a token without the Code Verifier.
Prerequisites
Angular 13.0.3, Node 16.12.0/16.13.0, Npm 8.1.0/8.1.3
You have already setup your application in Okta
Application Setup
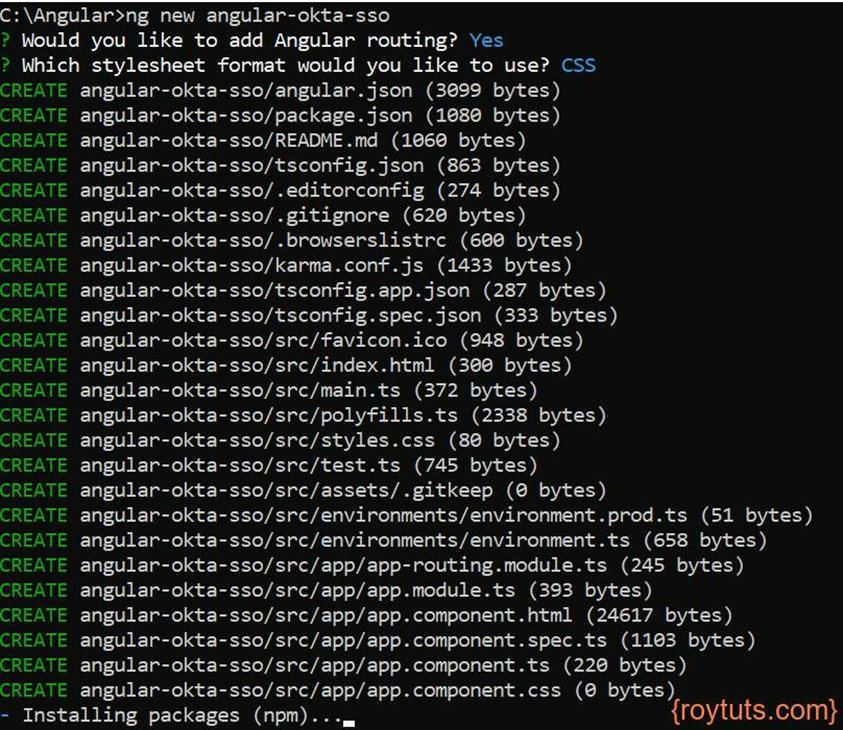
You need to setup an Angular app using the command ng new <app-name>. The following image shows how to create angular app (angular-okta-sso).
Crypto Setup
You need state, code_verifier, code_challenge which need to be passed in the Okta server to get the access token after the authorization server redirects back to your application.
code_verifier will be hashed using crypto-js Base64 encoding and SHA256 hashing algorithm is used to create a code_challenge.
Therefore, you need to install crypto-js package in your Angular app by executing the following command:
npm install --save-dev @types/crypto-jsOr if the above one does not work then try the following command:
npm install crypto-js --save-dev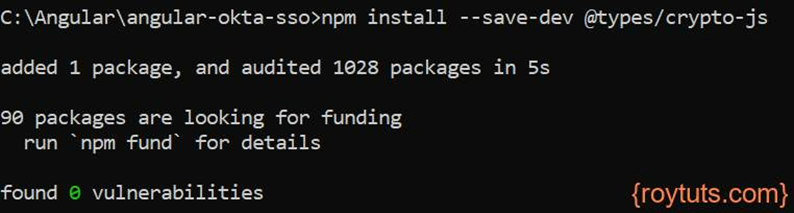
Component – Auth
The following auth component is created for this example to just show the token which is received after Okta authentication. Then you can use this token to call your backend REST API.
The call back URL or redirect URI after Okta authentication is the one where Auth component will be used.
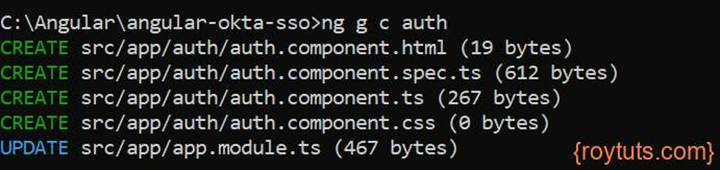
The command to create a component is: ng g c <component-name>.
The following component will automatically be added to the app module and that’s why you see the message UPDATE src/app/app.module.ts in the below image.
Environment Variables
The environment variables are declared in the src/environments/environment.ts file. The following variables are declared in it:
export const environment = {
  production: false,
  oauthClientId: '0oa1382uj9nDywFZ10h8',
  oauthLoginUrl: 'https://dev.oktapreview.com/oauth2/v1/authorize',
  oauthTokenUrl: 'https://dev.oktapreview.com/oauth2/v1/token',
  oauthCallbackUrl: 'http://localhost:4200/auth',
};
The required parameters with values have been added in the environment typescript file. oauthClientId is the client id of your application which you have created in Okta interface, oauthLoginUrl is the login page which will be shown to the end users for username/password, oauthTokenUrl is the token URL which will give you the access token, id token, token type, etc., oauthCallbackUrl, is the URL of the page of your Angular app, where you want to redirect after successful authentication.
I am testing in development environment, so production: false, if you are deploying in production environment then you need to make this value as true – production: true.
Routing
Here is the routing module where I have specified the routes or path for the application. The routing configuration determines where to navigate in the application. For example, you want to click on a link or button to navigate to different page of the application.
The following code is written into src/app/app-routing.module.ts file.
import { NgModule } from '@angular/core';
import { RouterModule, Routes } from '@angular/router';
import { AppComponent } from './app.component';
import { AuthComponent } from './auth/auth.component';

const routes: Routes = [
  { path: '', component: AppComponent },
  { path: 'auth', component: AuthComponent }
];

@NgModule({
  imports: [RouterModule.forRoot(routes)],
  exports: [RouterModule]
})

export class AppRoutingModule { }
The path ‘’ is the root path and when accessed from browser will redirect to the Okta login page.
The path ‘auth’ is redirected once login is successful in Okta login page.
App Modules
The modules which are used in the application need to be declared in the app module typescript file. For example, you need HttpClientModule when you are using http request to an API.
The custom modules, AppComponent, AuthComponent, which are created for this example were also added.
The following code is written into src/app/app.module.ts file.
import { NgModule } from '@angular/core';
import { BrowserModule } from '@angular/platform-browser';
import { HttpClientModule }    from '@angular/common/http';

import { AppRoutingModule } from './app-routing.module';
import { AppComponent } from './app.component';
import { AuthComponent } from './auth/auth.component';

@NgModule({
  declarations: [
    AppComponent,
    AuthComponent
  ],
  imports: [
    BrowserModule,
    AppRoutingModule,
    HttpClientModule
  ],
  providers: [],
  bootstrap: [AppComponent]
})

export class AppModule { }
Redirect to Authorization Server for login
The login URL for authorization server needs state, code_challenge, code_verifier parameters and values with random strings.
import { Component, OnInit } from '@angular/core';
import { ActivatedRoute, Router } from '@angular/router';

import * as CryptoJS from 'crypto-js';

import { environment } from './../environments/environment';

@Component({
  selector: 'app-root',
  templateUrl: './app.component.html',
  styleUrls: ['./app.component.css']
})
export class AppComponent implements OnInit {
  title = 'angular-okta-sso';

  constructor() {}

  ngOnInit() {
	  const state = this.randomStr(40);
	  const codeVerifier = this.randomStr(128);

	  window.sessionStorage.setItem('state', state);
	  window.sessionStorage.setItem('codeVerifier', codeVerifier);

	  const codeVerifierHash = CryptoJS.SHA256(codeVerifier).toString(CryptoJS.enc.Base64);

	  const codeChallenge = codeVerifierHash
		 .replace(/=/g, '')
		 .replace(/\+/g, '-')
		 .replace(/\//g, '_');

	  const params = [
		 'response_type=code',
		 'state=' + state,
		 'client_id=' + environment.oauthClientId,
		 'scope=openid',
		 'code_challenge=' + codeChallenge,
		 'code_challenge_method=S256',
		 'redirect_uri=' + encodeURIComponent(environment.oauthCallbackUrl),
	  ];

	  let url = environment.oauthLoginUrl + '?' + params.join('&');

	  //alert(url);

	  window.location.href = url;
  }

  private randomStr(length: number) {
    let result = '';
    const characters = 'ABCDEFGHIJKLMNOPQRSTUVWXYZabcdefghijklmnopqrstuvwxyz0123456789';
    const charactersLength = characters.length;

    for (let i = 0; i < length; i++) {
        result += characters.charAt(Math.floor(Math.random() * charactersLength));
    }

    return result;
  }
}
In the above typescript file (src/app/app.component.ts), the randomStr() function is used to geneate random string.
In the ngOnInit() function I have generated required state, code verifier, code challenge followed by building the URL with required parameters which will send me the code and state in return in query string after successful authentication.
The state and code will be required further to fetch token and user details from the Okta.
So, once you open the URL http://localhost:4200, you will see that you are redirecting to the login page that will ask you to enter username/password.
Once you are successfully logged in then you will be redirected to the URL http://localhost:4200/auth and in this case the Auth component is called.
Auth Component
In the auth component I am fetching the token and user detail information.
import { Component, OnInit } from '@angular/core';
import { HttpClient, HttpParams } from '@angular/common/http';
import { ActivatedRoute } from '@angular/router';

import { environment } from './../../environments/environment';

@Component({
selector: 'app-auth',
templateUrl: './auth.component.html',
styleUrls: ['./auth.component.css']
})
export class AuthComponent implements OnInit {

	constructor(
	private activatedRoute: ActivatedRoute,
	private http: HttpClient ) { }

	ngOnInit(): void {
			this.activatedRoute.queryParams.subscribe(params => {
		if (params['code']) {
			this.getAccessTokenAndUserInfo(params['code'], params['state']);
		}
	});
	}

	getAccessTokenAndUserInfo(code: string, state: string) {
	if (state !== window.sessionStorage.getItem('state') as string) {
		console.log('Invalid state');
		return;
	}
	const payload = new HttpParams()
		.append('grant_type', 'authorization_code')
		.append('code', code)
		.append('code_verifier', window.sessionStorage.getItem('codeVerifier') as string)
		.append('redirect_uri', environment.oauthCallbackUrl)
		.append('client_id', environment.oauthClientId);
		 this.http.post(environment.oauthTokenUrl, payload, {
		   headers: {
			  'Content-Type': 'application/x-www-form-urlencoded'
		   }
		 }).subscribe((response: any) => {
		   console.log(response);

		   let token = response.token_type + ' ' + response.access_token;
		   this.http.post('https://dev.oktapreview.com/oauth2/v1/userinfo', payload, {
			  headers: {
							'Authorization': token
			  }
		   }).subscribe(resp => {
			  console.log(resp);
		   });
		 });
	}
}
getAccessTokenAndUserInfo() function fetches the token details and /userinfo endpoint gives you the details of the user.
If you have specified, the scope=’openid’ in the Authorization server URL in app component file, then you will get only the following response.
sub { ‘003fsea3t3362r26372h’ }If you want to extract more details, for example, use profile, email address, from the /userinfo then you need to specify also these things. For example, scope=’openid profile email groups’. The groups will return roles or in which group you have assigned a user to access the application.
The function getAccessTokenAndUserInfo() first fetches the token at /token endpoint followed by user details at /userinfo endpoint. For this example, I have just logged the response in the browser console, but in an ideal scenario you are going to pass the access token to your backend REST APIs to get the response from REST APIs.
Testing the Angular Okta SSO with PKCE
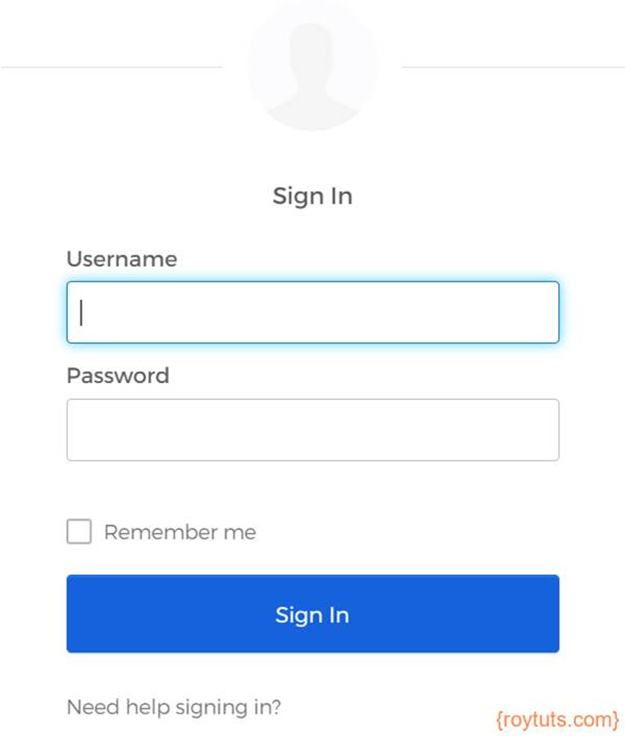
When you access the URL http://locahost:4200/, you will be redirected to the login page of your Okta interface as shown in the below image:
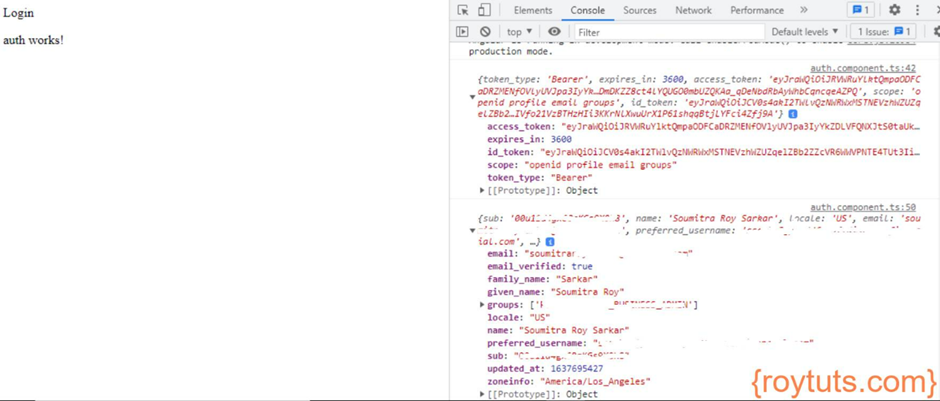
Once you put your correct username and password in the login page, you will get the following response in the browser console. The response contains various information related to the token – access toke, id token, token expiry time, etc.
After receiving the token I am fetching user detail information as shown in the following image. To get user details, make sure you pass “openid profile email groups” for the scope value in the Okta authorization URL.
That’s all. Hope you got an idea how to authenticate and authorize an user with the help of Okta SSO with PKCE.