Introduction
In this tutorial I am going to show you how to build Spring Boot Angular CRUD Application. CRUD is an acronym and stands for Create, Read, Update and Delete operations performed through an application or APIs. Using Spring Boot application I will build REST APIs which will be used to perform CRUD operations on server side resources. The Angular application is a frontend application which is going to consume or call those REST APIs build suing Spring Boot REST application.
As there are two separate applications, so I am going to create two separate applications for this example. The backend application’s name is spring-boot-angular-crud-rest-api and the frontend application’s name is angular-spring-boot-crud-app.
Prerequisites
Java 1.8+, Spring Boot 2.5.6 – 2.6.1, Angular 13.0.1 – 13.0.3, node 16.12.0/16.13.0, npm 8.1.0/8.1.3
Backend – Spring Boot Application
Project Setup
Create a maven based project in your favorite IDE or tool. The name of the project is spring-boot-angular-crud-rest-api. You can use the following pom.xml file for your project. The pom.xml file contains the required dependencies for the Spring Boot application.
<?xml version="1.0" encoding="UTF-8"?>

<project xmlns="http://maven.apache.org/POM/4.0.0"
	xmlns:xsi="http://www.w3.org/2001/XMLSchema-instance"
	xsi:schemaLocation="http://maven.apache.org/POM/4.0.0 http://maven.apache.org/xsd/maven-4.0.0.xsd">
	<modelVersion>4.0.0</modelVersion>

	<groupId>com.roytuts</groupId>
	<artifactId>spring-boot-angular-crud-rest-api</artifactId>
	<version>0.0.1-SNAPSHOT</version>

	<properties>
		<project.build.sourceEncoding>UTF-8</project.build.sourceEncoding>
		<maven.compiler.source>16</maven.compiler.source>
		<maven.compiler.target>16</maven.compiler.target>
	</properties>

	<parent>
		<groupId>org.springframework.boot</groupId>
		<artifactId>spring-boot-starter-parent</artifactId>
		<version>2.6.1</version>
	</parent>

	<dependencies>
		<dependency>
			<groupId>org.springframework.boot</groupId>
			<artifactId>spring-boot-starter-web</artifactId>
		</dependency>

		<dependency>
			<groupId>org.springframework.boot</groupId>
			<artifactId>spring-boot-starter-data-jpa</artifactId>
		</dependency>

		<dependency>
			<groupId>mysql</groupId>
			<artifactId>mysql-connector-java</artifactId>
		</dependency>

		<!--required only if jdk 9 or higher version is used -->
		<dependency>
			<groupId>javax.xml.bind</groupId>
			<artifactId>jaxb-api</artifactId>
			<scope>runtime</scope>
		</dependency>
	</dependencies>

	<build>
		<plugins>
			<plugin>
				<groupId>org.springframework.boot</groupId>
				<artifactId>spring-boot-maven-plugin</artifactId>
			</plugin>
		</plugins>
	</build>
</project>
MySQL Table
The following tables are created under the roytuts database. You may also skip table creation manually in the MySQL database server and you can create tables using Java entity class.
CREATE DATABASE IF NOT EXISTS `roytuts`;
USE `roytuts`;

CREATE TABLE IF NOT EXISTS `website` (
  `id` int NOT NULL AUTO_INCREMENT,
  `title` varchar(255) COLLATE utf8mb4_unicode_ci DEFAULT NULL,
  `url` varchar(255) COLLATE utf8mb4_unicode_ci DEFAULT NULL,
  PRIMARY KEY (`id`)
) ENGINE=InnoDB DEFAULT CHARSET=utf8mb4 COLLATE=utf8mb4_unicode_ci;
application.properties
The application.properties file is kept under src/main/resources with the following content:
#Spring Datasource
spring.datasource.driverClassName=com.mysql.cj.jdbc.Driver
spring.datasource.url=jdbc:mysql://localhost:3306/roytuts
spring.datasource.username=root
spring.datasource.password=root

#ignore null fields in json
spring.jackson.default-property-inclusion=NON_NULL

#SQL related
spring.jpa.show-sql = true
spring.jpa.properties.hibernate.format_sql=true
logging.level.org.hibernate.type.descriptor.sql=trace

spring.jpa.hibernate.ddl-auto = create
I am including only non-null fields in JSON response from REST APIs.
I have set the following properties so that Hibernate creates website table under roytuts database in MySQL server. If you want that your entity class should not create table in database then change the value from create to none.
spring.jpa.hibernate.ddl-auto=createI am logging SQL statement and formatting them for better reading in the console using the following key/value pairs:
spring.jpa.show-sql=true
spring.jpa.properties.hibernate.format_sql=true
logging.level.org.hibernate.type.descriptor.sql=trace
Entity Class – Website
The Website entity class stores website information. I have not specified the table name and column names because the table name should be same as the class name with lowercase letter and also the column names should be same as attribute or field names in this class.
@Table
@Entity
public class Website {

	@Id
	@GeneratedValue(strategy = GenerationType.IDENTITY)
	private Integer id;

	@Column
	private String url;

	@Column
	private String title;
}
Repository Interface
The repository interface is used to fetch or save data from/to database. Spring Data JPA provides repository interface with built-in methods for performing basic CRUD operations.
public interface WebsiteRepository extends JpaRepository<Website, Integer> {

}
VO Class – Request
It is always good idea to create request/response objects separately instead of using entity or model classes for non-repository or non-DAO classes. You can read more about best practices in Spring applications.
public class WebsiteVo {

	private Integer id;
	private String url;
	private String title;
}
Converter Class
The converter class is used to convert entity to VO or VO to entity class object.
public final class EntityVoConverter {

	private EntityVoConverter() {
	}

	public static WebsiteVo convertEntityToVo(Website website) {
		WebsiteVo websiteVo = new WebsiteVo();
		websiteVo.setId(website.getId());
		websiteVo.setTitle(website.getTitle());
		websiteVo.setUrl(website.getUrl());

		return websiteVo;
	}

	public static Website convertVoToEntity(WebsiteVo websiteVo) {
		Website website = new Website();
		website.setId(websiteVo.getId());
		website.setTitle(websiteVo.getTitle());
		website.setUrl(websiteVo.getUrl());

		return website;
	}

	public static List<WebsiteVo> convertEntityToVoList(List<Website> websites) {
		return websites.stream().map(w -> {
			return convertEntityToVo(w);
		}).collect(Collectors.toList());
	}

	public static List<Website> convertVoToEntityList(List<WebsiteVo> websiteVos) {
		return websiteVos.stream().map(wvo -> {
			return convertVoToEntity(wvo);
		}).collect(Collectors.toList());
	}

}
Service Class
The service class where the business logic for an application is written.
@Service
public class WebsiteService {

	@Autowired
	private WebsiteRepository websiteRepository;

	public List<WebsiteVo> getWebsites() {
		System.out.println("Total Websites: " + websiteRepository.findAll().size());

		return EntityVoConverter.convertEntityToVoList(websiteRepository.findAll());
	}

	public WebsiteVo getWebsite(final Integer id) {
		if (id == null || id == 0) {
			throw new RuntimeException("You must provide valid website id");
		}

		WebsiteVo website = EntityVoConverter.convertEntityToVo(websiteRepository.findById(id).get());

		if (website == null) {
			throw new RuntimeException("Website detail not found for the given id => " + id);
		} else {
			return website;
		}
	}

	public void deleteWebsite(final Integer id) {
		if (id == null || id == 0) {
			throw new RuntimeException("You must provide valid website id");
		}

		try {
			websiteRepository.deleteById(id);
		} catch (Exception e) {
			throw new RuntimeException("Website detail not found for the given id => " + id);
		}
	}

	public void saveWebsite(final WebsiteVo website) {
		if (website == null || (website.getTitle() == null && website.getUrl() == null)) {
			throw new RuntimeException("You must provide Website details");
		}

		try {
			websiteRepository.save(EntityVoConverter.convertVoToEntity(website));
		} catch (Exception e) {
			throw new RuntimeException("Error occurred during website details saving");
		}
	}

	public void updateWebsite(final WebsiteVo website) {
		if (website == null || ((website.getId() == null || website.getId() == 0) && website.getTitle() == null
				&& website.getUrl() == null)) {
			throw new RuntimeException("You must provide Website details");
		}

		try {
			websiteRepository.save(EntityVoConverter.convertVoToEntity(website));
		} catch (Exception e) {
			throw new RuntimeException("Error occurred during website details updating");
		}
	}

}
REST Controller Class
The REST controller class which is responsible for handling client requests and responses.
@RestController
@CrossOrigin(value = "*")
public class WebsiteRestController {

	@Autowired
	private WebsiteService websiteService;

	@GetMapping("/websites")
	public ResponseEntity<List<WebsiteVo>> getWebsites() throws Exception {
		return new ResponseEntity<List<WebsiteVo>>(websiteService.getWebsites(), HttpStatus.OK);
	}

	@GetMapping("/website/{id}")
	public ResponseEntity<WebsiteVo> getWebsite(@PathVariable Integer id) throws Exception {
		return new ResponseEntity<WebsiteVo>(websiteService.getWebsite(id), HttpStatus.OK);
	}

	@PostMapping("/website")
	public ResponseEntity<Void> saveWebsite(@RequestBody WebsiteVo website) throws Exception {
		websiteService.saveWebsite(website);
		return new ResponseEntity<Void>(HttpStatus.CREATED);
	}

	@PutMapping("/website")
	public ResponseEntity<Void> updateWebsite(@RequestBody WebsiteVo website) throws Exception {
		websiteService.updateWebsite(website);
		return new ResponseEntity<Void>(HttpStatus.OK);
	}

	@DeleteMapping("/website/{id}")
	public ResponseEntity<WebsiteVo> deleteWebsite(@PathVariable Integer id) throws Exception {
		websiteService.deleteWebsite(id);
		return new ResponseEntity<WebsiteVo>(HttpStatus.OK);
	}

}
Spring Boot Main Class
A class is having a main method with annotation @SpringBootApplication is enough to deploy the application into embedded Tomcat server.
@SpringBootApplication
public class SpringAngularCrudRestApiApp {

	public static void main(String[] args) {
		SpringApplication.run(SpringAngularCrudRestApiApp.class, args);
	}

}
Testing Spring Boot API
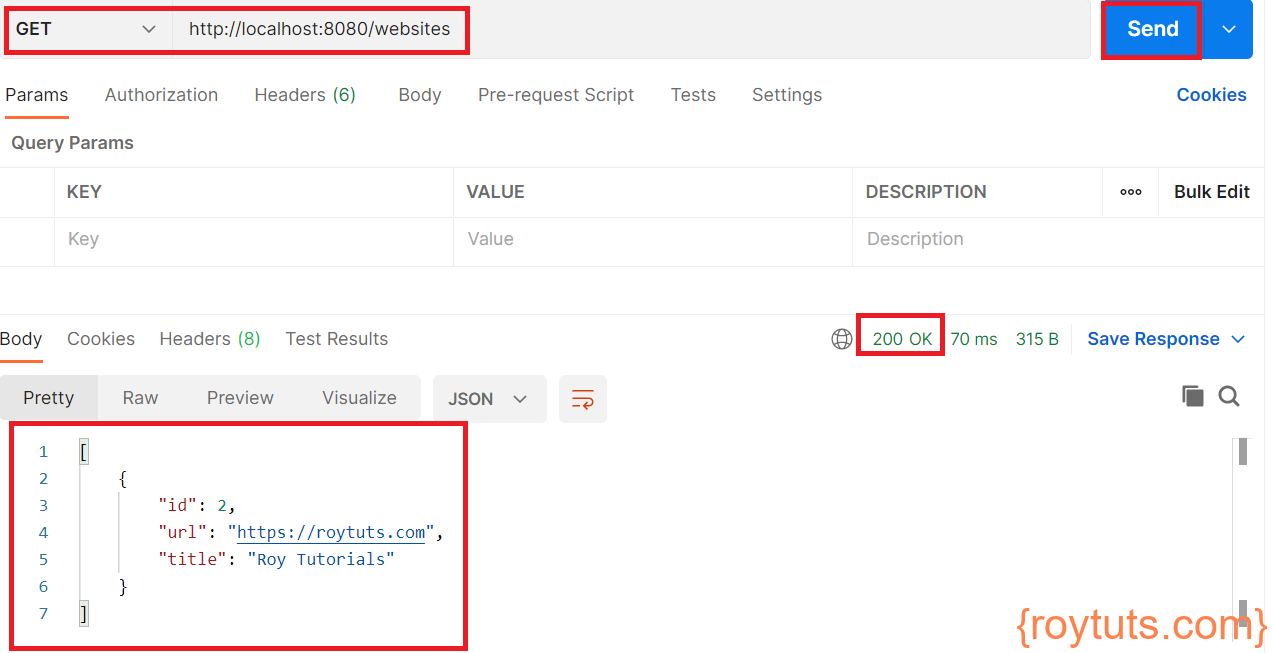
Once your application is deployed by running the above main class then you can test your REST APIs via Postman or any other REST client tool. For example, I am going to test website creation and website retrieval operations.
To carete a new website information, you can use the following request details:

To fetch all website information you can use the following details:
Frontend – Angular Application
Project Setup
Create new angular project using the command ng new <project name> as you see in the following image:
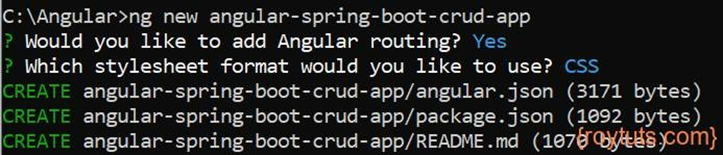
When you are asked for routing creation, then say “yes”, because routing will give you flexibility for creating navigations in your application.
Also choose the format of style sheet you would like to use – CSS or any other format.
Components
Having separate component for each operation will give you more control over managing source code and project structure. The following four components are created for performing CRUD (Create, Read, Update and Delete) operations. To create a component in Angular you need to use the command format: ng g c <component name>.
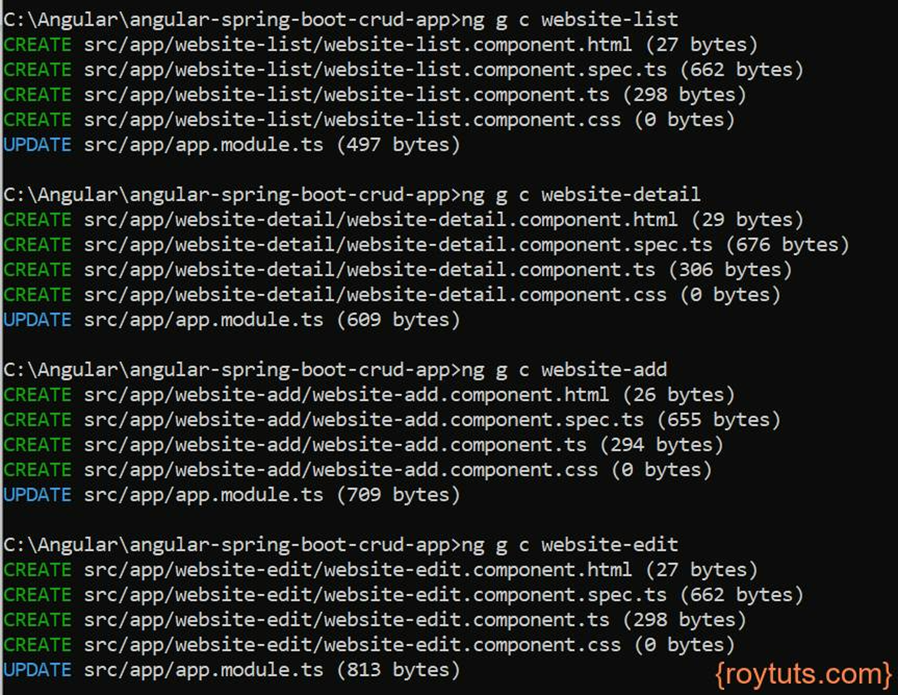
The above four components will be created under src/app folder. If you want to create under different folder under src/app then you need to specify the folder name before component name in the command.
Service Class
The service class is used by all modules or components in Angular. The service class will interact the server-side code or REST APIs to fetch data. To create a service class, you need to use command: ng g s <service class name>. The service class will be created under src/app folder. If you want to create under a folder then you need to mention folder name before the service class name in the command, for example, ng g s <folder name>/<service class name>.

The service class is written into the file src/app/website.service.ts and it will list down CRUD operation methods. In the below class I have defined methods for CRUD operations for websites.
So, I give user options through your UI (User Interface) to add new website, update existing website, fetching exiting websites/website and deleting existing website. Also notice that I have mentioned responseType: ‘text’ as ‘json’. By default, the response type is json and you don’t need to mention response type but, here the server-side code produces text response and this response type is not handled by Angular. Therefore, you need to convert to json response to avoid incompatibility issues.
import { Injectable } from '@angular/core';

import { HttpClient, HttpHeaders } from '@angular/common/http';
import { Observable, of } from 'rxjs';
import { catchError, map, tap } from 'rxjs/operators';
import { Website } from './website.model';

const httpHeaders = {
  headers: new HttpHeaders({ 'Content-Type': 'application/json' })
};

@Injectable({
  providedIn: 'root'
})
export class WebsiteService {

  private baseUrl = 'http://localhost:8080';  // Base URL to REST API

  constructor(private http: HttpClient) { }

  /** GET websites from the server */
  getWebsites(): Observable<Website[]> {
	 return this.http.get<Website[]>(this.baseUrl + '/websites');
  }

  /** GET website by id. Will 404 if id not found */
  getWebsite(id: string): Observable<any> {
	 const url = `${this.baseUrl}/website/${id}`;
	 return this.http.get<Website>(url);
  }

  /** POST: add a new website to the server */
  addWebsite(website: Website) {
	 console.log(website);
	 return this.http.post(this.baseUrl + '/website', website, {headers: new HttpHeaders({ 'Content-Type': 'application/json' })});
  }

  /** PUT: update the website on the server */
  updateWebsite(website: Website): Observable<any> {
	 return this.http.put(this.baseUrl + '/website', website, {headers: new HttpHeaders({ 'Content-Type': 'application/json' })});
  }

  /** DELETE: delete the website from the server */
  deleteWebsite(website: Website) {
	if (confirm("Are you sure to delete?")) {
	 console.log(website);

	 const options = {
	   headers: new HttpHeaders({
				   'Content-Type': 'application/json',
	   }),
	   body: website,
	   responseType: 'text' as 'json'
	 };

	 return this.http.delete(this.baseUrl + '/website/' + website.id, options);
	}

	return of({});
  }

}
Model Class
The model class is used to represent your data object and will map REST response to this class which will make your life easier to access JSON key/value pairs for the data. The command would be to create a model class: ng g interface <model class name> --type=model. Again, if you want to create under a folder then you need to mention the folder name before model class name in the command. The default location for the model class is src/app.

The model class file src/app/website.model.ts has the following code:
export interface Website {
  id?: string;
  url: string;
  title: string;
}
The ? mark at the end of id attribute indicates the optional value for the id attribute, so value may or may not present in id field.
Routing – Navigations
Angular routing determines the navigation for your application and it is recommended to have a user friendly page navigation.
For example, you want to create new website information, so you will click on a link – New Website. You may update existing website information, so you may click on Edit Website and so on.
Edit file src/app/app-routing.module.ts to have below source code.
I am importing the required modules and components and at the end I exported the class for using into different components. I have defined paths for routing, such as, when you hit the root URL in the browser, it will redirect to the /websites path, or when you want to perform other operations – create, update, delete or fetch detail for a particular product.
import { NgModule } from '@angular/core';
import { RouterModule, Routes } from '@angular/router';

import { WebsiteListComponent } from './website-list/website-list.component';
import { WebsiteAddComponent } from './website-add/website-add.component';
import { WebsiteEditComponent } from './website-edit/website-edit.component';
import { WebsiteDetailComponent } from './website-detail/website-detail.component';

const routes: Routes = [
  { path: '', redirectTo: '/websites', pathMatch: 'full' },
  { path: 'websites', component: WebsiteListComponent },
  { path: 'website/:id/detail', component: WebsiteDetailComponent },
  { path: 'website/:id/update', component: WebsiteEditComponent },
  { path: 'website/add', component: WebsiteAddComponent }
];


@NgModule({
  imports: [RouterModule.forRoot(routes)],
  exports: [RouterModule]
})
export class AppRoutingModule { }
If you now try to open your application by executing command ng serve –open in command line tool you won’t see the content from the page http://localhost:4200/websites (src/app/website-list/website-list.component.html), though I have redirected root path to /websites in src/app/app-routing.module.ts file.
You will see the path in browser as http://localhost:4200/websites but you will see the content on the browser from src/app/app.component.html file.
Therefore, remove everything from src/app/app.component.html file and put only <router-outlet></router-outlet> in this file and now save the file.
Now if you open the application by executing command ng serve --open, then you should see the output as website-list works! on home page.
Modules
Open your src/app/app.module.ts and add few required modules for the application, such as, FormsModule, HttpClientModule and AppRoutingModule. Other components and modules are added automatically into this typescript file. FormsModule is required to define your HTML form, HttpClientModule is required for preforming data exchange over HTTP protocol and AppRoutingModule is required for defining routes used for navigation in the application.
import { NgModule } from '@angular/core';
import { BrowserModule } from '@angular/platform-browser';

import { FormsModule }    from '@angular/forms';
import { HttpClientModule }    from '@angular/common/http';

import { AppRoutingModule } from './app-routing.module';
import { AppComponent } from './app.component';
import { WebsiteListComponent } from './website-list/website-list.component';
import { WebsiteDetailComponent } from './website-detail/website-detail.component';
import { WebsiteAddComponent } from './website-add/website-add.component';
import { WebsiteEditComponent } from './website-edit/website-edit.component';

@NgModule({
  declarations: [
    AppComponent,
    WebsiteListComponent,
    WebsiteDetailComponent,
    WebsiteAddComponent,
    WebsiteEditComponent
  ],
  imports: [
    BrowserModule,
    AppRoutingModule,
	FormsModule,
	HttpClientModule
  ],
  providers: [],
  bootstrap: [AppComponent]
})
export class AppModule { }
Display Websites
I am going to write the code how to fetch all websites and display on an HTML table.
So modify the file src/app/website-list/website-list.component.ts to write the required code.
ngOnInit() hook initializes the directive/component after Angular first displays the data-bound properties and sets the directive/component’s input properties.
I fetch all websites data using getWebsites() method and populate the websites[] array to display data on the HTML page. I also define delete() method to delete a particular website from a list of websites shown on HTML page.
import { Component, OnInit } from '@angular/core';

import { ActivatedRoute } from '@angular/router';
import { Website } from '../website.model';
import { WebsiteService } from '../website.service';

@Component({
  selector: 'app-website-list',
  templateUrl: './website-list.component.html',
  styleUrls: ['./website-list.component.css']
})
export class WebsiteListComponent implements OnInit {

  websites: Website[] = [];

  constructor(private route: ActivatedRoute, private websiteService: WebsiteService) { }

  ngOnInit() {
	 this.getWebsites();
  }

  getWebsites(): void {
	 this.websiteService.getWebsites().subscribe(websites => this.websites = websites);
  }

  delete(website: Website): void {
	this.websiteService.deleteWebsite(website).subscribe(success => {this.getWebsites();});
  }

}
Now edit src/app/website-list/website-list.component.html file to show websites information on page. Here I am showing websites information on HTML table and I have attached Detail, Edit and Delete operations for each row of the table data.
<div>
<a routerLink="/website/add">
Add New Website
</a>
</div>
<div *ngIf="websites.length > 0">
<h3>List of Websites</h3>
<table>
<tr>
<th>ID</th>
<th>URL</th>
<th>Title</th>
<th>Actions</th>
</tr>
<tr *ngFor="let website of websites">
<td>{{website.id}}</td>
<td>{{website.url}}</td>
<td>{{website.title}}</td>
<td>
<a routerLink="/website/{{website.id}}/detail">Detail</a>
<a routerLink="/website/{{website.id}}/update">Edit</a>
<button title="delete website" (click)="delete(website)">x</button>
</td>
</tr>
</table>
</div>
<div *ngIf="websites.length <= 0">
<p style="color: red">No Record Found!</p>
</div>I have also applied some basic styles to the HTML table for cell padding and spacing and border around the table and cells. Edit src/app/website-list/website-list.component.css to write the below code.
table, th, td {
  border: 1px solid black;
  border-collapse: collapse;
}

th, td {
  padding: 5px;
}
Single Website Details
Now I will show you how to retrieve single website detail information when you click on Detail link.
Open src/app/website-detail/website-detail.component.ts file and update the file with below source code. Here in the below class, I have fetched the website detail for a given website id as a path parameter. I have also provided goBack() function to give user option when he/she wants to go to the previous page.
import { Component, OnInit } from '@angular/core';

import { Location } from '@angular/common';
import { ActivatedRoute } from '@angular/router';
import { Website } from '../website.model';
import { WebsiteService } from '../website.service';

@Component({
  selector: 'app-website-detail',
  templateUrl: './website-detail.component.html',
  styleUrls: ['./website-detail.component.css']
})
export class WebsiteDetailComponent implements OnInit {

  website: Website = {id: '', url: '', title: ''};

  constructor(private route: ActivatedRoute, private websiteService: WebsiteService, private location: Location) { }

  ngOnInit() {
	 this.getWebsite();
  }

  getWebsite(): void {
	 const id = this.route.snapshot.paramMap.get('id') || '';
	 this.websiteService.getWebsite(id).subscribe(website => {
				   this.website = website;
	 });
  }

  goBack(): void {
	 this.location.back();
  }

}
Now open src/app/website-detail/website-detail.component.html file to update with below code. This page displays the website detail information to the end users.
<div *ngIf="website">
  <h2>{{website.title | uppercase}} Details</h2>
  <div>
	<p>{{website.id}}</p>
    <p>{{website.url}}</p>
    <p>{{website.title}}</p>
  </div>
  <button (click)="goBack()">Go Back</button>
</div>
Update Website Information
I will show how to update an existing website information by clicking on the Edit link on the page.
Open the file src/app/website-edit/website-edit.component.ts and update as below. I fetch the website details first and these values will be used to populate the input fields on HTML form so that user can understand what the previous value for a field was.
import { Component, OnInit, Input } from '@angular/core';

import { Location } from '@angular/common';
import { ActivatedRoute } from '@angular/router';
import { Website } from '../website.model';
import { WebsiteService } from '../website.service';

@Component({
  selector: 'app-website-edit',
  templateUrl: './website-edit.component.html',
  styleUrls: ['./website-edit.component.css']
})
export class WebsiteEditComponent implements OnInit {

  @Input() website: Website  = {id: '', url: '', title: ''};

  constructor(private route: ActivatedRoute, private websiteService: WebsiteService, private location: Location) { }

  ngOnInit() {
	this.getWebsite();
  }

  getWebsite(): void {
	 const id = this.route.snapshot.paramMap.get('id') || '';
	 this.websiteService.getWebsite(id).subscribe(website => this.website = website);
  }

  save(): void {
	this.websiteService.updateWebsite(this.website).subscribe(success=> {this.goBack();});
  }

  goBack(): void {
	 this.location.back();
  }

}
Next open src/app/website-edit/website-edit.component.html file to update as below.
<div *ngIf="website">
  <h2>{{website.title | uppercase}} Details</h2>
  <div>
    <p>
	 Title: <input [(ngModel)]="website.title" placeholder="Website Title">
    </p>

    <p>
	 URL: <input [(ngModel)]="website.url" placeholder="Website URL">
    </p>
  </div>
  <button (click)="goBack()">Go Back</button>
  <button (click)="save()">Save</button>
</div>
Add New Website Information
Next, I will implement functionality for adding new website information. Open the file src/app/website-add/website-add.component.ts and update with below code.
import { Component, OnInit, Input } from '@angular/core';

import { Location } from '@angular/common';
import { Website } from '../website.model';
import { WebsiteService } from '../website.service';

@Component({
  selector: 'app-website-add',
  templateUrl: './website-add.component.html',
  styleUrls: ['./website-add.component.css']
})
export class WebsiteAddComponent implements OnInit {

  @Input() website: Website = { url: '', title: '' };

  constructor(private websiteService: WebsiteService, private location: Location) { }

  ngOnInit() {
  }

  save(): void {
	 this.websiteService.addWebsite(this.website).subscribe(() => this.goBack());
  }

  goBack(): void {
	 this.location.back();
  }

}
Update the file src/app/website-add/website-add.component.html as below.
<div>
  <h2>Add New Website Detail</h2>
  <div>
	<p>
	 Title: <input [(ngModel)]="website.title" placeholder="Website Title">
    </p>

	<p>
	 URL: <input [(ngModel)]="website.url" placeholder="Website URL">
    </p>
  </div>
  <button (click)="goBack()">Go Back</button>
  <button (click)="save()">Save</button>
</div>
Now if you click on the x link to delete a website. You will get confirmation alert and you need to click Yes for deletion.
Router Outlet
Add router-outlet element in the src/app/app.component.html file:
<router-outlet></router-outlet>The router-outlet determines which routing content has to be displayed from the routes defined in the src/app/app-routing.module.ts file.
Testing Angular CRUD App
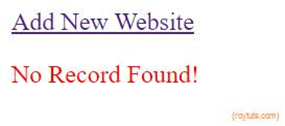
Initially you won’t find any record in the home page, so your application will return No Record Found!
Add New Record
Add a new record for website using the link Add New Website. I am adding the following information:
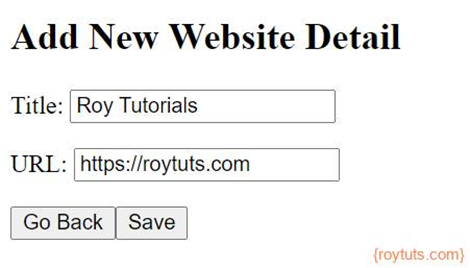
Click on Save button to save the record or Go Back button to go back to the previous page.
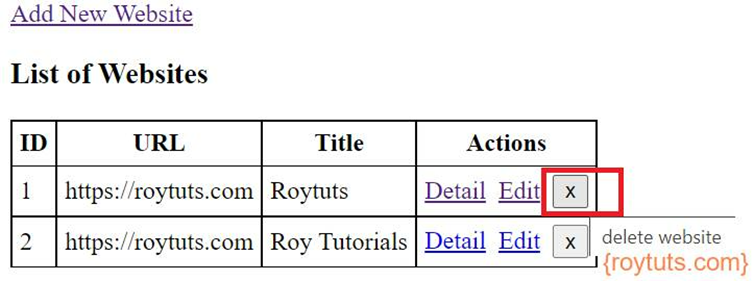
Display Websites
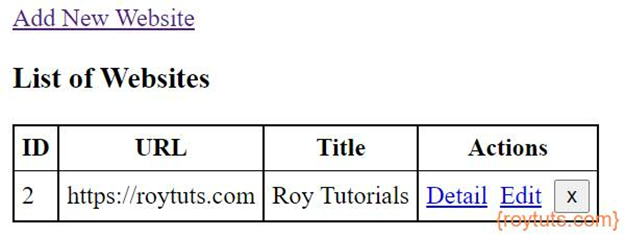
I have created two records using Add New Website button and the home page displays the following results. Actually once you create a new website, it will redirect to the home page and display in the HTML table.

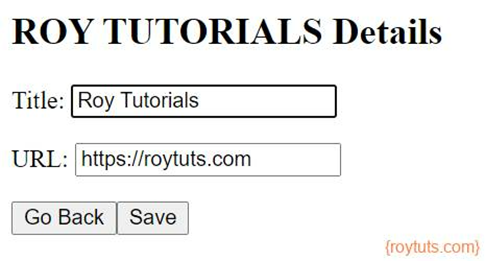
If you need to check details about a website, then you can click on the Detail link and see the details:

Update Website Information
When you need to update a particular record, you can clink on Edit link. Your fields will be auto-populated and editable for modify.
Now you can change the Title and URL value for a website and click on Save button to save the updated content.
Changing Title from Roy Tutorials to Roytuts:
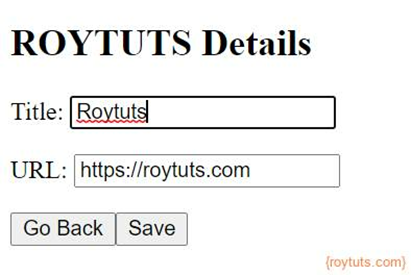
Once you save , you will see the updated value:

Delete Website
If you want to delete a particular web site then you can click on Delete cross sign (x) mark.
Now clicking on x sign will ask you for confirmation of deletion:

Once you click on OK button, it will delete the record and returns to the following page:
That’s all about how to build ANgular Spring Boot CRUD application.
Hello, first, I would like to say thank you for the information. It helps me a lot to start in this field.
One question, where is the code to autogenerate the database?
CREATE DATABASE IF NOT EXISTS `roytuts`;
USE `roytuts`;
CREATE TABLE IF NOT EXISTS `website` (
`id` int NOT NULL AUTO_INCREMENT,
`title` varchar(255) COLLATE utf8mb4_unicode_ci DEFAULT NULL,
`url` varchar(255) COLLATE utf8mb4_unicode_ci DEFAULT NULL,
PRIMARY KEY(`id`)
) ENGINE=InnoDB DEFAULT CHARSET=utf8mb4 COLLATE=utf8mb4_unicode_ci;
this table creation DDL you need to execute in the MySQL database