Angular Spring Security
Here I will create Spring Boot Security Angular Login Logout Example which will show you how to integrate Spring Security with Angular to login to the application. I will redirect user to the login page if user is not already logged in. Similarly I will redirect user to the home page if user is already logged in. Because if user logged in then there is no point of showing the login page again when user click on the browser’s back button.
Spring Boot’s default security mechanism will ask for username and password when you try to access the REST GET API from browser. The default username is user and password is generated in the console of the Spring Boot application during start up.
I can also configure the password which is easy to remember in the application.properties or application.yml file. In this example I will configure both user name and password in the application.properties file.
In the frontend using Angular I will consume the REST API to authenticate the user and if the user is successfully authenticated then user will be able to consume other REST API, in other words I will show greeting message with random generated string on UI.
At the beginning when Angular application starts, the UI will render the login page. Once user successfully logged in then user will be redirected to the home page where he/she will see greeting message with a random string.
Prerequisites
Gradle 5.6, Maven 3.6.1/3.8.5, Java 8/12/19, Angular 8/16, Spring Boot 2.2.2/3.1.5
Server Application
First I will create server application using Java and Spring Boot.
Project Setup
You may create gradle or maven based project in Eclipse or any IDE or tool of your choice.
For spring boot 3.x.x use the following pom.xml file for your project:
<?xml version="1.0" encoding="UTF-8"?>

<project xmlns="http://maven.apache.org/POM/4.0.0"
	xmlns:xsi="http://www.w3.org/2001/XMLSchema-instance"
	xsi:schemaLocation="http://maven.apache.org/POM/4.0.0 http://maven.apache.org/xsd/maven-4.0.0.xsd">
	<modelVersion>4.0.0</modelVersion>

	<groupId>com.roytuts</groupId>
	<artifactId>springboot-angular-security</artifactId>
	<version>0.0.1-SNAPSHOT</version>

	<properties>
		<project.build.sourceEncoding>UTF-8</project.build.sourceEncoding>
		<maven.compiler.source>19</maven.compiler.source>
		<maven.compiler.target>19</maven.compiler.target>
	</properties>

	<parent>
		<groupId>org.springframework.boot</groupId>
		<artifactId>spring-boot-starter-parent</artifactId>
		<version>3.1.5</version>
	</parent>

	<dependencies>
		<dependency>
			<groupId>org.springframework.boot</groupId>
			<artifactId>spring-boot-starter-web</artifactId>
		</dependency>

		<dependency>
			<groupId>org.springframework.boot</groupId>
			<artifactId>spring-boot-starter-security</artifactId>
		</dependency>
	</dependencies>

	<build>
		<plugins>
			<plugin>
				<groupId>org.springframework.boot</groupId>
				<artifactId>spring-boot-maven-plugin</artifactId>
			</plugin>
		</plugins>
	</build>
</project>
For spring boot 2.x.x use the following either build.gradle or pom.xml file:
If you are creating gradle based project then you can use below build.gradle script. The name of the project is springboot-angular-security.
buildscript {
	ext {
		springBootVersion = '2.2.2.RELEASE'
	}

    repositories {
        mavenCentral()
    }

    dependencies {
        classpath("org.springframework.boot:spring-boot-gradle-plugin:${springBootVersion}")
    }
}

plugins {
    id 'java-library'
    id 'org.springframework.boot' version '2.2.2.RELEASE'
}

sourceCompatibility = 12
targetCompatibility = 12

repositories {
    mavenCentral()
}

dependencies {
    implementation("org.springframework.boot:spring-boot-starter-web:${springBootVersion}")
    implementation("org.springframework.boot:spring-boot-starter-security:${springBootVersion}")
}
If you are creating maven based project then you can use below pom.xml file:
<project xmlns="http://maven.apache.org/POM/4.0.0"
	xmlns:xsi="http://www.w3.org/2001/XMLSchema-instance"
	xsi:schemaLocation="http://maven.apache.org/POM/4.0.0 http://maven.apache.org/xsd/maven-4.0.0.xsd">
	<modelVersion>4.0.0</modelVersion>

	<groupId>com.roytuts</groupId>
	<artifactId>springboot-angular-security</artifactId>
	<version>0.0.1-SNAPSHOT</version>

	<parent>
		<groupId>org.springframework.boot</groupId>
		<artifactId>spring-boot-starter-parent</artifactId>
		<version>2.2.2.RELEASE</version>
	</parent>

	<properties>
		<project.build.sourceEncoding>UTF-8</project.build.sourceEncoding>
	</properties>

	<dependencies>
		<dependency>
			<groupId>org.springframework.boot</groupId>
			<artifactId>spring-boot-starter-web</artifactId>
		</dependency>

		<dependency>
			<groupId>org.springframework.boot</groupId>
			<artifactId>spring-boot-starter-security</artifactId>
		</dependency>
	</dependencies>

    <build>
        <plugins>
			<plugin>
				<groupId>org.apache.maven.plugins</groupId>
				<artifactId>maven-compiler-plugin</artifactId>
				<version>3.8.1</version>
				<configuration>
					<source>at least 8</source>
					<target>at least 8</target>
				</configuration>
			</plugin>
		</plugins>
	</build>
</project>
Security Configuration
I will configure security using Spring Security mechanism as shown below.
For spring boot 3.x.x use the following configuration class:
For spring boot 3 version you don’t need to extend any class or you don’t need to annotate the class with security related annotation. Also you need to create an instance of SecurityFilterChain for security configuration.
@Configuration
public class SpringSecurityConfig {

	@Bean
	public SecurityFilterChain securityFilterChain(HttpSecurity http) throws Exception {
		http.csrf(csrf -> csrf.disable());

		http.authorizeHttpRequests(
				auth -> auth.requestMatchers(HttpMethod.OPTIONS, "/**").permitAll().anyRequest().authenticated());

		http.httpBasic(Customizer.withDefaults());

		return http.build();
	}

}
For spring boot 2.x.x use the following configuration class:
@Configuration
@EnableWebSecurity
public class SpringSecurityConfig extends WebSecurityConfigurerAdapter {

	@Override
	protected void configure(HttpSecurity http) throws Exception {
		http.csrf().disable().authorizeRequests().antMatchers(HttpMethod.OPTIONS, "/**").permitAll().anyRequest()
				.authenticated().and().httpBasic();
	}

}
I override the configure() method, I disable csrf token, I apply the basic authentication.
Configure User Credentials
I configure username and password in the src/main/resources/application.properties file. The username is user and password is user.
spring.security.user.name=user
spring.security.user.password=user
REST Endpoints
I expose two REST endpoints – one is for authenticating user and another is for fetching greeting message.
I allow URL http://localhost:4200 to avoid any cross origin issues.
@RestController
@CrossOrigin(origins = "http://localhost:4200")
public class UiRestController {

	@GetMapping("/auth")
	public Principal user(Principal user) {
		return user;
	}

	@GetMapping("/resource")
	public Map<String, Object> home() {
		Map<String, Object> model = new HashMap<String, Object>();
		model.put("id", UUID.randomUUID().toString());
		model.put("content", "Hello World");
		return model;
	}

}
Main Class
A class with main method and @SpringBootAnnotation is enough to deploy the Spring Boot application into embedded Tomcat server.
@SpringBootApplication
public class SpringBootAngularSecurityApp {

	public static void main(String[] args) {
		SpringApplication.run(SpringBootAngularSecurityApp.class, args);
	}
}
That’s all about server application. After deploying the application by running the above main class you will be able to access the endpoint /resource by authenticating the user using user/user when asked for the credentials.
Now let’s move on to creating the client application.
Client Application
Make sure to create Angular project. The name of the project is spring-boot-angular-security.
Change Global Title
You can change the global title at page index.html under src directory.
<title>Spring Boot Angular Security</title>Authentication Service
The authentication service which provides some common functionalities such as authenticating user, whether user is logged in, the logged in user name etc.
You can create service file using command ng g s auth from the command line tool while you are on the project’s root directory. The file name will be generated as auth.service.ts under src/app directory.
For Angular 16
import { HttpClient } from '@angular/common/http';
import { Injectable } from '@angular/core';
import { map } from 'rxjs/operators';

@Injectable({
  providedIn: 'root'
})
export class AuthService {

    SESSION_KEY: string = 'auth_user'

	username: string = '';
	password: string = '';

	constructor(private http: HttpClient) {}

	authenticate(username: string, password: string) {
		return this.http.get(`http://localhost:8080/auth`, {
			headers: { authorization: this.createBasicAuthToken(username, password) }}).pipe(map((res) => {
				this.username = username;
				this.password = password;
				this.registerInSession(username, password);
		}));
	}

	createBasicAuthToken(username: string, password: string) {
		return 'Basic ' + window.btoa(username + ":" + password)
	}

	registerInSession(username: string, password: string) {
		sessionStorage.setItem(this.SESSION_KEY, username)
	}

	logout() {
		sessionStorage.removeItem(this.SESSION_KEY);
		this.username = '';
		this.password = '';
	}

	isUserLoggedin() {
		let user = sessionStorage.getItem(this.SESSION_KEY)
		if (user === null) return false
		return true
	}

	getLoggedinUser() {
		let user = sessionStorage.getItem(this.SESSION_KEY)
		if (user === null) return ''
		return user
	}

}
For Angular 8
import { HttpClient } from '@angular/common/http';
import { Injectable } from '@angular/core';
import { map } from 'rxjs/operators';

@Injectable({
  providedIn: 'root'
})
export class AuthService {

	SESSION_KEY = 'auth_user'

	username: String;
	password: String;

	constructor(private http: HttpClient) {}

	authenticate(username: String, password: String) {
		return this.http.get(`http://localhost:8080/auth`, {
			headers: { authorization: this.createBasicAuthToken(username, password) }}).pipe(map((res) => {
				this.username = username;
				this.password = password;
				this.registerInSession(username, password);
		}));
	}

	createBasicAuthToken(username: String, password: String) {
		return 'Basic ' + window.btoa(username + ":" + password)
	}

	registerInSession(username, password) {
		sessionStorage.setItem(this.SESSION_KEY, username)
	}

	logout() {
		sessionStorage.removeItem(this.SESSION_KEY);
		this.username = null;
		this.password = null;
	}

	isUserLoggedin() {
		let user = sessionStorage.getItem(this.SESSION_KEY)
		if (user === null) return false
		return true
	}

	getLoggedinUser() {
		let user = sessionStorage.getItem(this.SESSION_KEY)
		if (user === null) return ''
		return user
	}
}
HttpInterceptor
This acts as a filter for each request. It checks if authorization is present in the HTTP header and if present continue with the header else it will add authorization header in HTTP request.
The following code is written into file httpInterceptor.service.ts.
import { HttpInterceptor, HttpRequest, HttpHandler, HttpEvent, HttpHeaders } from '@angular/common/http';
import { Injectable } from '@angular/core';
import { Observable } from 'rxjs';
import { AuthService } from './auth.service';

@Injectable()
export class HttpInterceptorService implements HttpInterceptor {

    constructor(private authService: AuthService) { }

    intercept(req: HttpRequest<any>, next: HttpHandler): Observable<HttpEvent<any>> {
        if (this.authService.isUserLoggedin() && req.url.indexOf('basicauth') === -1) {
            const request = req.clone({
                headers: new HttpHeaders({
                    'Content-Type': 'application/json',
                    'Authorization': `Basic ${window.btoa(this.authService.username + ":" + this.authService.password)}`
                })
            });
            return next.handle(request);
        }

		return next.handle(req);
    }
}
Login Page
The login component is created using the command ng g c login from the command line tool while you are on the root directory of the project.
The required files will be created under login folder under src/app directory.
The following code is written into login.component.html file.
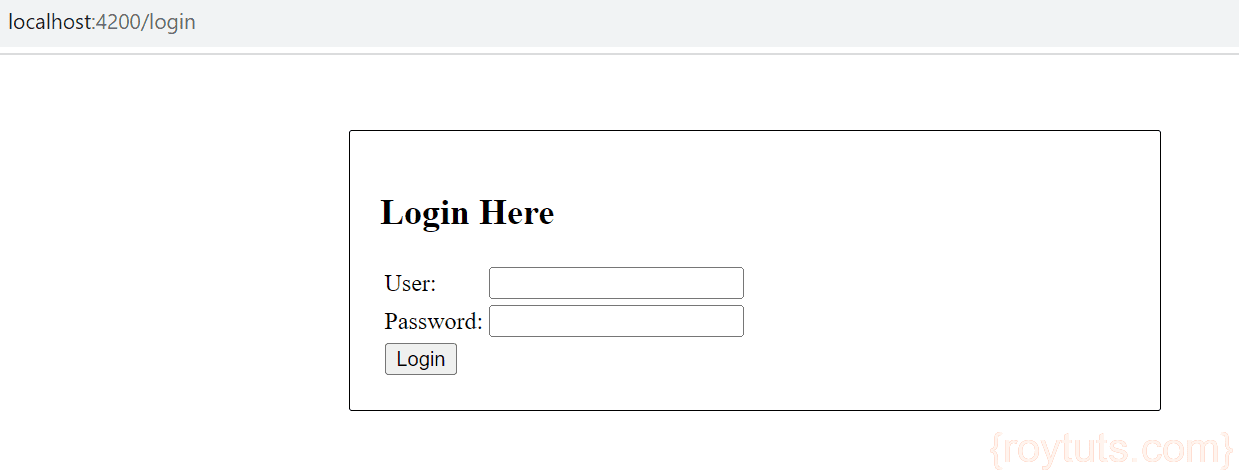
<div id="login-box">
	<h2>Login Here</h2>
	<div style="color : red" *ngIf='error'>{{error}}</div>
	<form name='loginForm' (submit)="doLogin()">
		<table>
			<tr>
				<td>User:</td>
				<td><input type='text' name='username' [(ngModel)]="username"></td>
			</tr>
			<tr>
				<td>Password:</td>
				<td><input type='password' name='password' [(ngModel)]="password"/></td>
			</tr>
			<tr>
				<td colspan='2'><input name="submit" type="submit"
					value="Login" /></td>
			</tr>
		</table>
	</form>
</div>
Style Login Form
I apply basic style to the login form to align it on center.
The following code is written into login.component.css file.
.error {
	padding: 15px;
	margin-bottom: 20px;
	border: 1px solid transparent;
	border-radius: 4px;
	color: #a94442;
	background-color: #f2dede;
	border-color: #ebccd1;
}
.msg {
	padding: 15px;
	margin-bottom: 20px;
	border: 1px solid transparent;
	border-radius: 4px;
	color: #31708f;
	background-color: #d9edf7;
	border-color: #bce8f1;
}
#login-box {
	width: 500px;
	padding: 20px;
	margin: 50px auto;
	background: #fff;
	-webkit-border-radius: 2px;
	-moz-border-radius: 2px;
	border: 1px solid #000;
}
Authenticate User
I need to authenticate user once user tries to login to the application by providing the credentials (user/user).
The following code is written into login.component.ts file.
If user is already logged in then I redirect user to the home page when user clicks on the back button of the browser.
I have basic validation if user credentials are not valid or if something went wrong on server side.
For Angular 16
import { Component, OnInit } from '@angular/core';
import { Router, ActivatedRoute } from '@angular/router';
import { AuthService } from '../auth.service';

@Component({
  selector: 'app-login',
  templateUrl: './login.component.html',
  styleUrls: ['./login.component.css']
})
export class LoginComponent implements OnInit {

	username: string = '';
	password : string = '';

	isLoggedin = false;

	error: string = '';

	constructor(private route: ActivatedRoute, private router: Router, private authService: AuthService) {}

	ngOnInit() {
		this.isLoggedin = this.authService.isUserLoggedin();

		if(this.isLoggedin) {
			this.router.navigateByUrl('home');
		}
	}

	doLogin() {
		if(this.username !== '' && this.username !== null && this.password !== '' && this.password !== null) {
			this.authService.authenticate(this.username, this.password).subscribe((result)=> {
				console.log(result);
				this.router.navigate(['/home']);
			}, () => {
				this.error = 'Either invalid credentials or something went wrong';
			});
		} else {
			this.error = 'Invalid Credentials';
		}
	}
}
For Angular 8
import { Component, OnInit } from '@angular/core';
import { Router, ActivatedRoute } from '@angular/router';
import { AuthService } from '../auth.service';

@Component({
  selector: 'app-login',
  templateUrl: './login.component.html',
  styleUrls: ['./login.component.css']
})
export class LoginComponent implements OnInit {

	username: string = '';
	password : string = '';

	isLoggedin = false;

	error: string;

	constructor(private route: ActivatedRoute, private router: Router, private authService: AuthService) {}

	ngOnInit() {
		this.isLoggedin = this.authService.isUserLoggedin();

		if(this.isLoggedin) {
			this.router.navigateByUrl('home');
		}
	}

	doLogin() {
		if(this.username !== '' && this.username !== null && this.password !== '' && this.password !== null) {
			this.authService.authenticate(this.username, this.password).subscribe((result)=> {
				console.log(result);
				this.router.navigate(['/home']);
			}, () => {
				this.error = 'Either invalid credentials or something went wrong';
			});
		} else {
			this.error = 'Invalid Credentials';
		}
	}
}
Home Page
The home component is created using the command ng g c home from the command line tool in the same way I created login component above.
The below code is written into home.component.html file.
In the below source I have two div and rendered according to whether user is logged in or not.
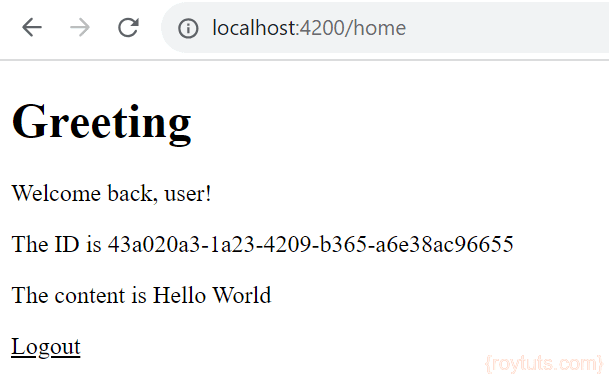
<h1>Greeting</h1>
<div [hidden]="!isLoggedin">
	<p>Welcome back, {{ loggedinUser }}!</p>
	<p>The ID is {{greeting.id}}</p>
	<p>The content is {{greeting.content}}</p>

	<p><a style="text-decoration: underline; cursor: pointer;" (click)=doLogout()>Logout</a></p>
</div>
<div [hidden]="isLoggedin">
	<p>Login to see your greeting</p>
</div>
Greeting Message
I call the REST API if user is logged in to show the greeting message on the home page. If user is not logged in then I redirect to the login page when user clicks on the back button of the browser.
The below code is written into home.component.ts file.
For Angular 16
import { Component, OnInit } from '@angular/core';
import { HttpClient } from '@angular/common/http';

import { AuthService } from '../auth.service';
import { ActivatedRoute, Router } from '@angular/router';

@Component({
  selector: 'app-home',
  templateUrl: './home.component.html',
  styleUrls: ['./home.component.css']
})
export class HomeComponent implements OnInit {

	isLoggedin = false;

	loggedinUser: string = '';

	greeting: any = {};

	constructor(private route: ActivatedRoute, private router: Router, private http: HttpClient, private authService: AuthService) {}

	ngOnInit() {
		this.isLoggedin = this.authService.isUserLoggedin();
		this.loggedinUser = this.authService.getLoggedinUser();

		if(!this.isLoggedin) {
			this.router.navigateByUrl('login');
		}

		this.http.get('http://localhost:8080/resource').subscribe(data => this.greeting = data);
	}

	doLogout() {
		this.authService.logout();
		this.router.navigateByUrl('login');
	}

}
For Angular 8
import { Component, OnInit } from '@angular/core';
import { HttpClient } from '@angular/common/http';

import { AuthService } from '../auth.service';
import { ActivatedRoute, Router } from '@angular/router';

@Component({
  selector: 'app-home',
  templateUrl: './home.component.html',
  styleUrls: ['./home.component.css']
})
export class HomeComponent implements OnInit {

	isLoggedin = false;

	loggedinUser: string = '';

	greeting = {};

	constructor(private route: ActivatedRoute, private router: Router, private http: HttpClient, private authService: AuthService) {}

	ngOnInit() {
		this.isLoggedin = this.authService.isUserLoggedin();
		this.loggedinUser = this.authService.getLoggedinUser();

		if(!this.isLoggedin) {
			this.router.navigateByUrl('login');
		}

		this.http.get('http://localhost:8080/resource').subscribe(data => this.greeting = data);
	}

	doLogout() {
		this.authService.logout();
		this.router.navigateByUrl('login');
	}

}
App Component
The app component is created during new Angular project creation and the page is displayed with the content which is written in this page.
Here I don’t want to display anything but according to our routing configurations put into routing component which I will see later.
<router-outlet></router-outlet>App Routing Module
I put all components and modules in the app.module.ts file under src/app directory. This is the file where I need to declare all modules or components used in the whole application.
import { BrowserModule } from '@angular/platform-browser';
import { NgModule } from '@angular/core';

import { AppRoutingModule } from './app-routing.module';
import { AppComponent } from './app.component';
import { LoginComponent } from './login/login.component';

import { FormsModule } from '@angular/forms';
import { HttpInterceptorService } from './httpInterceptor.service';
import { HttpClientModule, HTTP_INTERCEPTORS } from '@angular/common/http';
import { HomeComponent } from './home/home.component';

@NgModule({
  declarations: [
    AppComponent,
    LoginComponent,
    HomeComponent
  ],
  imports: [
    BrowserModule,
    AppRoutingModule,
    HttpClientModule,
    FormsModule
  ],
  providers: [
    {
      provide: HTTP_INTERCEPTORS,
      useClass: HttpInterceptorService,
      multi: true
    }
  ],
  bootstrap: [AppComponent]
})

export class AppModule { }
Route Configurations
As I said earlier that I want to display the page on UI according to the routing configurations which are kept in the file app-routing.module.ts under src/app directory.
By default it will redirect to the home page and home page will be displayed if user is logged in otherwise login page will be displayed.
import { NgModule } from '@angular/core';
import { Routes, RouterModule } from '@angular/router';
import { HomeComponent } from './home/home.component';
import { LoginComponent } from './login/login.component';

const routes: Routes = [
  {path: '', redirectTo: 'home', pathMatch: 'full'},
  {path: 'home', component: HomeComponent},
  {path: 'login', component: LoginComponent}
];

@NgModule({
  imports: [RouterModule.forRoot(routes)],
  exports: [RouterModule]
})

export class AppRoutingModule { }
Testing the Angular Spring Security Application
Now it’s time to test our hard written application code. Make sure your Spring Boot Security application is running on Tomcat server at port 8080.
Then run your Angular application on port 4200 by executing command ng serve --open from the command line while you are on the project’s root directory.
Hit URL http://locahost:4200 in the browser or this URL will be opened automatically on the default browser on your system. The below page is displayed:
Login to the application using credentials user/user and you will see below greeting message with random generated string.
You will also see logout link to logout from the application.
That’s all. Hope you got an idea how to authenticate user using Angular and Spring Boot security.
Hello, how will i do a custom authentication for the part of the login process? BTW your how-to document is the easiest so far to be understood. Thanks!