Introduction
In this post you will see an example about Angular Spring Boot Security JWT (JSON Web Token) Authentication and role based Authorization for REST APIs or RESTful services. I won’t explain here about JWT as there is already very good article on JWT. I will implement Spring Security’s UserDetailsService to load user from database.
I will use Spring Data JPA API to perform database operations for fetching or saving user and roles into database. I will use MySQL database to store the user information. If you want to use JDBC template to perform database operations then you can check my another tutorial about Spring Boot Security JWT Authentication and Authorization.

Authentication and Authorization Flow
Here I will tell you how authentication and authorization flow work in this application that I am going to show you how to implement it with Angular Spring Boot and JWT APIs in the following sections.
- User signup at endpoint /signup with username, password and role(s).
- The user information is stored into database.
- User receives JWT (JSON Web Token) on successful signin using the same username/password at step 1.
- User continues to access the endpoints for which user has role(s) as long as the token is valid. User must send JWT in HTTP header with key/value as Authorization/Bearer <generated JWT on signin>.
Note: The JWT is valid for 3 minutes, so token gets expired automatically after 3 minutes. Therefore, it’s not mandatory to verify the token expiration but optionally you can check for expiration as you will see in this example.
Prerequisites
Java 11 – 16, Maven 3.8.2, Spring Boot 2.5.6, MySQL 8.0.26, Angular 13.0.1, Node 16.12.0/16.13.0, Npm 8.1.0/8.1.3
Backend – Spring Boot Application
Project Setup
Create a maven based project in your favorite IDE or tool. The name of the project is spring-boot-security-jwt-auth-api. You can use the following pom.xml file for your project. The pom.xml file contains the required dependencies for the Spring Boot application.
<?xml version="1.0" encoding="UTF-8"?>

<project xmlns="http://maven.apache.org/POM/4.0.0"
	xmlns:xsi="http://www.w3.org/2001/XMLSchema-instance"
	xsi:schemaLocation="http://maven.apache.org/POM/4.0.0 http://maven.apache.org/xsd/maven-4.0.0.xsd">
	<modelVersion>4.0.0</modelVersion>

	<groupId>com.roytuts</groupId>
	<artifactId>spring-boot-security-jwt-auth-api</artifactId>
	<version>0.0.1-SNAPSHOT</version>

	<properties>
		<project.build.sourceEncoding>UTF-8</project.build.sourceEncoding>
		<maven.compiler.source>16</maven.compiler.source>
		<maven.compiler.target>16</maven.compiler.target>
	</properties>

	<parent>
		<groupId>org.springframework.boot</groupId>
		<artifactId>spring-boot-starter-parent</artifactId>
		<version>2.5.6</version>
	</parent>

	<dependencies>
		<dependency>
			<groupId>org.springframework.boot</groupId>
			<artifactId>spring-boot-starter-web</artifactId>
		</dependency>
		<dependency>
			<groupId>org.springframework.boot</groupId>
			<artifactId>spring-boot-starter-security</artifactId>
		</dependency>
		<dependency>
			<groupId>org.springframework.boot</groupId>
			<artifactId>spring-boot-starter-data-jpa</artifactId>
		</dependency>
		<dependency>
			<groupId>mysql</groupId>
			<artifactId>mysql-connector-java</artifactId>
		</dependency>
		<!--required only if jdk 9 or higher version is used -->
		<dependency>
			<groupId>javax.xml.bind</groupId>
			<artifactId>jaxb-api</artifactId>
			<scope>runtime</scope>
		</dependency>
		<dependency>
			<groupId>io.jsonwebtoken</groupId>
			<artifactId>jjwt</artifactId>
			<version>0.9.1</version>
		</dependency>
	</dependencies>

	<build>
		<plugins>
			<plugin>
				<groupId>org.springframework.boot</groupId>
				<artifactId>spring-boot-maven-plugin</artifactId>
			</plugin>
		</plugins>
	</build>
</project>
MySQL Table
The following tables are created under the roytuts database. You may also skip table creation manually in the MySQL database server and you can create tables using Java entity class.
DROP TABLE IF EXISTS `user_role`;
DROP TABLE IF EXISTS `user`;

CREATE TABLE `user` (
  `id` int unsigned NOT NULL AUTO_INCREMENT,
  `user_name` varchar(30) NOT NULL,
  `user_pass` varchar(255) NOT NULL,
  PRIMARY KEY (`id`)
);

CREATE TABLE `user_role` (
  `id` int unsigned NOT NULL AUTO_INCREMENT,
  `role` varchar(15) NOT NULL,
  `user_id` int unsigned NOT NULL,
  PRIMARY KEY (`id`),
  FOREIGN KEY (`user_id`) REFERENCES `user` (`id`)
);
application.properties
The application.properties file is kept under src/main/resources with the following content:
#Spring Datasource
spring.datasource.driverClassName=com.mysql.cj.jdbc.Driver
spring.datasource.url=jdbc:mysql://localhost:3306/roytuts
spring.datasource.username=root
spring.datasource.password=root

#secret key - should be encrypted
jwt.secret=secretkey
#3 minutes validity
jwt.token.validity=180000

#ignore null fields in json
spring.jackson.default-property-inclusion=NON_NULL

#SQL related
spring.jpa.show-sql = true
spring.jpa.properties.hibernate.format_sql=true
logging.level.org.hibernate.type.descriptor.sql=trace

spring.jpa.hibernate.ddl-auto = none
The above class path properties file contains the datasource configurations. I have also specified the validity for JWT and secret for JWT. The secret for the JWT should ideally be kept in more secured plavce like a vault.
I am including only non-null fields in JSON response from REST APIs.
I have set the following properties so that Hibernate does not create user and user_role tables because I already have created the table in MySQL server. If you want that your entity class should create table in database then change the value from none to create.
spring.jpa.hibernate.ddl-auto=noneI am logging SQL statement and formatting them for better reading in the console using the following key/value pairs:
spring.jpa.show-sql=true
spring.jpa.properties.hibernate.format_sql=true
logging.level.org.hibernate.type.descriptor.sql=trace
Entity Class – User
The User entity class stores user information. A user may have one or more roles, so I have used an annotation @OneToMany to map roles to a user.
package com.roytuts.spring.boot.security.jwt.auth.api.entity;

import java.util.HashSet;
import java.util.Set;

import javax.persistence.CascadeType;
import javax.persistence.Column;
import javax.persistence.Entity;
import javax.persistence.GeneratedValue;
import javax.persistence.GenerationType;
import javax.persistence.Id;
import javax.persistence.OneToMany;
import javax.persistence.Table;

@Table
@Entity
public class User {

	@Id
	@GeneratedValue(strategy = GenerationType.IDENTITY)
	private int id;

	@Column
	private String userName;

	@Column
	private String userPass;

	@OneToMany(mappedBy = "user", cascade = CascadeType.ALL)
	private Set<UserRole> userRoles = new HashSet<>();

	public int getId() {
		return id;
	}

	public void setId(int id) {
		this.id = id;
	}

	public String getUserName() {
		return userName;
	}

	public void setUserName(String userName) {
		this.userName = userName;
	}

	public String getUserPass() {
		return userPass;
	}

	public void setUserPass(String userPass) {
		this.userPass = userPass;
	}

	public Set<UserRole> getUserRoles() {
		return userRoles;
	}

	public void setUserRoles(Set<UserRole> userRoles) {
		this.userRoles = userRoles;

		for (UserRole r : userRoles) {
			r.setUser(this);
		}
	}

}
Entity Class – UserRole
The UserRole entity class maps roles to a user. This class uses @ManyToOne annotation to map the user. The User and UserRole class uses bidirectional OneToMany and ManyToOne relationship.
@Table
@Entity
public class UserRole {

	@Id
	@GeneratedValue(strategy = GenerationType.IDENTITY)
	private int id;

	@Column
	private String role;

	@JoinColumn(name = "user_id")
	@ManyToOne(fetch = FetchType.LAZY, optional = false)
	private User user;

	public int getId() {
		return id;
	}

	public void setId(int id) {
		this.id = id;
	}

	public String getRole() {
		return role;
	}

	public void setRole(String role) {
		this.role = role;
	}

	public User getUser() {
		return user;
	}

	public void setUser(User user) {
		this.user = user;
	}

}
Repository Interface
The repository interface is used to fetch or save data from/to database. Spring Data JPA provides repository interface with built-in methods for performing basic CRUD operations.
public interface UserRepository extends JpaRepository<User, Integer> {

	Optional<User> findByUserName(String userName);

}
I have used Optional to indicate that a user may or may not exist in the database.
VO Class – Request
It is always good idea to create request/response objects separately instead of using entity or model classes for non-repository or non-DAO classes. You can read more about best practices in Spring applications.
The following class is used to signup or requesting the JWT token by the end users.
public class Request {

	private String userName;
	private String userPwd;
	private List<String> roles;

        //getters and setters
}
VO Class – Response
The following class is sued to send as a response from the REST APIs.
public class Response {

	private String token;
	private List<String> roles;

        //getters and setters
}
Service Class
I will implement Spring Security’s UserDetailsService to load user by username using loadUserByUsername() method.
This service class is required to authenticate and role-based authorization.
I have also added additional method saveUser() to save new user’s information when a user signs up.
The @Transactional annoyation is required to create a transaction that propagates into the repository layer and keeps the persistence context until the method finishes its operations. Otherwise your application will throw the following exception:
falied to initialize a collection of role hibernateThis problem is arised because by default the collection in Hibernate is loaded lazily and the code is accessing a lazy JPA relation when the connection to the database has been closed.
You can also use the association Fetch type from LAZY to EAGER but this is not a good practice because it will degrade the performance of your application.
@Service
public class UserAuthService implements UserDetailsService {

	@Autowired
	private PasswordEncoder passwordEncoder;

	@Autowired
	private UserRepository userRepository;

	@Override
	@Transactional
	public UserDetails loadUserByUsername(String username) throws UsernameNotFoundException {
		User user = userRepository.findByUserName(username).get();

		List<UserRole> userRoles = user.getUserRoles().stream().collect(Collectors.toList());

		List<GrantedAuthority> grantedAuthorities = userRoles.stream().map(r -> {
			return new SimpleGrantedAuthority(r.getRole());
		}).collect(Collectors.toList());

		return new org.springframework.security.core.userdetails.User(username, user.getUserPass(), grantedAuthorities);
	}

	public void saveUser(Request request) {
		if (userRepository.findByUserName(request.getUserName()).isPresent()) {
			throw new RuntimeException("User already exists");
		}

		User user = new User();
		user.setUserName(request.getUserName());
		user.setUserPass(passwordEncoder.encode(request.getUserPwd()));

		user.setUserRoles(request.getRoles().stream().map(r -> {
			UserRole ur = new UserRole();
			ur.setRole(r);
			return ur;
		}).collect(Collectors.toSet()));

		userRepository.save(user);
	}

}
Custom Exception Class
The following custom exception classes are used to throw during JWT expires or invalid JWT or invalid credentials.
public class DisabledUserException extends RuntimeException {

	private static final long serialVersionUID = 1L;

	public DisabledUserException(String msg) {
		super(msg);
	}

}
public class InvalidUserCredentialsException extends RuntimeException {
private static final long serialVersionUID = 1L;
public InvalidUserCredentialsException(String msg) {
super(msg);
}
}public class JwtTokenMalformedException extends AuthenticationException {
private static final long serialVersionUID = 1L;
public JwtTokenMalformedException(String msg) {
super(msg);
}
}public class JwtTokenMissingException extends AuthenticationException {
private static final long serialVersionUID = 1L;
public JwtTokenMissingException(String msg) {
super(msg);
}
}JWT (JSON Web Token) – Token Generation and Validation
Now I will show you how to generate token using generateToken() method. This method takes Authentication object and generates token based on authenticated user’s principal.
I will also show you how to get the username information back from JWT using getUserName() method. This method takes generated JWT as a parameter.
I will create an optional method validateToken() to validate token. This method takes generated JWT as a parameter and throws appropriate exception based on issues in token.
Why validateToken() is optional?
If you do not check the token expiry then also application will throw exception because it is automatically taken care by JWT API.
@Component
public class JwtUtil {

	@Value("${jwt.secret}")
	private String jwtSecret;

	@Value("${jwt.token.validity}")
	private long tokenValidity;

	public String getUserName(final String token) {
		try {
			Claims body = Jwts.parser().setSigningKey(jwtSecret).parseClaimsJws(token).getBody();

			return body.getSubject();
		} catch (Exception e) {
			System.out.println(e.getMessage() + " => " + e);
		}

		return null;
	}

	public String generateToken(Authentication authentication) {
		User user = (User) authentication.getPrincipal();
		Claims claims = Jwts.claims().setSubject(user.getUserName());

		final long nowMillis = System.currentTimeMillis();
		final long expMillis = nowMillis + tokenValidity;

		Date exp = new Date(expMillis);

		return Jwts.builder().setClaims(claims).setIssuedAt(new Date(nowMillis)).setExpiration(exp)
				.signWith(SignatureAlgorithm.HS512, jwtSecret).compact();
	}

	public void validateToken(final String token) {
		try {
			Jwts.parser().setSigningKey(jwtSecret).parseClaimsJws(token);
		} catch (SignatureException ex) {
			throw new JwtTokenMalformedException("Invalid JWT signature");
		} catch (MalformedJwtException ex) {
			throw new JwtTokenMalformedException("Invalid JWT token");
		} catch (ExpiredJwtException ex) {
			throw new JwtTokenMalformedException("Expired JWT token");
		} catch (UnsupportedJwtException ex) {
			throw new JwtTokenMalformedException("Unsupported JWT token");
		} catch (IllegalArgumentException ex) {
			throw new JwtTokenMissingException("JWT claims string is empty.");
		}
	}

}
Authentication Entry Point
Instead of triggering the authentication process by redirecting to a login page when a client requests a secured resource, the REST server authenticates all requests using the data available in the request itself, the JWT token in this case. If such an authentication fails, redirection makes no sense. The REST API simply sends an HTTP code 401 Unauthorized response and clients should know what to do.
This class just returns HTTP code 401 Unauthorized when authentication fails, overriding default Spring’s redirecting.
@Component
public class ApiAuthenticationEntryPoint implements AuthenticationEntryPoint {

	@Override
	public void commence(HttpServletRequest request, HttpServletResponse response,
			AuthenticationException authException) throws IOException, ServletException {
		response.sendError(HttpServletResponse.SC_UNAUTHORIZED, "Unauthorized");
	}

}
OncePerRequestFilter
This is Filter base class that aims to guarantee a single execution per request dispatch, on any servlet container. As of Servlet 3.0, a filter may be invoked as part of a REQUEST or ASYNC dispatches that occur in separate threads. You may read more on OncePerRequestFilter.
A common use case is in Spring Security, where authentication and access control functionality is typically implemented as a filter that sits in front of the main application Servlet. When a request is dispatched using a request dispatcher, it has to go through the filter chain again (or possibly a different one) before it gets to the Servlet that is going to deal with it. The problem is that some of the security filter actions should only be performed once for a request. Hence the need for OncePerRequestFilter.
You must override the method doFilterInternal() method in order to extend the functionalities of this filter.
I have checked for Authorization with HTTP_TOKEN token (JWT) in the HTTP header and if JWT presents then I have extracted it for further operations.
I have optionally validated the token before extracting user information from this token.
Further I have loaded user details from database and set authentication into SecurityContext.
@Component
public class JwtAuthenticationFilter extends OncePerRequestFilter {

	@Autowired
	private JwtUtil jwtUtil;

	@Autowired
	private UserAuthService userAuthService;

	@Override
	protected void doFilterInternal(HttpServletRequest request, HttpServletResponse response, FilterChain filterChain)
			throws ServletException, IOException {
		String header = request.getHeader("Authorization");

		if (header == null || !header.startsWith("HTTP_TOKEN")) {
			throw new JwtTokenMissingException("No JWT token found in the request headers");
		}

		String token = header.substring("HTTP_TOKEN".length() + 1);

		// Optional - verification
		jwtUtil.validateToken(token);

		String userName = jwtUtil.getUserName(token);

		UserDetails userDetails = userAuthService.loadUserByUsername(userName);

		UsernamePasswordAuthenticationToken usernamePasswordAuthenticationToken = new UsernamePasswordAuthenticationToken(
				userDetails, null, userDetails.getAuthorities());

		usernamePasswordAuthenticationToken.setDetails(new WebAuthenticationDetailsSource().buildDetails(request));

		if (SecurityContextHolder.getContext().getAuthentication() == null) {
			SecurityContextHolder.getContext().setAuthentication(usernamePasswordAuthenticationToken);
		}

		filterChain.doFilter(request, response);
	}

}
I have overridden three main methods – configure(WebSecurity web), configure(AuthenticationManagerBuilder auth) and configure(HttpSecurity http).
configure(HttpSecurity http)
I have disabled csrf because it’s not a form based authentication. I have disabled security for endpoints – /signin and /signup. Because these end-points should be accessed without any security or authentication.
All other end-points must go through authentication process and I have configured authenticationEntryPoint().
I do not store anything in the session so I have set the stateless session.
For authentication verification I have configured authentication filter using addFilterBefore().
configure(AuthenticationManagerBuilder auth)
This is required to configure database authentication and role based authorization using Spring JDBC on UserDetailsService.
configure(WebSecurity web)
I had already excluded the /signin and /signup endpoints in the configure(HttpSecurity http) but it still requires in WebSecurity.
RegistrationBean
Spring Boot automatically creates beans for the application on the fly. As a result JwtAuthenticationFilter class was being automatically put into the filter chain by Spring Boot, and also being included in the Security filter chain when it was declared it in Spring Security config.
Although /signin and /signup endpoints were excluded in Spring Security config, that wasn’t enough to stop the filter from happening in the context of Spring Boot itself.
The solution was to configure a bean that explicitly prevents it from being added by Spring Boot.
@Configuration
@EnableWebSecurity
@EnableGlobalMethodSecurity(prePostEnabled = true)
public class ApiSecurityConfig extends WebSecurityConfigurerAdapter {

	@Autowired
	private UserAuthService userAuthService;

	@Autowired
	private JwtAuthenticationFilter jwtAuthenticationFilter;

	@Autowired
	private ApiAuthenticationEntryPoint authenticationEntryPoint;

	@Override
	public void configure(WebSecurity web) throws Exception {
		web.ignoring().antMatchers("/signin", "/signup");
	}

	@Autowired
	public void configure(AuthenticationManagerBuilder auth) throws Exception {
		auth.userDetailsService(userAuthService).passwordEncoder(passwordEncoder());
	}

	@Override
	protected void configure(HttpSecurity http) throws Exception {
		http.cors().and().csrf().disable().authorizeRequests().antMatchers("/signin", "/signup").permitAll()
				.anyRequest().authenticated().and().exceptionHandling()
				.authenticationEntryPoint(authenticationEntryPoint).and().sessionManagement()
				.sessionCreationPolicy(SessionCreationPolicy.STATELESS);

		http.addFilterBefore(jwtAuthenticationFilter, UsernamePasswordAuthenticationFilter.class);
	}

	@Bean
	public RegistrationBean jwtAuthFilterRegister(JwtAuthenticationFilter filter) {
		FilterRegistrationBean<JwtAuthenticationFilter> registrationBean = new FilterRegistrationBean<>(filter);
		registrationBean.setEnabled(false);
		return registrationBean;
	}

	@Bean
	@Override
	public AuthenticationManager authenticationManagerBean() throws Exception {
		return super.authenticationManagerBean();
	}

	@Bean
	public PasswordEncoder passwordEncoder() {
		return new BCryptPasswordEncoder();
	}

}
REST Endpoints – Singin and Signup
This REST controller class exposes two end-points – /signup that a user will use to register himself/herself and /signin that a user will login using same credentials used during signup to get the JWT.
If user already exists in the database, then I will throw an exception message that a user already exists.
@RestController
@CrossOrigin(value = "http://localhost:4200")
public class JwtRestApi {

	@Autowired
	private JwtUtil jwtUtil;

	@Autowired
	private UserAuthService userAuthService;

	@Autowired
	private AuthenticationManager authenticationManager;

	@PostMapping("/signin")
	public ResponseEntity<Response> generateJwtToken(@RequestBody Request request) {
		Authentication authentication = null;
		try {
			authentication = authenticationManager
					.authenticate(new UsernamePasswordAuthenticationToken(request.getUserName(), request.getUserPwd()));
		} catch (DisabledException e) {
			throw new DisabledUserException("User Inactive");
		} catch (BadCredentialsException e) {
			throw new InvalidUserCredentialsException("Invalid Credentials");
		}

		User user = (User) authentication.getPrincipal();
		Set<String> roles = user.getAuthorities().stream().map(r -> r.getAuthority()).collect(Collectors.toSet());

		String token = jwtUtil.generateToken(authentication);

		Response response = new Response();
		response.setToken(token);
		response.setRoles(roles.stream().collect(Collectors.toList()));

		return new ResponseEntity<Response>(response, HttpStatus.OK);
	}

	@PostMapping("/signup")
	public ResponseEntity<String> signup(@RequestBody Request request) {
		userAuthService.saveUser(request);

		return new ResponseEntity<String>("User successfully registered", HttpStatus.OK);
	}

}
In the class level annotation, I have used @CrossOrigin to allow http://localhost:4200 so that the Angular application will be able to access the Spring Boot REST endpoint. If you do not allow then you will face CORS and pre-flight issue.
REST Endpoints – Accessible based on Roles
This REST controller class exposes few endpoints based on user roles and if user has the appropriate role, then user will be able to access the corresponding endpoint.
Notice that in the following REST controller class I have also allowed the Angular application URL (http://localhost:4200).
I have also used allowCredentilas = “true” to allow the Authorization headers to be read by Spring Boot application. If you do not allow credentials, then your Spring Boot application will receive null value for authorization headers and you will get exception “No JWT token found in the header”.
@RestController
@CrossOrigin(value = "http://localhost:4200", allowCredentials = "true")
public class GreetingRestApi {

	@PreAuthorize("hasRole('USER')")
	@GetMapping("/greet/user")
	public ResponseEntity<String> greetingUser() {
		return new ResponseEntity<String>("Welcome, you have USER role", HttpStatus.OK);
	}

	@PreAuthorize("hasRole('ADMIN')")
	@GetMapping("/greet/admin")
	public ResponseEntity<String> greetingAdmin() {
		return new ResponseEntity<String>("Welcome, you have ADMIN role", HttpStatus.OK);
	}

	@PreAuthorize("hasRole('USER') or hasRole('ADMIN')")
	@GetMapping("/greet/userOrAdmin")
	public ResponseEntity<String> greetingUserOrAdmin() {
		return new ResponseEntity<String>("Welcome, you have USER and ADMIN role", HttpStatus.OK);
	}

	@PreAuthorize("hasRole('ANONYMOUS')")
	@GetMapping("/greet/anonymous")
	public ResponseEntity<String> greetingAnonymous() {
		return new ResponseEntity<String>("Welcome, you have ANONYMOUS role", HttpStatus.OK);
	}

}
Spring Boot Main Class
A class is having a main method with annotation @SpringBootApplication is enough to deploy the application into embedded Tomcat server.
@SpringBootApplication
public class SpringSecurityJwtApiApp {

	public static void main(String[] args) {
		SpringApplication.run(SpringSecurityJwtApiApp.class, args);
	}

}
Testing Spring Boot Security JWT Authentication/Authorization
Make sure you deploy your Spring Boot application by executing the main class. I am using Postman tool to test the application for JWT authentication.
First a user will signup by providing details to the REST API:

Once user successfully got signed up, user needs to sign in to get the JWT token:
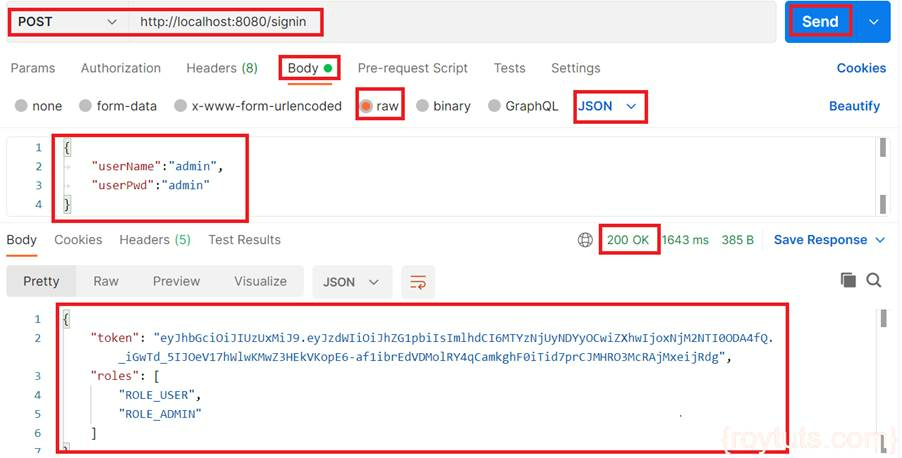
The generated token should be passed to the HTTP Header of the REST API which a user requests to get response:
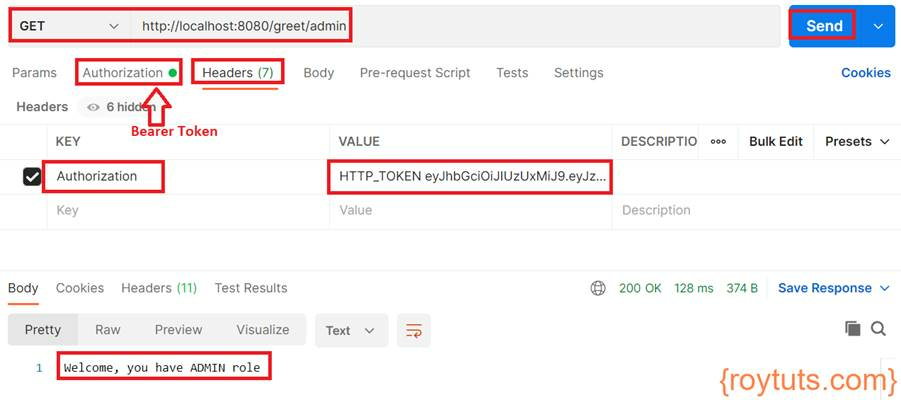
In the above image I am calling /greet/admin endpoint by passing the token into the key Authorization and value as HTTP_TOKEN <token value>. Also make sure you select Bearer Token under Authorization tab.
The expected response is highlighted “Welcome, you have ADMIN role”.
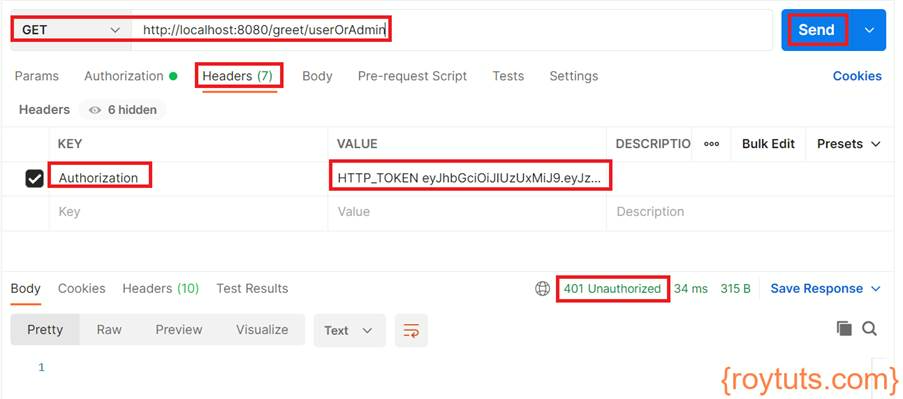
Similarly, you can test for other endpoints. If your role is not assigned to an endpoint, then you will get 403 Forbidden error. For example, the admin user does not have role ANONYMOUS but trying to access endpoint /greet/anonymous:

The JWT token is valid for 3 minutes, so if token gets expired then you will get 401 Unauthorized error.
The exception you will get in the log as given below:
com.roytuts.spring.boot.security.jwt.auth.api.exception.JwtTokenMalformedException: Expired JWT token

              at com.roytuts.spring.boot.security.jwt.auth.api.util.JwtUtil.validateToken(JwtUtil.java:63)
Frontend – Angular Application
Project Setup
Create a new Angular project using the command ng new angular-spring-boot-jwt-auth. The name of the project is angular-spring-boot-jwt-auth.
Create Components
Having separate components for each operation will give you more control over managing the source code and project structure. The respective directories and files will be created accordingly under src/app folder.
I am creating two components – one for signin and another for signup. To create a component, you need to execute command ng g c <component name> in CLI on project’s root directory.
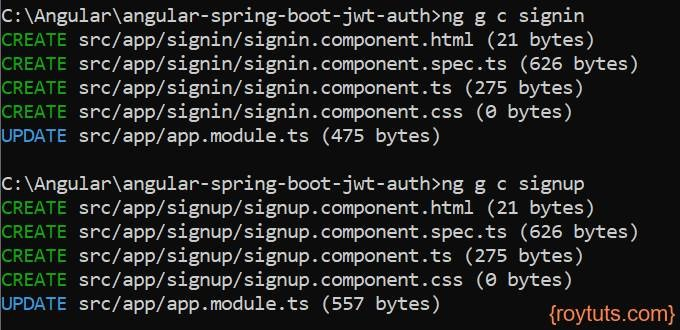
I am also creating a separate component for user dashboard or home which will be shown upon user’s successful login.
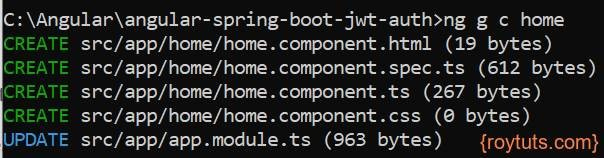
If you open src/app/app.module.ts file, you will see entries for all new modules are also added to this file.
Change Title
You can change the global title at page index.html under src directory.
<title>Angular Spring Boot Security JWT Authentication</title>Model
I have created a model interface in the file request.model.ts under folder src/app with the following code.
export interface Request {
	userName: string;
	userPwd: string;
	roles?: string[];
}
This model class will usually be used as a request object in the body of the http post request.
Authentication Service
The authentication service which provides some common functionalities such as authenticating user, whether user is logged in, the logged in username etc.
You can create service file using command ng g s auth from the command line tool by navigating to the root directory of the Angular project while you are on the project’s root directory. The file name will be generated as auth.service.ts under src/app directory.

The following code is written into the file src/app/auth.service.ts.
import { Injectable } from '@angular/core';
import { HttpClient, HttpHeaders } from '@angular/common/http';
import { Observable } from 'rxjs';
import { map } from 'rxjs/operators';
import { Request } from './request.model';
import { ActivatedRoute, Router } from '@angular/router';

@Injectable({
	providedIn: 'root'
})
export class AuthService {

	private baseUrl = 'http://localhost:8080/';

	constructor(private route: ActivatedRoute, private router: Router, private http: HttpClient) { }

	signin(request: Request): Observable<any> {
		return this.http.post<any>(this.baseUrl + 'signin', request, {headers: new HttpHeaders({ 'Content-Type': 'application/json' })}).pipe(map((resp) => {
			sessionStorage.setItem('user', request.userName);
			sessionStorage.setItem('token', 'HTTP_TOKEN ' + resp.token);
			return resp;
		}));
	}

	signup(request: Request): Observable<any> {
		return this.http.post<any>(this.baseUrl + 'signup', request, {headers: new HttpHeaders({ 'Content-Type': 'application/json' }), responseType: 'text' as 'json'}).pipe(map((resp) => {
			return resp;
		}));
	}

	signout() {
		sessionStorage.removeItem('user');
		sessionStorage.removeItem('token');

		this.router.navigateByUrl('signin');
	}

	isUserSignedin() {
		return sessionStorage.getItem('token') !== null;
	}

	getSignedinUser() {
		return sessionStorage.getItem('user') as string;
	}

	getToken() {
		let token = sessionStorage.getItem('token') as string;
		return token;
	}

}
The base URL is the backend REST API’s base URL.
In the signin() function, once a user successfully logged in, I am putting user’s information and token in the sessionStorage.
The singup() function is used to register a new user with the role(s).
The signout() function removes the data, which were previously stored in sessionStorage, from sessionStorage.
Greeting Service
This service class fetches data from backend REST APIs for logged in or signed in users. You could also write the same code in the above authentication service class.

The following code is written into the file src/app/greeting.service.ts file.
import { Injectable } from '@angular/core';
import { HttpClient } from '@angular/common/http';
import { Observable } from 'rxjs';
import { map } from 'rxjs/operators';

@Injectable({
providedIn: 'root'
})
export class GreetingService {

	private baseUrl = 'http://localhost:8080/greet';

	constructor(private http: HttpClient) { }

	getByUserRole(): Observable<string>{
		//const url = `${this.baseUrl}/user`;
		//return this.http.get<string>(url, {responseType: 'text' as 'json'})
		return this.http.get<string>(this.baseUrl + '/user', {responseType: 'text' as 'json'}).pipe(map((resp) => {
			return resp;
		}));
	}

	getByAdminRole(): Observable<any>{
		return this.http.get<any>(this.baseUrl + '/admin', {responseType: 'text' as 'json'}).pipe(map((resp) => {
			return resp;
		}));
	}

	getByUserOrAdminRole(): Observable<any>{
		return this.http.get<any>(this.baseUrl + '/userOrAdmin', {responseType: 'text' as 'json'}).pipe(map((resp) => {
			return resp;
		}));
	}

	getByAnonymousRole(): Observable<any>{
		return this.http.get<any>(this.baseUrl + '/anonymous', {responseType: 'text' as 'json'}).pipe(map((resp) => {
			return resp;
		}));
	}

}
The above functions will only be called to fetch data from Spring Boot REST APIs if a user is successfully logged in and has appropriate role(s).
HttpInterceptor
This interceptor acts as a filter for each request. It checks if authorization header is present in the HTTP request or not and if present continue with the header else it will add authorization header in HTTP request. The following code is written into file src/app/httpInterceptor.service.ts.
import { HttpInterceptor, HttpRequest, HttpHandler, HttpEvent, HttpHeaders, HttpErrorResponse } from '@angular/common/http';
import { Injectable } from '@angular/core';
import { Observable, throwError } from 'rxjs';
import { catchError } from 'rxjs/operators';
import { AuthService } from './auth.service';

@Injectable()
export class HttpInterceptorService implements HttpInterceptor {

    constructor(private authService: AuthService) { }

    intercept(req: HttpRequest<any>, next: HttpHandler): Observable<HttpEvent<any>> {
        if (this.authService.isUserSignedin() && this.authService.getToken()) {
            const request = req.clone({
                headers: new HttpHeaders({
                    'Authorization': this.authService.getToken()
                })
            });
            return next.handle(request).pipe(
				catchError(err => {
					if(err instanceof HttpErrorResponse && err.status === 401) {
						this.authService.signout();
					}
					return throwError(err);
				})
			);
        }

		return next.handle(req);
    }

}
The previously generated and stored JWT token from localStorage during login process is put into the Authorization header with HTTP_TOKEN.
I am redirecting the user to the login page if JWT token gets expired (based on http status 401 that means Unauthorized).
Routing
Angular routing determines the navigation for your application and it is recommended to have a user friendly page navigation.
For example, a new user wants to signup, so you will click on a link – Signup, a user will signin, so a user will click on Signin or Login link and so on.
Edit file src/app/app-routing.module.ts to have below source code.
I am importing the required modules and components and at the end I exported the class for using into different components.
I have defined paths for routing, such as, when you hit the root URL in the browser, it will redirect to the /home path, and if user was authenticated already then user will see the content in dashboard or home page, otherwise user will be redirected to the signin page.
The following code is written into src/app/app-routing.module.ts file.
import { NgModule } from '@angular/core';
import { RouterModule, Routes } from '@angular/router';
import { HomeComponent } from './home/home.component';
import { SigninComponent } from './signin/signin.component';
import { SignupComponent } from './signup/signup.component';

const routes: Routes = [
	{ path: '', redirectTo: '/home', pathMatch: 'full' },
	{ path: 'home', component: HomeComponent },
	{ path: 'signin', component: SigninComponent },
	{ path: 'signup', component: SignupComponent },
];

@NgModule({
  imports: [RouterModule.forRoot(routes)],
  exports: [RouterModule]
})

export class AppRoutingModule { }
Additional Modules
Open your src/app/app.module.ts and add few required modules for the application, such as, FormsModule, HttpClientModule and AppRoutingModule. Other components and modules are added automatically into this file when you generate components or created the Angular project. FormsModule is required to define your HTML form, HttpClientModule is required for preforming data exchange over HTTP protocol and AppRoutingModule is required for defining routes used for navigation in the application.
import { NgModule } from '@angular/core';
import { BrowserModule } from '@angular/platform-browser';
import { FormsModule }    from '@angular/forms';
import { HttpInterceptorService } from './httpInterceptor.service';
import { HttpClientModule, HTTP_INTERCEPTORS }    from '@angular/common/http';
import { AppRoutingModule } from './app-routing.module';
import { AppComponent } from './app.component';
import { SigninComponent } from './signin/signin.component';
import { SignupComponent } from './signup/signup.component';
import { HomeComponent } from './home/home.component';

@NgModule({
  declarations: [
    AppComponent,
    SigninComponent,
    SignupComponent,
    HomeComponent
  ],
  imports: [
    BrowserModule,
    AppRoutingModule,
    FormsModule,
    HttpClientModule
  ],
  providers: [
    {
      provide: HTTP_INTERCEPTORS,
      useClass: HttpInterceptorService,
      multi: true
    }
  ],
  bootstrap: [AppComponent]
})

export class AppModule { }
App Component
If you now try to open your application by executing command ng serve --open in command line tool you won’t be redirected to the http://localhost:4200/signin though I have redirected root path to /signin in src/app/app-routing.module.ts file.
You will see the path in browser as http://localhost:4200/signin but you will also see the output on the browser from src/app/app.component.html file.
Therefore, remove everything from app.component.html file and put only <router-outlet></router-outlet> in this file and now save the file.
<router-outlet></router-outlet>Home Component
The home component is used when a user successfully logs into the application using the credentials. The following code is written into the file src/app/home/home.component.ts file.
import { Component, OnInit } from '@angular/core';
import { HttpClient } from '@angular/common/http';
import { AuthService } from '../auth.service';
import { GreetingService } from '../greeting.service';
import { ActivatedRoute, Router } from '@angular/router';

@Component({
selector: 'app-home',
templateUrl: './home.component.html',
styleUrls: ['./home.component.css']
})
export class HomeComponent implements OnInit {

	isSignedin = false;

	signedinUser: string = '';

	greeting: any[] = [];

	constructor(private route: ActivatedRoute, private router: Router, private http: HttpClient, private authService: AuthService, private greetingService: GreetingService) {}

	ngOnInit() {
		this.isSignedin = this.authService.isUserSignedin();
		this.signedinUser = this.authService.getSignedinUser();

		if(!this.authService.isUserSignedin()) {
			this.router.navigateByUrl('signin');
		}

		if(this.isSignedin) {
			this.greetingService.getByUserRole().subscribe((result: string) => this.greeting.push(result), () => console.log('/user - You are not authorize'));
			this.greetingService.getByAdminRole().subscribe((result: string) => this.greeting.push(result), () => console.log('/admin - You are not authorized'));
			this.greetingService.getByUserOrAdminRole().subscribe((result: string) => this.greeting.push(result), () => console.log('/userOrAdmin - You are not authorized'));
			this.greetingService.getByAnonymousRole().subscribe((result: string) => this.greeting.push(result), () => console.log('/anonymous - You are not authorized'));
		}
	}

	doSignout() {
		this.authService.signout();
	}

}
ngOnInit() hook initializes the directive/component after Angular first displays the data-bound properties and sets the directive/component’s input properties.
I am calling all REST APIs to fetch data and to display data on the HTML page. The content from each REST API will be displayed if the user has the role to access otherwise user will see 403 error in the browser’s console.
I also define doSignout() function to logout or signout a a user from the application. The following code is written into the file src/app/home/home.component.html file.
<div *ngIf="isSignedin">
	<p>Welcome back, {{ signedinUser }}!</p>

	<div *ngFor="let greet of greeting">
		{{greet}}
	</div>

	<p><a style="text-decoration: underline; cursor: pointer;" (click)="doSignout()">Signout</a></p>
</div>
User will see the content from this page if user has been signed in.
Signin Component
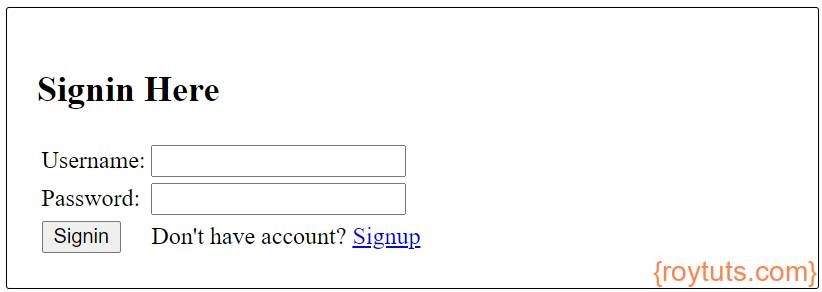
The following signin form is displayed to the end users for login. The following code is written into the file src/app/signin/signin.component.html file.
<div id="signin-box">
	<h2>Signin Here</h2>
	<div style="color : red" *ngIf='error'>{{error}}</div>
	<form name='signinForm' (submit)="doSignin()">
		<table>
			<tr>
				<td>Username:</td>
				<td><input type='text' name='username' [(ngModel)]="username"></td>
			</tr>
			<tr>
				<td>Password:</td>
				<td><input type='password' name='password' [(ngModel)]="password"/></td>
			</tr>
			<tr>
				<td><input name="submit" type="submit" value="Signin" /></td>
				<td>Don't have account? <a href="/signup" routerLink="/signup">Signup</a></td>
			</tr>
		</table>
	</form>
</div>
The logic for signin and validation is written into the following file – src/app/signin/signin.component.ts file.
import { Component, OnInit } from '@angular/core';
import { Router, ActivatedRoute } from '@angular/router';
import { AuthService } from '../auth.service';
import { Request } from '../request.model';

@Component({
selector: 'app-signin',
templateUrl: './signin.component.html',
styleUrls: ['./signin.component.css']
})
export class SigninComponent implements OnInit {

	username: string = '';
	password : string = '';

	isSignedin = false;

	error: string = '';

	constructor(private route: ActivatedRoute, private router: Router, private authService: AuthService) {}

	ngOnInit() {
		this.isSignedin = this.authService.isUserSignedin();

		if(this.isSignedin) {
			this.router.navigateByUrl('home');
		}
	}

	doSignin() {
		if(this.username !== '' && this.username !== null && this.password !== '' && this.password !== null) {
			const request: Request = { userName: this.username, userPwd: this.password};

			this.authService.signin(request).subscribe((result)=> {
				//this.router.navigate(['/home']);
				this.router.navigateByUrl('home');
			}, () => {
				this.error = 'Either invalid credentials or something went wrong';
			});
		} else {
			this.error = 'Invalid Credentials';
		}
	}

}
I have applied a basic style to the signin form and I have written the following css code in the file src/app/signin/signin.component.css file.
#signin-box {
	width: 500px;
	padding: 20px;
	margin: 50px auto;
	background: #fff;
	-webkit-border-radius: 2px;
	-moz-border-radius: 2px;
	border: 1px solid #000;
}
Signup Component
The signup form is displayed to the end users for registering to the application.
<div id="signup-box">
	<h2>Signup Here</h2>
	<div style="color : red" *ngIf='error'>{{error}}</div>
	<div style="color : green" *ngIf='success'>{{success}}</div>
	<form name='signupForm' (submit)="doSignup()">
		<table>
			<tr>
				<td>Username:</td>
				<td><input type='text' name='username' [(ngModel)]="username"></td>
			</tr>
			<tr>
				<td>Password:</td>
				<td><input type='password' name='password' [(ngModel)]="password"/></td>
			</tr>
			<tr>
				<td>Roles:</td>
				<td>
					<div *ngFor="let role of user_roles">
						<input [(ngModel)]="role.selected" name="{{ role.name }}" type="checkbox" id="{{role.name}}" (change)="onChangeCategory($event, role)">
						<label class="form-check-label" for="{{role.name}}">
							{{role.name}}
						</label>
					</div>
				</td>
			</tr>
			<tr>
				<td><input name="submit" type="submit" value="Signup" /></td>
				<td>Have account? <a href="/signin" routerLink="/signin">Signin</a></td>
			</tr>
		</table>
	</form>
</div>
The form has multiple checkboxes for role selection while registering. A basic style is applied to the above form and css is written into the file src/app/signup/signup.component.css file.
#signup-box {
	width: 500px;
	padding: 20px;
	margin: 50px auto;
	background: #fff;
	-webkit-border-radius: 2px;
	-moz-border-radius: 2px;
	border: 1px solid #000;
}
The following code written into the file src/app/signup/signup.component.ts for processing signup a new user.
import { Component, OnInit } from '@angular/core';
import { AuthService } from '../auth.service';
import { Request } from '../request.model';
import { catchError } from 'rxjs/operators';

@Component({
selector: 'app-signup',
templateUrl: './signup.component.html',
styleUrls: ['./signup.component.css']
})
export class SignupComponent implements OnInit {

	constructor(private authService: AuthService) { }

	username: string = '';
	password: string = '';

	user_roles: any = [
		{name:'User', value:'ROLE_USER', selected: false},
		{name:'Admin', value:'ROLE_ADMIN', selected: false},
		{name:'Anonymous', value:'ROLE_ANONYMOUS', selected: false},
	]

	selectedRoles: string[] = [];

	error: string = '';
	success: string = '';

	ngOnInit(): void {
	}

	onChangeCategory(event: any, role: any) {
		this.selectedRoles.push(role.value);
	}

	doSignup() {
		if(this.username !== '' && this.username !== null && this.password !== '' && this.password !== null && this.selectedRoles.length > 0) {
			const request: Request = { userName: this.username, userPwd: this.password, roles: this.selectedRoles};

			this.authService.signup(request).subscribe((result)=> {
				//console.log(result);
				//this.success = 'Signup successful';
				this.success = result;
			}, (err) => {
				//console.log(err);
				this.error = 'Something went wrong during signup';
			});
		} else {
			this.error = 'All fields are mandatory';
		}
	}

}
Testing Angular Spring Boot JWT Authentication
Run the Angular application using the CLI command ng serve --open on project’s root directory. Your application will open browser at http://localhost:4200 and you will be redirected to the signin page:
Signup page looks like below image:

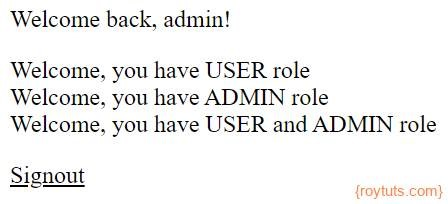
A user who signs up using user role will see the home page like below image:

A user who signs up with user and admin role will see the following home page:
As the JWT is valid only for 3 minutes, so your end users will be redirected to the singin page after 3 minutes once JWT expires.
That’s all about how to authenticate and authorize users using JWT toekn in Spring Boot and Angular application.
And how to get to the greeting-sites with Angular and the token?