Introduction
In this tutorial I am going to discuss about best practices while building applications using Spring framework. Recently Spring has been one of the most popular Java based framework for building enterprise applications. Anyone can grasp the basic concepts and starts building applications using Spring right away but to become a strong developer you need to put efforts and time into it.
In this tutorial I will discuss on the most common best practices to be followed while building applications using Spring framework. These common best practices are discussed mainly for the web applications built with the help of Spring framework.
Now I will discuss the most common Spring framework best practices which need to be followed during application developments.
Avoid Deep Implementation
Most of developers seem to suffer from the common symptoms including the regularly rewriting pieces of commonly used code.
While it is good to understand the internals of a particular library or framework and its implementation for most of the parts in your application but it could be detrimental if you, as a developer, constantly use the same low-level implementations.
This is one of the many reasons why abstractions and frameworks, such as, Spring exists. The Spring framework helps you to concentrate on domain model and business logic by avoiding the repetitive manual works.
So to embrace the abstraction you need to search for the existing framework or library that could be used to solve your particular problem without reinventing the wheel.
I am going to use a useful library called Lombok that is used to reduce boilerplate code. You can check this tutorial how to setup and work with Lombok.
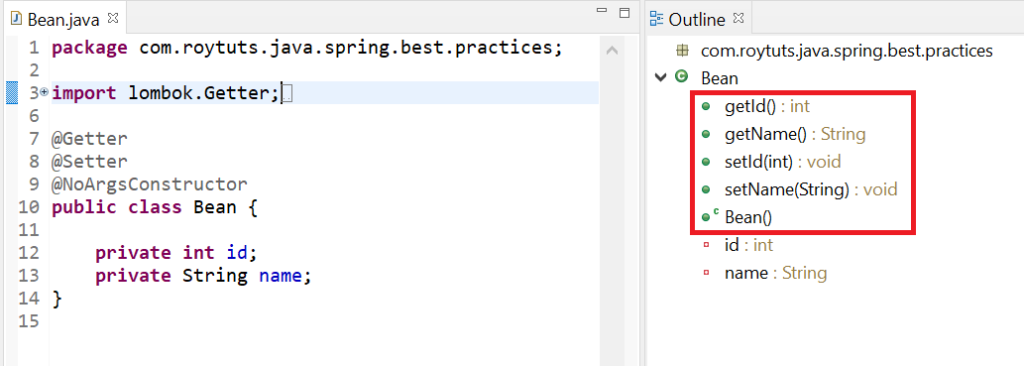
For example, consider the below bean with Lombok:
@Getter
@Setter
@NoArgsConstructor
public class Bean {

	private int id;
	private String name;
}
So using Lombok, you see how many lines of code you write. The rest is done by Lombok. Look without Lombok what else you had to write from the highlighted part in the below image. So Lombok generates no argument constructor, getters and setters.
Therefore, without going too much low level, you can easily integrate such useful library to reduce the writing of such boilerplate code.
Never Expose Internal Structure
Exposing your internal structure to the outside world is never a good idea because it promote bad coding practices and makes inflexibility in service design.
For example, you should never expose your database structure to be accessible from your API endpoints. So your entity class or a class that represents your database structure should never be exposed. Instead you should make similar class to represent your entity class.
Let’s say you have the following entity class that represents a table in database:
@Entity
@Getter
@Setter
@Table(name = "user")
@NoArgsConstructor
public class User implements Serializable {
	private int id;
	private String name;
	private String email;
	private String address;
}
Now let’s say an endpoint needs to access the above entity class to be returned as a data to client. So instead of using the above class, make a similar class that will represent the entity class.
@Getter
@Setter
@NoArgsConstructor
@AllArgsConstructor
public class UserData {
	private int id;
	private String name;
	private String email;
	private String address;
}
This way you don’t need to perform additional changes in your service layer when you are changing on your database backend. This way you can also avoid exposing your sensitive information to client. What would happen when you consider to add a field password for storing password hash into database and accidentally your sensitive data would be exposed.
Managing Separation of Concerns
It is customary to understand the separation of concerns and more importantly later implement them during writing code for your application. As the application grows over the time, effectively organization of code becomes even more important matter. Otherwise it becomes inevitably a problem down the road during testing or maintenance or somewhere in between.
Consider the following Spring REST Controller that returns User data from repository:
@RestController
public class UserRestController {

    @Autowired
    private final UserRepository userRepository;

    @GetMapping("/users")
    public List<UserData> getUsers() {
        return userRepository.findAll()
                .stream()
                .map(this::entityToData)
                .collect(Collectors.toList());
    }

    private UserData entityToData(User userEntity) {
        return new UserData(userEntity.getId(), userEntity.getName(), userEntity.getEmail(), userEntity.getAddress());
    }

}
Apparently you won’t find any problem with the above piece of code; it returns a list of UserData which is retrieved from User entity instances. But with a closer look, we can see that the controller is mapping request to a particular endpoint (/users) and converting entity into a different format after fetching from the UserRepository repository.
So a cleaner solution is to separate those concerns into their own classes.
@RestController
public class UserRestController {

	@Autowired
    private final UserService userService;

    @GetMapping("/users")
    public List<UserData> getUsers() {
        return userService.getUserList();
    }
}

@Service
public class UserService {

    @Autowired
    private final UserRepository userRepository;

	@Autowired
    private final UserEntityConverter userEntityConverter;

    public List<UserData> getUserList() {
        return userRepository.findAll()
                .stream()
                .map(userEntityConverter::toResponse)
                .collect(Collectors.toList());
    }
}

@Component
public class UserEntityConverter {

    public UserData toResponse(User userEntity) {
        return new UserData(userEntity.getId(), userEntity.getName(), userEntity.getEmail(), userEntity.getAddress());
    }

}
Advantage of the above separation of concerns is you can easily inspect the functionality by looking at the class name. Further you can easily mock the classes during testing if you need to.
Consistency and Error Handling
Consistency in maintaining the hierarchy or standard of the structure is an important facet while working on Java based projects including Spring applications. While coding style standard may be limited to a team or an organization but having a common standard makes a great productivity aid.
In Spring based applications with various configurations, services and controllers it creates easy searchable structure semantically. For example, one can easily manage his/her way around the code by appending suffix to the class name. For example, Config suffix to the config classes, Service suffix to the service classes, Controller suffix to the controller classes, Repository suffix to the repository interfaces or classes, etc.
It could be a pain to parse exceptions and even more painful to determine the reason why these exceptions occurred if you ever had to handle the exception responses from poorly written APIs.
An API developer may try to convert the errors into common format for API endpoints. This usually means having a generic error code and description rather than appropriate solution. Generic error message could be probably 500 internal server error. You should never show the stack trace to your end users as it exposes the internals of the application.
The common error response class might look similar to the below:
public class ErrorResponse {

    private Integer code;
    private String message;

}
Handling Multi-Threading Wisely
Does not matter which framework you are using for building your Java based application; even it does not matter whether the application you are building is desktop or web based. The only thing that matters is to deal with multi-threading in Java based applications and it could be tough to handle wisely.
Majority of the problems occurs due to the parallel executions of threads and becomes often extremely difficult to debug depending on your issues. Sometimes you are unable to debug your code and you try to find the actual cause manually, which is again time consuming process. Unfortunately there is no short-cut solution to this problem.
Of course there is no one-size-fits-all solution exists but you can avoid multi-threading errors by some practical considerations for debugging.
- You should always avoid global variable. If you need it absolutely then you should closely monitor it. You should gaurd its unintentional modification by using synchronized keyword. You should also monitor application’s performance and make sure it does not create bottleneck due to synchronization.
- You should think about the design of immutability which comes straight from the functional programming. This means you should avoid class mutability and changing state wherever possible. I assume you know how to design an immutable class. The class which is having private final fields with no setters and the fields values are mutated at the time of construction only. This way you can ensure that accessing properties will provide correct values all the time.
- You should use loggers in your application wisely because it introduces additional I/O and it can impact your application’s performance adversely if logging not used wisely. Think carefully where your application might cause trouble and log crucial data. It would help you to know which requests were received and will have better insights why application did not behave in an expected way, if any error occurs.
- Whenever you need to spawn new threads, reuse existing safe implementation instead of creating new threads as it involves expensive I/O. Use ExecutorService or CompletableFuture, Spring also provides Async or DeferredResult for making asynchronous requests.
Use Annotation based Validation
To have a clean solution on validation you can employ HibernateValidator framework instead of applying too many validations manually as shown in the below code snippets:
@RestController
public class UserRestController {

	@Autowired
    private final UserService userService;

    @PostMapping("/addUser")
    public ResponseEntity<UserData> addUser(@RequestBody UserData userData) {
		boolean isNameInvalid = Optional.ofNullable(userData).map(UserData::getName).map(name -> name.length() <= 25).orElse(true);

		if (isNameInvalid) {
			// throw some exception
		}

        return userService.addUser(userData);
    }
}
Instead of doing something similar to the above example you can use Hibernate Validator to validate your request object in Spring application.
For my above example, we can write the UserData class using Hibernate validator as shown below:
public class UserData {

	...

	@NotNull
	@NotEmpty
	@NotBlank
	@Size(max = 25)
	private String name;

	@Email
	@NotNull
	@NotBlank
	@NotEmpty
	@Size(max = 150)
	private String email;

	...

}
Use Annotation based Configuration
Spring gradually improved itself a lot over the time and Spring version 2.5 onward provides annotation based configuration. In older version of Spring the configurations were mainly done via XML files but nowadays it becomes unnecessary boilerplate code.
Even you can create Spring application using Spring boot framework which just let developers focus on the business logic of the application. You just create a class having main method with @SpringBootApplication annotation is enough to deploy your application into embedded Tomcat server.
@SpringBootApplication
public class SpringBootApp {

	public static void main(String[] args) {
		SpringApplication.run(SpringBootApp.class, args);
	}

}
The composite annotation @SpringBootApplication tells Spring which packages should be scanned to retrieve beans. The beans which are annotated with @Component, @Service, @Controller, @RestController, @Repository at the same level package as @SpringBootApplication will be scanned.
Use Spring Profiles
Common problem in server side development is encountered generally in differentiating the different configuration values, mainly between development and production environments. Often such problem arises mainly due to forgetting update of the configuration values while switching between environments. Therefore instead of manually updating various configuration values, the more efficient approach would be to use Spring profiles.
For example, let’s say you are developing an application using in-memory database, such as, h2 but in production you want to use MySQL. So you need two different configuration for your database depending on the development or production environment.
Let’s say we have two different configuration files – one if for production environment and another one for development environment as shown below. You might have more configurations for other environments, such as, SIT, UAT, etc.
application.properties file:
#default profile 'dev'
spring.profiles.active=dev

#production database details
spring.datasource.driverClassName=com.mysql.cj.jdbc.Driver
spring.datasource.url=jdbc:mysql://localhost/roytuts
spring.datasource.username=root
spring.datasource.password=root
application-dev.properties file:
spring.datasource.url=jdbc:h2:mem:testdb
spring.datasource.driverClassName=org.h2.Driver
spring.datasource.username=sa
spring.datasource.password=
Why do you need separate configuration? because you do not want to accidentally perform any actions on other environment for which it is not intended. And you only want to change in your development environment, so it makes sense to set default profile as dev.
On the server you need to configure the profile by providing a parameter to the JVM. The parameter is similar to -Dspring.profiles.active=prod for production environment, -Dspring.profiles.active=uat for UAT environment, etc.
Embrace Dependency Injection
Always use dependency injection properly in Spring projects. It helps to collaborate objects together by scanning all required configuration classes. This provides loose coupling relationships among the collaborating objects and makes a testing whole lot easier.
Instead of writing the tight coupling classes as shown in the below example:
@RestController
public class UserRestController {

	private final UserService userService;

	public UserRestController() {
		this.userService = new UserService();
	}

    @GetMapping("/users")
    public List<UserData> getUsers() {
        return userService.getUserList();
    }
}
You can write the following classes to allow wiring for you:
@RestController
public class UserRestController {

	private final UserService userService;

	public UserRestController(UserService userService) {
		this.userService = userService;
	}

    @GetMapping("/users")
    public List<UserData> getUsers() {
        return userService.getUserList();
    }
}
Or
@RestController
public class UserRestController {

	@Autowired
    private final UserService userService;

    @GetMapping("/users")
    public List<UserData> getUsers() {
        return userService.getUserList();
    }
}
In tight coupling, classes and objects are dependent on one another. So, tight coupling reduces the flexibility and re-usability of the code because classes and objects are tied together tightly. Changing one object in a tightly coupled application often requires changes in a number of other objects.
In loose coupling, the main idea is to reduce the dependencies of a class that uses the different class directly. Loose coupling is achieved by means of a design that promotes single-responsibility and separation of concerns. A loosely-coupled class can be consumed and tested independently.
Proper Testing
You should always make the Junit test case writing as a practice because a lot of developers either do not write Junit test cases thinking that it is not required or they simply forget to add later. As a best practice you should write test cases properly because it not only helps to verify the accuracy of your code but also it helps to identify how the application behaves in different use cases.
While performing MVC test on Spring Spring framework, you rarely write pure Junit tests since communication over HTTP usually requires you to onvoke Spring’s DispatcherServlet. You may also need to take care of integration testing, validation, serialization, etc.
Spring provides @WebMvcTest annotation to test Spring Controller class. You can read how to use @WebMvcTest annotation to test Spring Controller in Spring MVC application.
You can read about testing of REST APIs using RestAssured library and testing of file upload and download REST APIs.
Spring is a powerful framework, easy to get started with but requires some dedication and time to achieve good knowledge. And taking time to familiarize with Spring framework will definitely improve your productivity.