In this tutorial I will show you how to upload single and multiple files using PHP based CodeIgniter framework 4. In many enterprise applications files upload is an important task for various purposes. CodeIgniter makes working with files uploaded through a form much simpler and more secure than using PHP’s $_FILES array directly. This extends the File class and thus gains all of the features of that class.
Using PHP’s $_FILES array super global variable has some major shortcomings when working with multiple files uploaded at once, and has potential security flaws. CodeIgniter helps with this situation by standardizing your usage of files behind a common interface.
There are multiple ways to name the file input, and anything but the simplest can create strange results. The array returns in a manner that you would expect. With the simplest usage, a single file might be submitted like:
<input type="file" name="avatar" />If you used an array notation for the name, the input would look something like:
<input type="file" name="my-form[details][avatar]" />In some cases, you may specify an array of files to upload:
Upload an avatar: <input type="file" name="my-form[details][avatars][]" />
Upload an avatar: <input type="file" name="my-form[details][avatars][]" />
If you just need to access a single file, you can use getFile() function to retrieve the file instance directly. For example, a form has the following single file input:
<input type="file" name="userfile" />You can get the single file using the following code:
$file = $this->request->getFile('avatar');If you used an array notation for the name, the input would look something like:
<input type="file" name="my-form[details][avatar]" />Get the file instance using the following code:
$file = $this->request->getFile('my-form.details.avatar');For multiple files you can have the following input:
<input type="file" name="images[]" multiple />You can access in the controller class:
if($imagefile = $this->request->getFiles()) {
   foreach($imagefile['images'] as $img) {
      if ($img->isValid() && ! $img->hasMoved()) {
           $newName = $img->getRandomName();
           $img->move(WRITEPATH.'uploads', $newName);
      }
   }
}
You can also retrieve multiple files individually:
$file1 = $this->request->getFile('images.0');
$file2 = $this->request->getFile('images.1');
You might find it easier to use getFileMultiple() function to get an array of uploaded files with the same name:
$files = $this->request->getFileMultiple('images');You can check that a file was actually uploaded via HTTP with no errors by calling the isValid() method:
if (! $file->isValid()) {
    throw new RuntimeException($file->getErrorString().'('.$file->getError().')');
}
Files are uploaded under the writable/uploads folder which is found under your project’s root directory.
Prerequisites
PHP 7.4.3, CodeIgniter 4.0.4
Project Directory
It’s assumed that you have setup PHP and CodeIgniter in Windows system.
Now I will create a project root directory called codeigniter-4-files-upload.
Now move all the directories and files from CodeIgniter framework into the project root directory.
I may not mention the project root directory in subsequent sections and I will assume that I am talking with respect to the project root directory.
Controller Class
The controller is responsible for handling request and response from/to the clients or end users. The controller class is also responsible for validating the user input.
In the following controller class I have created two functions to upload single and multiple files. The index() function by default redirects to a page where you will find option for uploading single file.
In the single file upload page I have placed a link for uploading multiple files. So clicking on this link will take you to the multiple files upload page. From this multiple files upload page you can also navigate to the single file upload page.
I am getting the file instances using the input field names and uploading the files into appropriate directory.
On successful file upload you will see success message and on file upload error you will see error message on the UI (User Interface).
<?php namespace App\Controllers;

class FilesUpload extends BaseController {

	public function __construct() {
		helper(['form', 'url']);
	}

	public function index() {
		return redirect()->to(site_url('filesupload/upload_single_file'));
	}

	public function upload_single_file() {
		if($this->request->getPost('file_upload')) {
			if($file = $this->request->getFile('single_file')) {
				if ($file->isValid() && !$file->hasMoved()) {
					$newName = $file->getRandomName();
					$file->move(WRITEPATH . 'uploads', $newName);

					echo view('file_upload', ['success' => 'File Uploaded Successfully']);
				} else {
					$error = $file->getErrorString() . '(' . $file->getError() . ')';

					echo view('file_upload', ['error' => $error]);
				}
			} else {
				echo view('file_upload', ['error' => 'Select a file for upload']);
			}
		} else {
			echo view('file_upload');
		}
	}

	public function upload_multiple_files() {
		if($this->request->getPost('files_upload')) {
			if($files = $this->request->getFileMultiple('multiple_files'))	{
				$errors = array();
				foreach($files as $file) {
				  if ($file->isValid() && ! $file->hasMoved()) {
					   $newName = $file->getRandomName();
					   $file->move(WRITEPATH . 'uploads', $newName);
				  } else {
					  array_push($errors, $file->getErrorString() . '(' . $file->getError() . ')');
				  }
				}

				if(empty($errors)) {
					echo view('files_upload', ['success' => 'All Files Uploaded Successfully']);
				} else {
					echo view('files_upload', ['errors' => $errors]);
				}
			} else {
				echo view('files_upload', ['error' => 'Select at least one file for upload']);
			}
		} else {
			echo view('files_upload');
		}
	}
}
View Files
View file is responsible for rendering the required page to the UI where user can choose files and upload to the server destination.
Single File Upload
The following view file file_upload.php displays the browse button to select a file for upload. I have also placed a link for multiple files upload.
<!DOCTYPE html>
<html lang="en">
<head>
	<meta charset="UTF-8">
	<title>CodeIgniter 4 Single File Upload Example</title>
	<meta name="description" content="CodeIgniter 4 Single File Upload">
	<meta name="viewport" content="width=device-width, initial-scale=1.0">
	<link rel="shortcut icon" type="image/png" href="/favicon.ico"/>
	<style type="text/css">
		body {
			background-color: #fff;
			margin: 40px;
			font: 13px/20px normal Helvetica, Arial, sans-serif;
			color: #4F5155;
		}
		#body{
			margin: 0 15px 0 15px;
		}
		#container {
			width: 600px;
			margin: auto;
		}
		.error {
			color: #E13300;
		}
		.info {
			color: gold;
		}
		.success {
			color: darkgreen;
		}
	</style>
</head>
<body>
	<div id="container">
		<div class="message_box">
			<?php
				if (isset($success) && strlen($success)) {
					echo '<div class="success">';
					echo '<p>' . esc($success) . '</p>';
					echo '</div>';
				}

				if (isset($error) && strlen($error)) {
					echo '<div class="error">';
					echo '<p>' . esc($error) . '</p>';
					echo '</div>';
				}
			?>
		</div>
		<div>
			<div><?php echo anchor('filesupload/upload_multiple_files', 'Upload Multiple Files', 'title="Upload Multiple Files"'); ?></div>
			<?php
			echo form_open_multipart('filesupload/upload_single_file', array('id' => 'upload-single-file'));
			?>
				<fieldset>
					<legend>Upload Single File</legend>
					<section>
						<label>Browse a file</label>
						<label>
							<input type="file" name="single_file" id="single_file" readonly="true"/>
						</label>
						<p>
							<input type="submit" name="file_upload" value="Upload File"/>
						</p>
					</section>
				</fieldset>
			</form>
		</div>
	</div>
</body>
</html>
Multiple Files Upload
The following view file files_upload.php displays the browse button to select multiple files for upload. I have also placed a link for single file upload.
<!DOCTYPE html>
<html lang="en">
<head>
	<meta charset="UTF-8">
	<title>CodeIgniter 4 Multiple Files Upload Example</title>
	<meta name="description" content="CodeIgniter 4 Single File Upload">
	<meta name="viewport" content="width=device-width, initial-scale=1.0">
	<link rel="shortcut icon" type="image/png" href="/favicon.ico"/>
	<style type="text/css">
		body {
			background-color: #fff;
			margin: 40px;
			font: 13px/20px normal Helvetica, Arial, sans-serif;
			color: #4F5155;
		}
		#body{
			margin: 0 15px 0 15px;
		}
		#container {
			width: 600px;
			margin: auto;
		}
		.error {
			color: #E13300;
		}
		.info {
			color: gold;
		}
		.success {
			color: darkgreen;
		}
	</style>
</head>
<body>
	<div id="container">
		<div class="message_box">
			<?php
				if (isset($success) && strlen($success)) {
					echo '<div class="success">';
					echo '<p>' . esc($success) . '</p>';
					echo '</div>';
				}

				if (isset($errors) && !empty($errors)) {
					echo '<div class="error">';
					foreach ($errors as $error) :
						echo '<p>' . esc($error) . '</p>';
					endforeach;
					echo '</div>';
				}
			?>
		</div>
		<div>
			<div><?php echo anchor('filesupload/upload_single_file', 'Upload Single File', 'title="Upload Single File"'); ?></div>
			<?php
			echo form_open_multipart('filesupload/upload_multiple_files', array('id' => 'upload-multiple-files'));
			?>
				<fieldset>
					<legend>Upload Multiple Files</legend>
					<section>
						<label>Browse file(S)</label>
						<label>
							<input type="file" name="multiple_files[]" id="multiple_files" readonly="true" multiple/>
						</label>
					</section>
					<p>
						<input type="submit" name="files_upload" value="Upload Files"/>
					</p>
				</fieldset>
			</form>
		</div>
	</div>
</body>
</html>
You will see either success or error message depending on whether files were successfully uploaded to the destination or not.
Route Configuration
Route configuration is required in order to display your pages to the end users. The following changes are done in the app/Config/Routes.php file.
Set default controller as $routes->setDefaultController('FilesUpload'); and default route as $routes->get('/', 'FilesUpload::index');.
Deploy the Application
I am not going to use any external server but CLI command to run the application. If you want to use external server to run your application you can use. Execute the following command on your project root directory to run your application.
php spark serveYour application will be running on localhost and port 8080.
Testing the Application
Let’s start testing for single and multiple files upload using CodeIgniter framework. Hit the URL http://localhost:8080/ in the browser and you will see the page as shown in the following image:
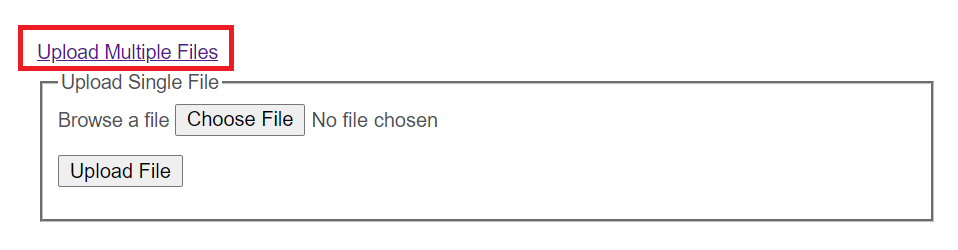
For uploading multiple files you will find a link Upload Multiple Files.
The below page is shown when you click on the link for uploading multiple files. Here also I have put a link for navigating to the single file upload page.

If you click on Upload File or Upload Files button without selecting any file then you will get error No file was uploaded.(4).
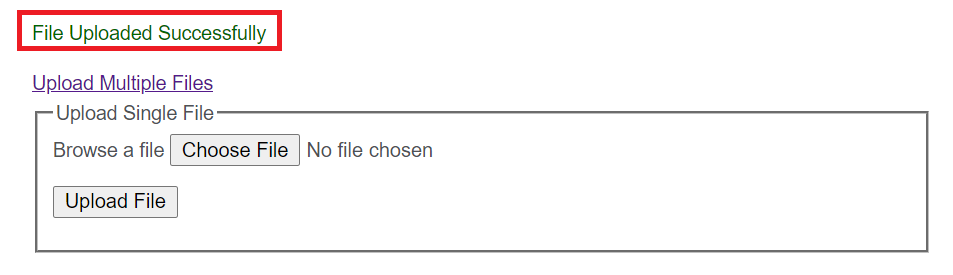
When your single file uploaded successfully to the destination then you will see the following success message.
When your all files uploaded successfully to the destination then you will see the following success message.

That’s all about uploading single and multiple files using CodeIgniter 4 framework.