REST Service
In this tutorial I am going to show you how you can download file using REST or RESTful web service.
The most important concept in REST is resources, which are identified by global IDs — typically using URIs. Client applications use HTTP methods (GET/ POST/ PUT/ DELETE) to manipulate the resource or collection of resources. A RESTful Web service is implemented using HTTP and the principles of REST. Typically, a RESTful Web service should define the following aspects:
The base/root URI for the Web service such as http://<host>/<appcontext/contextpath>/<url pattern>/<resources>.
The MIME type of the response data supported, which are JSON/XML/TEXT/HTML etc.
The set of operations supported by the service. (for example, POST, GET, PUT or DELETE).
Prerequisites
Java 8/19, Jersey 2.23.2/3.1.3, Maven 3.6.1/3.8.5
Project Setup
You can create a maven based project in your favorite IDE. The following pom.xml file can be used for your project.
For Jersey 3.1.3 you can use the following pom file:
<?xml version="1.0" encoding="UTF-8"?>

<project xmlns="http://maven.apache.org/POM/4.0.0"
	xmlns:xsi="http://www.w3.org/2001/XMLSchema-instance"
	xsi:schemaLocation="http://maven.apache.org/POM/4.0.0 http://maven.apache.org/xsd/maven-4.0.0.xsd">
	<modelVersion>4.0.0</modelVersion>

	<groupId>com.roytuts</groupId>
	<artifactId>jersey-rest-api-file-download</artifactId>
	<version>0.0.1-SNAPSHOT</version>
	<packaging>war</packaging>

	<properties>
		<project.build.sourceEncoding>UTF-8</project.build.sourceEncoding>
		<maven.compiler.source>19</maven.compiler.source>
		<maven.compiler.target>19</maven.compiler.target>
	</properties>

	<dependencies>
		<dependency>
			<groupId>org.glassfish.jersey.containers</groupId>
			<artifactId>jersey-container-servlet</artifactId>
			<version>3.1.3</version>
		</dependency>


		<dependency>
			<groupId>org.glassfish.jersey.inject</groupId>
			<artifactId>jersey-hk2</artifactId>
			<version>3.1.3</version>
		</dependency>
	</dependencies>

	<build>
		<finalName>jersey-rest-api-file-download</finalName>
		<plugins>
			<plugin>
				<groupId>org.apache.maven.plugins</groupId>
				<artifactId>maven-compiler-plugin</artifactId>
				<version>3.8.1</version>
			</plugin>

			<plugin>
				<groupId>org.apache.maven.plugins</groupId>
				<artifactId>maven-war-plugin</artifactId>
				<version>3.4.0</version>
				<configuration>
					<failOnMissingWebXml>false</failOnMissingWebXml>
				</configuration>
			</plugin>
		</plugins>
	</build>
</project>
The <failOnMissingWebXml>false</failOnMissingWebXml> has been configured in the maven war plugin if you do not want to use the web.xml file and you want to configure the REST resources using Java based configurations.
For Jersey 2.32.2 you can use the following pom file:
<project xmlns="http://maven.apache.org/POM/4.0.0" xmlns:xsi="http://www.w3.org/2001/XMLSchema-instance"
	xsi:schemaLocation="http://maven.apache.org/POM/4.0.0 http://maven.apache.org/maven-v4_0_0.xsd">
	<modelVersion>4.0.0</modelVersion>
	<groupId>com.roytuts</groupId>
	<artifactId>jersey-rest-api-file-download</artifactId>
	<packaging>war</packaging>
	<version>0.0.1-SNAPSHOT</version>

	<properties>
		<java.version>1.8</java.version>
		<jersey.version>2.23.2</jersey.version>
	</properties>

	<dependencies>
		<dependency>
			<groupId>org.glassfish.jersey.containers</groupId>
			<artifactId>jersey-container-servlet</artifactId>
			<version>${jersey.version}</version>
		</dependency>
	</dependencies>

	<build>
		<finalName>jersey-rest-api-file-download</finalName>
		<plugins>
			<plugin>
				<groupId>org.apache.maven.plugins</groupId>
				<artifactId>maven-compiler-plugin</artifactId>
				<configuration>
					<source>${java.version}</source>
					<target>${java.version}</target>
				</configuration>
			</plugin>
		</plugins>
	</build>
</project>
Deployment Descriptor
Modify the src/main/webapp/WEB-INF/web.xml file to use the jersey servlet.
For Jersey version 3.1.3 you can use the following web.xml file:
<?xml version="1.0" encoding="UTF-8"?>
<web-app xmlns="https://jakarta.ee/xml/ns/jakartaee"
	xmlns:xsi="http://www.w3.org/2001/XMLSchema-instance"
	xsi:schemaLocation="https://jakarta.ee/xml/ns/jakartaee https://jakarta.ee/xml/ns/jakartaee/web-app_5_0.xsd"
	version="5.0" metadata-complete="false">

	<display-name>Jersey REST Service File Download</display-name>

	<servlet>
		<servlet-name>REST</servlet-name>
		<servlet-class>org.glassfish.jersey.servlet.ServletContainer</servlet-class>
		<init-param>
			<param-name>jersey.config.server.provider.packages</param-name>
			<param-value>com.roytuts.rest.resources</param-value>
		</init-param>
		<load-on-startup>1</load-on-startup>
	</servlet>

	<!-- Map /rest/* to Jersey -->
	<servlet-mapping>
		<servlet-name>REST</servlet-name>
		<url-pattern>/*</url-pattern>
	</servlet-mapping>

</web-app>
The following web.xml file is used for Jersey version 2.32.2.
<!DOCTYPE web-app PUBLIC
 "-//Sun Microsystems, Inc.//DTD Web Application 2.3//EN"
 "http://java.sun.com/dtd/web-app_2_3.dtd" >
<web-app>
	<display-name>REST Service</display-name>
	<servlet>
		<servlet-name>REST</servlet-name>
		<servlet-class>org.glassfish.jersey.servlet.ServletContainer</servlet-class>
		<init-param>
			<param-name>jersey.config.server.provider.packages</param-name>
			<param-value>com.roytuts.rest.resources</param-value>
		</init-param>
		<load-on-startup>1</load-on-startup>
	</servlet>
	<!-- Map /rest/* to Jersey -->
	<servlet-mapping>
		<servlet-name>REST</servlet-name>
		<url-pattern>/*</url-pattern>
	</servlet-mapping>
</web-app>
REST Resource
Create a REST resource class as shown below. The REST API class publishes REST services over HTTP/HTTPS protocol.
For Jersey 3.1.3 use the following class:
package com.roytuts.rest.resources;

import java.io.File;

import jakarta.ws.rs.GET;
import jakarta.ws.rs.Path;
import jakarta.ws.rs.Produces;
import jakarta.ws.rs.core.MediaType;
import jakarta.ws.rs.core.Response;
import jakarta.ws.rs.core.Response.ResponseBuilder;

@Path("/file")
public class FileDownloadService {

	private static final String FILE_PATH = "C:/Download/250MB";

	@GET
	@Path("/download")
	@Produces(MediaType.APPLICATION_OCTET_STREAM)
	public Response getFile() {
		File file = new File(FILE_PATH);

		ResponseBuilder response = Response.ok((Object) file);

		response.header("Content-Disposition", "attachment; filename=" + file.getName());

		return response.build();
	}

}
If you do not want to use the web.xml file for Jersey version 3.1.3, you can also use the following configuration class for your REST resources:
package com.roytuts.rest.config;

import org.glassfish.jersey.server.ResourceConfig;

import jakarta.ws.rs.ApplicationPath;

@ApplicationPath("/")
public class ApplicationConfig extends ResourceConfig {

	public ApplicationConfig() {
		// this call has the same effect as
		// jersey.config.server.provider.packages
		// in the web.xml: it scans that packages for resources and providers.
		packages("com.roytuts.rest.resources");
	}

}
For Jersey 2.32.2 use the following class:
package com.roytuts.rest.resources;
import javax.ws.rs.GET;
import javax.ws.rs.Path;
import javax.ws.rs.Produces;
import javax.ws.rs.core.MediaType;
import javax.ws.rs.core.Response;
import javax.ws.rs.core.Response.ResponseBuilder;
@Path("/file")
public class RestService {
	private static final String FILE_PATH = "D:/Documents/JavaJ2EE.doc";
	@GET
	@Path("/download")
	@Produces(MediaType.APPLICATION_OCTET_STREAM)
	public Response getFile() {
		File file = new File(FILE_PATH);
		ResponseBuilder response = Response.ok((Object) file);
		response.header("Content-Disposition", "attachment; filename="" + file.getName() + """);
		return response.build();
	}
}
Testing File Download REST API
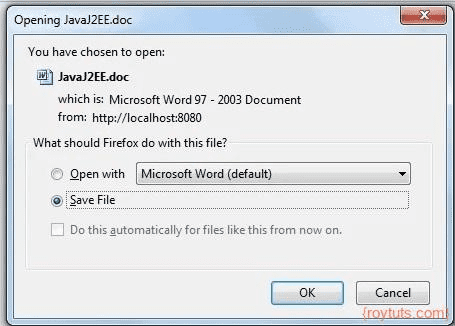
Now run the application (Jersey 2.32.2) on Tomcat 8 and Jersey 3.1.3 on Tomcat 10.1.15. Now access URL http://localhost:8080/jersey-rest-api-file-download/file/download you will see below output in the browser. Now you can either save the file or open the file.
Hope you got an idea how to build REST API using Jersey to download a file.