Introduction
In this example I will show you thorough example on how to deploy Python Flask MySQL based application in Heroku Cloud. I will use free account to use the cloud services from Heroku. I will show you how to import existing MySQL database into Heroku. I will also tell how to turn on/off the app in maintenance mode.
I will use the existing application written on Python Flask and MySQL database is used to store data for the application.
Related Posts:
Prerequisites
Python, Flask, MySQL
Make sure you download the source code from Github.
I will tell you here what are the softwares you need to install in your local system and server (Heroku).
Please note I am using Windows 10 64 bit Operating System, but if you are using Unix based system then also the commands should run fine.
You need to choose the appropriate version of software according to your Operating System.
Install MySQL
MySQL server is required to import your existing database into Heroku server. Therefore you need to install it locally on your system.
I will use mysql command to import existing database.
Install Git
This is required to initialize your git repository. You want to store your application files into git repository. Therefore you need to install it in your local system.
Install Heroku CLI
This is required to work with Heroku environment. You need to add files to remote git repository, you need to deploy your app into heroku environment, you need to create database and import database into heroku environment, etc.
Login to Heroku
Once you successfully install the Heroku CLI, make sure your login to Heroku using your account credentials.
Execute the command heroku login from command line tool. It will ask you to press ENTER key to open the browser with Heroku login page where you need to enter your username and password to login.
Initialize Git Repository
Once your software installations are done your next step is to initialize the git repository.
If you already have any existing code then you need to first clone it in your local system. For example, I will use my existing application.
Download the application and keep it anywhere in your local machine. let’s say my application’s root folder is python-flask-mysql-csv-report.
Navigate to the application’s root directory in the command line tool using command cd python-flask-mysql-csv-report.
Now you need to execute the command git init to initialize the git repository. You will see similar to the below message:
Initialized empty Git repository in <path>/python-flask-mysql-csv-report/.git/Now you need to add all files into the git repository by executing command git add . The add tells to add files. The dot(.) means all files.
Then commit the files into git repository using git commit -m "my first commit". commit is used to commit and -m is used to pass a message.
So you will find similar message after executing the commit command:
[master (root-commit) 621e32d] my first commit
 4 files changed, 64 insertions(+)
 create mode 100644 app.py
 create mode 100644 db.py
 create mode 100644 main.py
 create mode 100644 templates/download.html
Creating Heroku Remote
You need to deploy your app by pushing its code to a special Heroku-hosted remote that’s associated with your app.
Make sure you are in the project or application’s root directory on command line tool.
You can create application in Heroku either from the web interface or using command line tool.
If you create from web interface then you have to use the existing app name to sync with git repository.
If you create from command line tool without giving any app name then Heroku will create one for you and sync with your git repository. Even you can create app from command line tool by giving app name.
Let’s say you will create app flask-mysql-csv-report in Heroku server from command line. Therefore you need to use command heroku create python-flask-mysql-csv-report.
Once app created successfully you will get below message:
Creating ⬢ python-flask-mysql-csv-report... done
https://python-flask-mysql-csv-report.herokuapp.com/ | https://git.heroku.com/python-flask-mysql-csv-report.git
The heroku create CLI command creates a new empty application on Heroku, along with an associated empty Git repository. Running this command from your app’s root directory, the empty Heroku Git repository is automatically set as a remote for your local repository.
You can use the git remote command to confirm that a remote named heroku has been set for your app. You will see below output on executing the command git remote -v:
heroku  https://git.heroku.com/python-flask-mysql-csv-report.git (fetch)
heroku  https://git.heroku.com/python-flask-mysql-csv-report.git (push)
If you want to create app without giving name then execute heroku create. Then you have to execute the command git remote -v.
If you already have the app name (created earlier using web interface or command line) then you need to execute only the command: heroku git:remote -a <app name>.
Adding requirements.txt
You need to add requirements.txt file to the repository. requierements.txt file is required to build your app on Heroku environment.
You can also generate this file using the command pip freeze > requirements.txt. This will list all the packages installed for Python in your local system. You can add or remove as per your requirements for running the app.
I will create below content requirements.txt file and put it under the root directory of the project. This file tells what packages are required to run the application. In production environment you have to use Gunicorn to run our application.
Gunicorn==20.0.4
Babel==2.7.0
Click==7.0
Flask==1.1.1
Flask-Babel==0.12.2
Flask-MySQL==1.4.0
Flask-Table==0.5.0
itsdangerous==1.1.0
Jinja2==2.10.3
lxml==4.4.2
MarkupSafe==1.1.1
Pillow==6.2.1
PyMySQL==0.9.3
pytz==2019.3
six==1.13.0
Werkzeug==0.16.0
Add the file using command git add requirements.txt. Commit the file using command git commit -m "added requirements.txt". You will get following output:
[master b29d874] added requirements.txt
 1 file changed, 16 insertions(+)
 create mode 100644 requirements.txt
Deploying and Testing Application
You have created remote repository in Heroku in the previous step but code is not yet there. So you need to push your code into remote repository so that Heroku will find it from remote repository when you deploy the app.
Push the code in the master branch of the remote repository by executing the following command. Make sure you are in the project’s root directory in your local system from the command line.
git push heroku masterIf you are unable to push the code and get failure message then make sure you login to Heroku using the command heroku login from command line tool. It will ask to press ENTER key and it will open login page in the browser where you need to put your credentials to login.
Now you will be able to see many logs with build and deployment as shown below:
Enumerating objects: 10, done.
Counting objects: 100% (10/10), done.
Delta compression using up to 4 threads
Compressing objects: 100% (8/8), done.
Writing objects: 100% (10/10), 1.61 KiB | 330.00 KiB/s, done.
Total 10 (delta 1), reused 0 (delta 0)
remote: Compressing source files... done.
remote: Building source:
remote:
remote: -----> Python app detected
....
....
remote:        https://python-flask-mysql-csv-report.herokuapp.com/ deployed to Heroku
remote:
remote: Verifying deploy... done.
To https://git.heroku.com/python-flask-mysql-csv-report.git
 * [new branch]      master -> master
Now your app has been deployed into the server and you should be able to access using the given URL https://python-flask-mysql-csv-report.herokuapp.com/.
But you will get application error when you try to access the URL. You can check the log from the command line using command heroku logs --tail or using the web interface from: click on the app name python-flask-mysql-csv-report, click on More on top right and click on View logs.
You will see error No web processes running.
Therefore you need to run the command heroku ps:scale web=1. Actually you have deployed the app but did not start it. So executing this command will start your app.
When you deploy your application, heroku creates a “slug” where a runnable zipped version of your app is then stored. You can then start “dynos”, which take your current slug and start it on one of heroku’s servers.
Running heroku ps:scale web=1 will scale your app to one running dyno, basically you have one server running your app currently.
If you deploy your app again, a new slug will be generated and stored, and your currently running dynos will be destroyed, to be replaced by new ones with the new version of your code.
But wait your app will not be started and you will see error:
Scaling dynos... !
 !    Couldn't find that process type (web).
If you have noticed carefully you got a below message in the log:
remote: -----> Discovering process types
remote:        Procfile declares types -> (none)
So you don’t have any Procfile but you are trying to run web.
Now I need to create Procfile under the project’s root directory. Make sure the name is exactly Procfile without any extension.
Create below content in it and commit the file using the required git commands.
web: gunicorn main:appThe above content tells that I am going to run web using gunicorn from the file main.py with Flask’s app instance.
Once committed you need to deploy the app again using the command git push heroku master. So every time you make some changes you need to execute the same command to deploy the app.
Now if you access the app using URL https://python-flask-mysql-csv-report.herokuapp.com/ in the browser you will be able to see the below output on the browser:

Now if you try to click on the CSV report generation link you will get below error:

The actual error is I did not install MySQL database yet. Therefore it cannot establish the connection to the database.
Install MySQL Server
Heroku does not have really MySQL server but it has ClearDB which is used to run your MySQL database without any issue. ClearDB is a powerful, high-speed database-as-a-service in the cloud for your MySQL powered applications.
I will use our existing database dump and import it into the ClearDB.
Make sure your are on the project’s root directory from command line tool.
Execute the below command to create an instance of ClearDB for our MySQL.
heroku addons:create cleardb:igniteYou will see below message after database creation:
Creating cleardb:ignite on ⬢ python-flask-mysql-csv-report... free
Created cleardb-flat-59333 as CLEARDB_DATABASE_URL
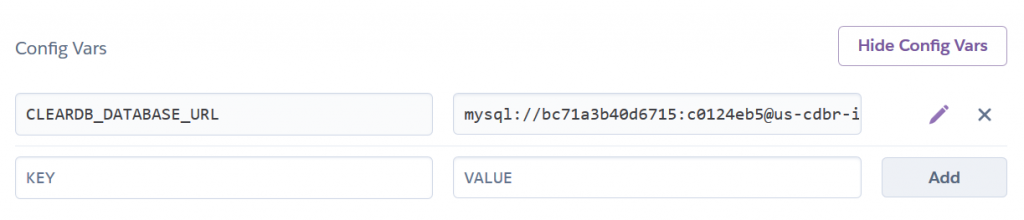
Use heroku addons:docs cleardb to view documentationNext step is to find the URL details for your database using the below command:
heroku config | findStr CLEARDB_DATABASE_URLIf you are using Unix system then use below command:
heroku config | grep CLEARDB_DATABASE_URLYou will get below output and from it you have to extract database name, user name, user password, host:
CLEARDB_DATABASE_URL: mysql://bc71a3b40d6715:c0124eb5@us-cdbr-iron-east-05.cleardb.net/heroku_360389a98465754?reconnect=trueYou can check the above URL to match the details:
Database Host: us-cdbr-iron-east-05.cleardb.net
Database User: bc71a3b40d6715
Database Password: c0124eb5
Database: heroku_360389a98465754
You could have create the same database using the web interface using the following steps:
- Click on your app
- Click on Resources
- You will find ClearDB My-SQL under Add-ons similar to the below image:
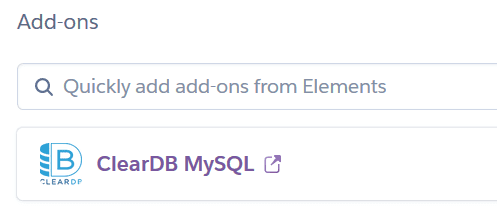
- Clicking on the link will create a database
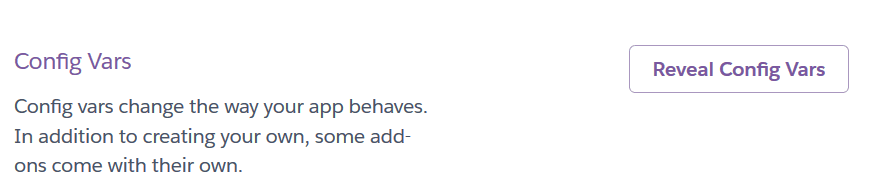
- Then you will find the database URL details: click on Settings -> under Config Vars, click on Reveal Config Vars to get the details.
Finally you have to change the database configuration details in db.py file.
from app import app
from flaskext.mysql import MySQL

mysql = MySQL()

# MySQL configurations
app.config['MYSQL_DATABASE_USER'] = 'bc71a3b40d6715'
app.config['MYSQL_DATABASE_PASSWORD'] = 'c0124eb5'
app.config['MYSQL_DATABASE_DB'] = 'heroku_360389a98465754'
app.config['MYSQL_DATABASE_HOST'] = 'us-cdbr-iron-east-05.cleardb.net'
mysql.init_app(app)
Importing SQL File
I am going to use our existing database dump so I am going to import the SQL file. Now you need mysql command to import. Now I think you understand why do you need local MySQL server installation.
You need to make some changes to our employee.sql file, specially for Collate. Collate utf8mb4_unicode_ci is not supported in Heroku. So you have to change it to utf8_general_ci. Also replace utf8mb4 by utf8. Change utf8mb4_0900_ai_ci to utf8_general_ci. Replace roytuts by heroku_360389a98465754.
The whole file looks to the following content:
/*!40101 SET @OLD_CHARACTER_SET_CLIENT=@@CHARACTER_SET_CLIENT */;
/*!40101 SET NAMES utf8 */;
/*!50503 SET NAMES utf8 */;
/*!40014 SET @OLD_FOREIGN_KEY_CHECKS=@@FOREIGN_KEY_CHECKS, FOREIGN_KEY_CHECKS=0 */;
/*!40101 SET @OLD_SQL_MODE=@@SQL_MODE, SQL_MODE='NO_AUTO_VALUE_ON_ZERO' */;


-- Dumping database structure for heroku_360389a98465754
DROP DATABASE IF EXISTS `heroku_360389a98465754`;
CREATE DATABASE IF NOT EXISTS `heroku_360389a98465754` /*!40100 DEFAULT CHARACTER SET utf8 COLLATE utf8_general_ci */ /*!80016 DEFAULT ENCRYPTION='N' */;
USE `heroku_360389a98465754`;

-- Dumping structure for table heroku_360389a98465754.employee
DROP TABLE IF EXISTS `employee`;
CREATE TABLE IF NOT EXISTS `employee` (
  `emp_id` int(10) unsigned NOT NULL AUTO_INCREMENT,
  `emp_first_name` varchar(30) CHARACTER SET utf8 COLLATE utf8_unicode_ci NOT NULL,
  `emp_last_name` varchar(20) CHARACTER SET utf8 COLLATE utf8_unicode_ci NOT NULL,
  `emp_mgr_id` int(11) DEFAULT NULL,
  `emp_designation` varchar(30) CHARACTER SET utf8 COLLATE utf8_unicode_ci DEFAULT NULL,
  PRIMARY KEY (`emp_id`)
) ENGINE=InnoDB AUTO_INCREMENT=7975 DEFAULT CHARSET=utf8 COLLATE=utf8_unicode_ci;

-- Dumping data for table heroku_360389a98465754.employee: ~16 rows (approximately)
/*!40000 ALTER TABLE `employee` DISABLE KEYS */;
INSERT INTO `employee` (`emp_id`, `emp_first_name`, `emp_last_name`, `emp_mgr_id`, `emp_designation`) VALUES
	(7369, 'SMITH', 'JHON', 7902, 'CLERK'),
	(7499, 'ALLEN', 'BORDER', 7698, 'SALESMAN'),
	(7521, 'WARD', 'SPACE', 7698, 'SALESMAN'),
	(7654, 'MARTIN', 'FOWLER', 7698, 'SALESMAN'),
	(7698, 'BLAKE', 'RAY', NULL, 'MANAGER'),
	(7782, 'CLARK', 'MICHAEL', NULL, 'MANAGER'),
	(7788, 'SCOTT', 'TIGER', 7566, 'ANALYST'),
	(7839, 'KING', 'ROY', NULL, 'VICE PRESIDENT'),
	(7844, 'TURNER', 'RICK', 7698, 'SALESMAN'),
	(7876, 'ADAMS', 'EVE', 7788, 'CLERK'),
	(7900, 'JAMES', 'BOND', 7698, 'CLERK'),
	(7902, 'FORD', 'LAMBDA', 7566, 'ANALYST'),
	(7934, 'MILLER', 'JOHN', 7782, 'CLERK'),
	(7954, 'FRANK', 'JOHN', 7782, 'MANAGER'),
	(7964, 'MARTIN', 'HIKMAN', NULL, 'CLERK'),
	(7974, 'APRIL', 'HICKMAN', 7782, 'SALESMAN');
/*!40000 ALTER TABLE `employee` ENABLE KEYS */;

/*!40101 SET SQL_MODE=IFNULL(@OLD_SQL_MODE, '') */;
/*!40014 SET FOREIGN_KEY_CHECKS=IF(@OLD_FOREIGN_KEY_CHECKS IS NULL, 1, @OLD_FOREIGN_KEY_CHECKS) */;
/*!40101 SET CHARACTER_SET_CLIENT=@OLD_CHARACTER_SET_CLIENT */;
First I will build our command to import the SQL file:
mysql --host=us-cdbr-iron-east-05.cleardb.net --user=bc71a3b40d6715 --password=c0124eb5 --reconnect heroku_360389a98465754 < C:\Documents\employee.sqlBefore you execute the above command you need to make the server in maintenance mode using command heroku maintenance:on.
Enabling maintenance mode for ⬢ python-flask-mysql-csv-report... doneYou need to scale down dynos using command heroku ps:scale web=0.
Scaling dynos... done, now running web at 0:FreeMake sure your local MySQL server is running. Now execute the above command from command line tool.
You may get warning as you are using password on command line interface. Your SQL file will be imported successfully without any message.
Now you have to commit the changes you made in db.py file and deploy the app using appropriate commands. Make sure your are in the project’s root directory.
git add db.py
git commit -m "db.py updated with database details"
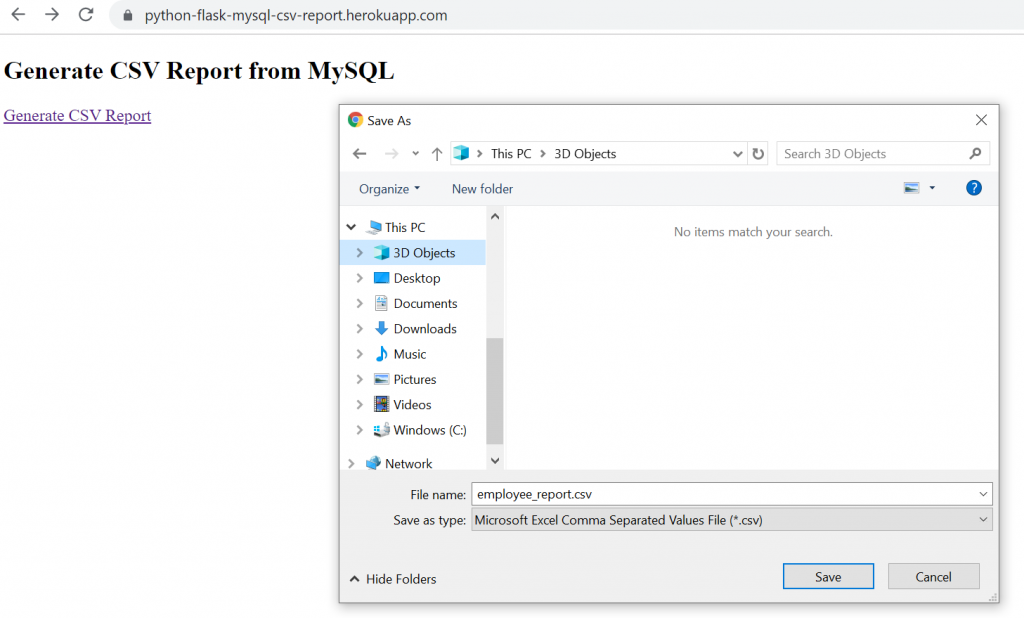
git push heroku masterNow you need to turn off maintenance mode using command heroku maintenance:off. Start the app using heroku ps:scale web=1.
Now you will be able to generate CSV report from MySQL database and you will be prompted to save the file:
That’s all. Hope you found this tutorial useful on how to deploy Python Flask MySQL based web application in Heroku cloud platform.
Thanks for reading.
Thank you for this amazing tutorial! It was really useful to me :D
Like!! Thank you for publishing this awesome article.