Introduction
In this example I will show you an example on Spring Boot jQuery AJAX CRUD. CRUD is an acronym for four operations such as Create, Read, Update and Delete. I am going to perform CRUD operations on company details. I will use here MySQL database to store company details information. I will perform each operation asynchronously through AJAX technique using jQuery on client side and Spring Boot with Spring Data JPA in server side.
I will create here REST APIs using Spring Boot and call those REST APIs through jQuery AJAX from front-end. I will create here both server and client application and deploy them into separate servers.
Server application using Spring Boot will be deployed into embedded Tomcat server and client application using jQuery, HTML will be deployed into Apache http web server. You can use any technologies or web server for deploying client application.
I will display company information in tabular format or in HTML table on UI or front-end. I will perform inline edit on a row. A alert box will be shown whether users want to really delete a record or not on clicking a delete button. I will add new company details on a popup window.
Prerequisites
Java at least 8, Gradle 5.6 – 6.7.1, Maven 3.6.3, Spring Boot 2.2.1 – 2.4.2, Spring Data JPA, MySQL 8.0.17 – 8.0.22, jQuery 3.4.1 – 3.5.1
Server Application – Spring Boot
I will create server application followed by client application.
MySQL Table
Before you perform any operation on data you need to create the required table. Naturally, I will create a table called company and insert some sample data for testing purpose.
CREATE TABLE `company` (
  `id` int unsigned COLLATE utf8mb4_unicode_ci NOT NULL AUTO_INCREMENT,
  `name` varchar(45) COLLATE utf8mb4_unicode_ci DEFAULT NULL,
  PRIMARY KEY (`id`)
) ENGINE=InnoDB AUTO_INCREMENT=1 DEFAULT CHARSET=utf8mb4 COLLATE=utf8mb4_unicode_ci;
In order to test the application right away, you need some data to be present into the table. So insert some sample data into the table as given below. You may also run some tests by creating new company information from UI if your table does not have any data initially.
INSERT INTO `company` (`id`, `name`) VALUES
	(1, 'Tom & Jerry'),
	(2, 'Order All'),
	(3, 'Akash Food'),
	(4, 'Chinese Food'),
	(5, 'Roy Food');
Project Setup
You may create a gradle or maven based project in your favorite IDE or tool. The name of the project is spring-boot-ajax-crud.
You need to include the required dependencies in build.gradle script for working on this application using Spring Boot JPA.
buildscript {
	ext {
		springBootVersion = '2.2.1.RELEASE' to 2.4.2
	}
    repositories {
        mavenCentral()
    }
    dependencies {
        classpath("org.springframework.boot:spring-boot-gradle-plugin:${springBootVersion}")
    }
}

plugins {
    id 'java-library'
    id 'org.springframework.boot' version "${springBootVersion}"
}

sourceCompatibility = 12
targetCompatibility = 12

repositories {
    mavenCentral()
}

dependencies {
    implementation("org.springframework.boot:spring-boot-starter-web:${springBootVersion}")
    implementation("org.springframework.boot:spring-boot-starter-data-jpa:${springBootVersion}")
    runtime('mysql:mysql-connector-java:8.0.17/22')
    //required only if jdk 9 or higher version is used
    runtimeOnly('javax.xml.bind:jaxb-api:2.4.0-b180830.0359')
}
Notice in the above build script I have added jaxb-api. This API is required by the Java application. Up to Java 8 version, you don’t need to add this API explicitly in your build script because this API is available by default up to Java 8. After Java 9 you have to add it in the build script or build file manually to avoid JAXB related exceptions.
Entity Class
A JPA entity class is a POJO (Plain Old Java Object) class, marked with annotation @Entity and having the ability to represent object in the database.
Entity class here implement Serializable interface in order to store the data into database directly.
Let’s say we have following entity class called Company.
package com.roytuts.spring.boot.ajax.crud.entity;

import javax.persistence.Column;
import javax.persistence.Entity;
import javax.persistence.GeneratedValue;
import javax.persistence.GenerationType;
import javax.persistence.Id;
import javax.persistence.Table;

@Entity
@Table(name = "company")
public class Company {

	@Id
	@Column(name = "id")
	@GeneratedValue(strategy = GenerationType.IDENTITY)
	private Integer id;

	@Column(name = "name")
	private String name;

	public Company() {
	}

	public Company(Integer id, String name) {
		this.id = id;
		this.name = name;
	}

	//getters and setters

}
Spring Data JPA Repository
Spring Data JPA API provides repository support for the Java Persistence API (JPA) and it eases development of applications that need to access JPA data sources.
Spring Data JPA is an abstraction over JPA, which is an abstraction over JDBC. Using Spring Data JPA Repository API has many advantages:
- Spring Data JPA provides find methods out of the box. So based on naming conventions
findByXyyy()will be provided by Spring Data JPA dynamically and will result to an entity result where all the entities will have for their field the corresponding parameter value. - Other useful features like pagination, sorting, Criteria API that is required for your search screens.
I will create repository interface and you don’t need to create any method in this interface because Spring provides methods for performing basic CRUD operations.
package com.roytuts.spring.boot.ajax.crud.repository;

import org.springframework.data.jpa.repository.JpaRepository;

import com.roytuts.spring.boot.ajax.crud.entity.Company;

public interface CrudRepository extends JpaRepository<Company, Integer> {

}
Service Class
Service class sits between controller and DAO layer and sends response accordingly. Generally you perform business logic in this service layer.
You get the results of join queries from repository and pass on to REST controller class.
I use the same method for saving or updating new or existing company information respectively.
package com.roytuts.spring.boot.ajax.crud.service;

import java.util.List;

import org.springframework.beans.factory.annotation.Autowired;
import org.springframework.stereotype.Service;

import com.roytuts.spring.boot.ajax.crud.entity.Company;
import com.roytuts.spring.boot.ajax.crud.repository.CrudRepository;

@Service
public class CrudService {

	@Autowired
	private CrudRepository crudRepository;

	public List<Company> getCompanyList() {
		return crudRepository.findAll();
	}

	public Company getCompanyById(Integer id) {
		return crudRepository.findById(id).get();
	}

	public void saveOrUpdateCompany(Company company) {
		crudRepository.save(company);
	}

	public void deleteCompany(Integer id) {
		crudRepository.deleteById(id);
	}

}
REST Controller Class
Spring provides wonderful API to build REST resources with little efforts. I mark the class as @RestController and I mark the method with appropriate annotation for http methods with endpoint.
This controller layer class handles incoming requests and outgoing response from/to clients or end users.
I perform CRUD operations on different endpoints. I use the same endpoint for creating new company information or updating the existing company information.
package com.roytuts.spring.boot.ajax.crud.rest.controller;

import java.util.List;

import org.springframework.beans.factory.annotation.Autowired;
import org.springframework.http.HttpStatus;
import org.springframework.http.ResponseEntity;
import org.springframework.web.bind.annotation.CrossOrigin;
import org.springframework.web.bind.annotation.DeleteMapping;
import org.springframework.web.bind.annotation.GetMapping;
import org.springframework.web.bind.annotation.PathVariable;
import org.springframework.web.bind.annotation.PostMapping;
import org.springframework.web.bind.annotation.RequestBody;
import org.springframework.web.bind.annotation.RestController;

import com.roytuts.spring.boot.ajax.crud.entity.Company;
import com.roytuts.spring.boot.ajax.crud.service.CrudService;

@RestController
@CrossOrigin(origins = "*")
public class CrudRestController {

	@Autowired
	private CrudService crudService;

	@GetMapping("/companyList")
	public ResponseEntity<List<Company>> getCompanyList() {
		return new ResponseEntity<List<Company>>(crudService.getCompanyList(), HttpStatus.OK);
	}

	@GetMapping("/company/{id}")
	public ResponseEntity<Company> getCompany(@PathVariable Integer id) {
		return new ResponseEntity<Company>(crudService.getCompanyById(id), HttpStatus.OK);
	}

	@PostMapping("/company/save")
	public ResponseEntity<Void> saveOrUpdateCompany(@RequestBody Company company) {
		crudService.saveOrUpdateCompany(company);
		return new ResponseEntity<Void>(HttpStatus.OK);
	}

	@DeleteMapping("/company/delete/{id}")
	public ResponseEntity<Void> deleteCompany(@PathVariable Integer id) {
		crudService.deleteCompany(id);
		return new ResponseEntity<Void>(HttpStatus.OK);
	}

}
Main Class
The beauty of Spring Boot application is to create a main class and mark with @SpringBootApplication and executing this main class will deploy your application into embedded Tomcat server.
package com.roytuts.spring.boot.ajax.crud;

import org.springframework.boot.SpringApplication;
import org.springframework.boot.autoconfigure.SpringBootApplication;

@SpringBootApplication(scanBasePackages = "com.roytuts.spring.boot.ajax.crud")
public class SpringBootAjaxCrudApp {

	public static void main(String[] args) {
		SpringApplication.run(SpringBootAjaxCrudApp.class, args);
	}

}
Application Configuration
I am using here MySQL database server for storing records. Therefore I need to connect to MySQL database to query data from tables.
So create application.properties file with the below content. Don’t forget to update the database configuration values according to yours.
#datasource
spring.datasource.driverClassName=com.mysql.cj.jdbc.Driver
spring.datasource.hibernate.dialect=org.hibernate.dialect.MySQL8Dialect
spring.datasource.url=jdbc:mysql://localhost:3306/roytuts
spring.datasource.username=root
spring.datasource.password=root

#show sql query
logging.level.org.hibernate.SQL=DEBUG

#disable schema generation from Hibernate
spring.jpa.hibernate.ddl-auto=none
Create below config class to create Datasource and EntityManagerFactory. Notice we have not loaded the application.properties file because it is loaded by default from the classpath.
package com.roytuts.spring.boot.ajax.crud.config;

import javax.persistence.EntityManagerFactory;
import javax.sql.DataSource;

import org.springframework.beans.factory.annotation.Autowired;
import org.springframework.context.annotation.Bean;
import org.springframework.context.annotation.Configuration;
import org.springframework.core.env.Environment;
import org.springframework.data.jpa.repository.config.EnableJpaRepositories;
import org.springframework.jdbc.datasource.DriverManagerDataSource;
import org.springframework.orm.jpa.LocalContainerEntityManagerFactoryBean;
import org.springframework.orm.jpa.vendor.Database;
import org.springframework.orm.jpa.vendor.HibernateJpaVendorAdapter;

@Configuration
@EnableJpaRepositories(basePackages = "com.roytuts.spring.boot.ajax.crud.repository")
public class DbConfig {

	@Autowired
	private Environment environment;

	@Bean
	public DataSource dataSource() {
		DriverManagerDataSource ds = new DriverManagerDataSource();
		ds.setDriverClassName(environment.getRequiredProperty("spring.datasource.driverClassName"));
		ds.setUrl(environment.getRequiredProperty("spring.datasource.url"));
		ds.setUsername(environment.getRequiredProperty("spring.datasource.username"));
		ds.setPassword(environment.getRequiredProperty("spring.datasource.password"));
		return ds;
	}

	@Bean
	public EntityManagerFactory entityManagerFactory(DataSource dataSource) {
		HibernateJpaVendorAdapter vendorAdapter = new HibernateJpaVendorAdapter();
		vendorAdapter.setDatabase(Database.MYSQL);
		LocalContainerEntityManagerFactoryBean factory = new LocalContainerEntityManagerFactoryBean();
		factory.setJpaVendorAdapter(vendorAdapter);
		factory.setPackagesToScan("com.roytuts.spring.boot.ajax.crud.entity");
		factory.setDataSource(dataSource);
		factory.afterPropertiesSet();
		return factory.getObject();
	}

}
I am done with the coding for server application. If you want you can use any REST client like Postman and test the functionalities. But as I have said in the beginning that I will invoke REST services from client application so I will now create client application.
Client Application
For deploying client application I have used here Apache http server. I am going to use jQuery with AJAX technique for calling REST APIs.
I assume you have the required configuration for running Apache web server.
Project Directory
The first thing is to create a project root directory anywhere in your machine or under htdocs folder of HTTP Apache Server (if you can run this client app using HTTP Apache Server). The name of the project root directory is ajax-crud-client.
View File
Next step is to create the view file which will have all the required configurations for displaying and perform operations on company data on a UI (User Interface). This app was tested with jQuery version 3.4.1 to 3.5.1.
<!doctype html>
<html>
<head>
<title>Spring Boot AJAX jQuery CRUD</title>
<meta http-equiv="Content-Type" content="text/html;charset=utf-8"/>
<script src="https://code.jquery.com/jquery-3.4.1.min.js"></script>
<!-- jQuery Modal -->
<script src="https://cdnjs.cloudflare.com/ajax/libs/jquery-modal/0.9.1/jquery.modal.min.js"></script>
<link rel="stylesheet" href="https://cdnjs.cloudflare.com/ajax/libs/jquery-modal/0.9.1/jquery.modal.min.css" />
<style>
.modal p { margin: 1em 0; }
.add_form.modal {
border-radius: 0;
line-height: 18px;
padding: 0;
font-family: "Lucida Grande", Verdana, sans-serif;
}
.add_form.modal p { padding: 20px 30px; border-bottom: 1px solid #ddd; margin: 0;
background: -webkit-gradient(linear,left bottom,left top,color-stop(0, #eee),color-stop(1, #fff));
overflow: hidden;
}
.add_form.modal p:last-child { border: none; }
.add_form.modal p label { float: left; font-weight: bold; color: #333; font-size: 13px; width: 110px; line-height: 22px; }
.add_form.modal p input[type="text"],
.add_form.modal p input[type="submit"] {
font: normal 12px/18px "Lucida Grande", Verdana;
padding: 3px;
border: 1px solid #ddd;
width: 200px;
}
#msg {
margin: 10px;
padding: 30px;
color: #fff;
font-size: 18px;
font-weight: bold;
background: -moz-linear-gradient(top, #2e5764, #1e3d47);
background: -webkit-gradient(linear,left bottom,left top,color-stop(0, #1e3d47),color-stop(1, #2e5764));
}
</style>
<script type="text/javascript">
$(document).ready(function() {
$.getJSON('http://localhost:8080/companyList', function(json) {
var tr=[];
for (var i = 0; i < json.length; i++) {
tr.push('<tr>');
tr.push('<td>' + json[i].id + '</td>');
tr.push('<td>' + json[i].name + '</td>');
tr.push('<td><button class=\'edit\'>Edit</button> <button class=\'delete\' id=' + json[i].id + '>Delete</button></td>');
tr.push('</tr>');
}
$('table').append($(tr.join('')));
});
$(document).delegate('#addNew', 'click', function(event) {
event.preventDefault();
var name = $('#name').val();
$.ajax({
type: "POST",
contentType: "application/json; charset=utf-8",
url: "http://localhost:8080/company/save",
data: JSON.stringify({'name': name}),
cache: false,
success: function(result) {
$("#msg").html( "<span style='color: green'>Company added successfully</span>" );
window.setTimeout(function(){location.reload()},1000)
},
error: function(err) {
$("#msg").html( "<span style='color: red'>Name is required</span>" );
}
});
});
$(document).delegate('.delete', 'click', function() {
if (confirm('Do you really want to delete record?')) {
var id = $(this).attr('id');
var parent = $(this).parent().parent();
$.ajax({
type: "DELETE",
url: "http://localhost:8080/company/delete/" + id,
cache: false,
success: function() {
parent.fadeOut('slow', function() {
$(this).remove();
});
location.reload(true)
},
error: function() {
$('#err').html('<span style=\'color:red; font-weight: bold; font-size: 30px;\'>Error deleting record').fadeIn().fadeOut(4000, function() {
$(this).remove();
});
}
});
}
});
$(document).delegate('.edit', 'click', function() {
var parent = $(this).parent().parent();
var id = parent.children("td:nth-child(1)");
var name = parent.children("td:nth-child(2)");
var buttons = parent.children("td:nth-child(3)");
name.html("<input type='text' id='txtName' value='" + name.html() + "'/>");
buttons.html("<button id='save'>Save</button> <button class='delete' id='" + id.html() + "'>Delete</button>");
});
$(document).delegate('#save', 'click', function() {
var parent = $(this).parent().parent();
var id = parent.children("td:nth-child(1)");
var name = parent.children("td:nth-child(2)");
var buttons = parent.children("td:nth-child(3)");
$.ajax({
type: "POST",
contentType: "application/json; charset=utf-8",
url: "http://localhost:8080/company/save",
data: JSON.stringify({'id' : id.html(), 'name' : name.children("input[type=text]").val()}),
cache: false,
success: function() {
name.html(name.children("input[type=text]").val());
buttons.html("<button class='edit' id='" + id.html() + "'>Edit</button> <button class='delete' id='" + id.html() + "'>Delete</button>");
},
error: function() {
$('#err').html('<span style=\'color:red; font-weight: bold; font-size: 30px;\'>Error updating record').fadeIn().fadeOut(4000, function() {
$(this).remove();
});
}
});
});
});
</script>
</head>
<body>
<h2>Spring Boot AJAX jQuery CRUD</h2>
<p><a class='btn' href="#add" rel="modal:open">Add New Company</a></p>
<table border="1" cellspacing="0" cellpadding="5">
<tr>
<th>Id</th>
<th>Name</th>
<th>Actions</th>
</tr>
</table>
<form id="add" action="#" class="add_form modal" style="display:none;">
<div id='msg'/>
<h3>Add a New Company</h3>
<p>
<label>Name</label>
<input type="text" id="name" name="name">
</p>
<p>
<input type="submit" id="addNew" value="Submit">
</p>
</form>
</body>
</html>In the above file I have included the required jQuery library from CDN.
Next I included library and css for modal window. Then I apply some basic style on modal window.
Next section contains the jQuery AJAX programming for performing CRUD operations. I reload window after deletion or addition of the record because AJAX technique is by default asynchronous and your changes on the page will not be reflected.
Testing the Application
Now executing the main class will deploy your application into Tomcat server.
Now run your Apache web server, your application will be deployed automatically as it is inside htdocs folder.
Now hitting the home page URL http://localhost/ajax-crud-client/ajax_crud.html will give you the following screen. As I had stored some data initially so it displays those data on home page.
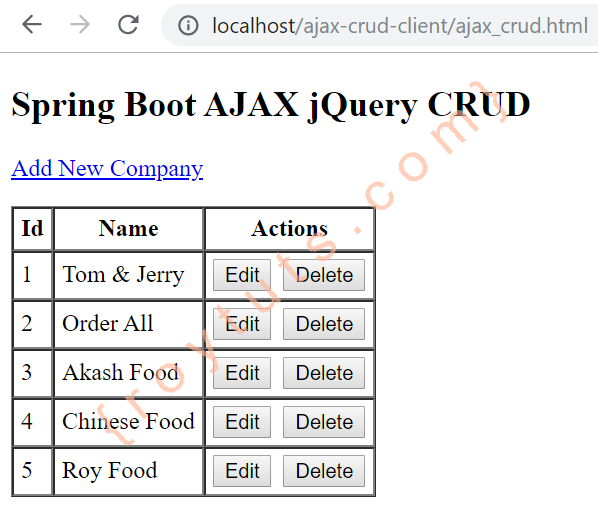
Now you can perform Edit, Delete and Add New Company using the corresponding buttons and link on this page.
Thanks Mate!!
Exactly
Actually , you don’t need DbConfig. I just delete DbConfig this file, and all works fine!