REST API Documentation
This tutorial will show you an example on how to document REST APIs using OpenAPI 3. When creating a REST API, good documentation is instrumental. Here I will use OpenAPI 3 in Spring application for creating documentation for REST APIs. I will create and deploy REST services but I do not have an option to let others know in a single place, where REST services, having methods, request body, request params, etc., are exposed for consumption. Here I will take a look at SpringDoc — a tool that simplifies the generation and maintenance of API docs, based on the OpenAPI 3 specification for Spring application.
Besides generating the OpenAPI 3 specification itself, I can integrate springdoc-openapi with Swagger UI so that I can interact with our API specification and exercise the endpoints. The Swagger specification is a powerful definition format to describe RESTful APIs. The Swagger specification creates a RESTful interface for easily developing and consuming an API by effectively mapping all the resources and operations associated with it. It’s easy-to-learn, language agnostic, and both human and machine readable.
Related Posts:
Prerequisites
Java 8/19, Spring Boot 2.2.4/3.1.0, SpringDoc Open API 1.1.49/1.7.0, Gradle 6.1.1, Maven 3.6.3/3.8.5
Project Setup
Create a gradle or maven based project in your favorite IDE or tool. The name of the project is spring-openapi-documentation.
If you are creating gradle based project then you can use the below build.gradle script to build your project.
buildscript {
	ext {
		springBootVersion = '2.2.4.RELEASE'
	}
    repositories {
        mavenCentral()
    }
    dependencies {
        classpath("org.springframework.boot:spring-boot-gradle-plugin:${springBootVersion}")
    }
}

plugins {
    id 'java-library'
    id 'org.springframework.boot' version '2.2.4.RELEASE'
}

sourceCompatibility = 12
targetCompatibility = 12

repositories {
    mavenCentral()
}

dependencies {
    implementation("org.springframework.boot:spring-boot-starter-web:${springBootVersion}")
    implementation('org.springdoc:springdoc-openapi-core:1.1.49')
}
If you are creating maven based project then you can use the below pom.xml file to build your project.
<?xml version="1.0" encoding="UTF-8"?>

<project xmlns="http://maven.apache.org/POM/4.0.0"
	xmlns:xsi="http://www.w3.org/2001/XMLSchema-instance"
	xsi:schemaLocation="http://maven.apache.org/POM/4.0.0 http://maven.apache.org/xsd/maven-4.0.0.xsd">
	<modelVersion>4.0.0</modelVersion>

	<groupId>com.roytuts</groupId>
	<artifactId>spring-openapi-documentation</artifactId>
	<version>0.0.1-SNAPSHOT</version>

	<properties>
		<project.build.sourceEncoding>UTF-8</project.build.sourceEncoding>
		<maven.compiler.source>19</maven.compiler.source>
		<maven.compiler.target>19</maven.compiler.target>
	</properties>

	<parent>
		<groupId>org.springframework.boot</groupId>
		<artifactId>spring-boot-starter-parent</artifactId>
		<version>3.1.0</version>
	</parent>

	<dependencies>
		<dependency>
			<groupId>org.springframework.boot</groupId>
			<artifactId>spring-boot-starter-web</artifactId>
		</dependency>

		<dependency>
			<groupId>org.springdoc</groupId>
			<artifactId>springdoc-openapi-starter-webmvc-ui</artifactId>
			<version>2.1.0</version>
		</dependency>

		<dependency>
			<groupId>javax.servlet</groupId>
			<artifactId>javax.servlet-api</artifactId>
			<version>4.0.1</version>
			<scope>provided</scope>
		</dependency>
	</dependencies>

	<build>
		<plugins>
			<plugin>
				<groupId>org.springframework.boot</groupId>
				<artifactId>spring-boot-maven-plugin</artifactId>
			</plugin>
		</plugins>
	</build>
</project>
REST APIs
Now I will publish two REST API End points using Spring boot framework, one is with http method GET for just returning Hello World! and another is to greet a person for a given name of the person with http method POST.
@RestController
public class RestApi {

	@GetMapping("/")
	public ResponseEntity<String> greet() {
		return new ResponseEntity<String>("Hello World!", HttpStatus.OK);
	}

	@PostMapping("/greet")
	public ResponseEntity<String> greet(@RequestBody String name) {
		return new ResponseEntity<String>("Hello, " + name, HttpStatus.OK);
	}

}
Spring Boot Main Class
A class is having main method with @SpringBootApplication is enough to deploy the Spring Boot application on the embedded Tomcat server.
@SpringBootApplication
public class SpringOpenApiDocumentationApp {

	public static void main(String[] args) {
		SpringApplication.run(SpringOpenApiDocumentationApp.class, args);
	}

}
Testing Swagger Documentation
Once your application is deployed successfully on Tomcat server you can access the documentation URL http://localhost:8080/v3/api-docs in the browser. The default path of the OpenAPI documentation is /v3/api-docs.
The output of you should get is given below:
{"openapi":"3.0.1","info":{"title":"OpenAPI definition","version":"v0"},"servers":[{"url":"http://localhost:8080","description":"Generated server url"}],"paths":{"/greet":{"post":{"tags":["rest-api"],"operationId":"greet","requestBody":{"content":{"application/json":{"schema":{"type":"string"}}},"required":true},"responses":{"200":{"description":"OK","content":{"*/*":{"schema":{"type":"string"}}}}}}},"/":{"get":{"tags":["rest-api"],"operationId":"greet_1","responses":{"200":{"description":"OK","content":{"*/*":{"schema":{"type":"string"}}}}}}}},"components":{}}You can customize the path in application.properties file, for example, springdoc.api-docs.path=/api-docs. Therefore the documentation path is /api-docs and you can now access at http://localhost:8080/api-docs and you will see the same output as above.
The OpenAPI definitions are in JSON format by default. For yaml format, I can obtain the definitions at http://localhost:8080/v3/api-docs.yaml or http://localhost:8080/api-docs.yaml. The content you will get is:
openapi: 3.0.1
info:
  title: OpenAPI definition
  version: v0
servers:
- url: http://localhost:8080
  description: Generated server url
paths:
  /greet:
    post:
      tags:
      - rest-api
      operationId: greet
      requestBody:
        content:
          application/json:
            schema:
              type: string
        required: true
      responses:
        "200":
          description: OK
          content:
            '*/*':
              schema:
                type: string
  /:
    get:
      tags:
      - rest-api
      operationId: greet_1
      responses:
        "200":
          description: OK
          content:
            '*/*':
              schema:
                type: string
components: {}
Now you see the documentation is readable but not pretty good to be read. Therefore I have used Swagger UI along with OpenAPI 3 specification as I said earlier at the beginning of the tutorial.
<dependency>
	<groupId>org.springdoc</groupId>
	<artifactId>springdoc-openapi-starter-webmvc-ui</artifactId>
	<version>2.1.0</version>
</dependency>
Next task is to rebuild your application and deploy the application by executing the main class.
Now access the Swagger UI at URl http://localhost:8080/swagger-ui.html, if you want to customize the path then you can do it in the application.properties file springdoc.swagger-ui.path=/swagger.html, now your URL will be http://localhost:8080/swagger.html.
Now you will see the similar screen on the browser as shown in the below image:
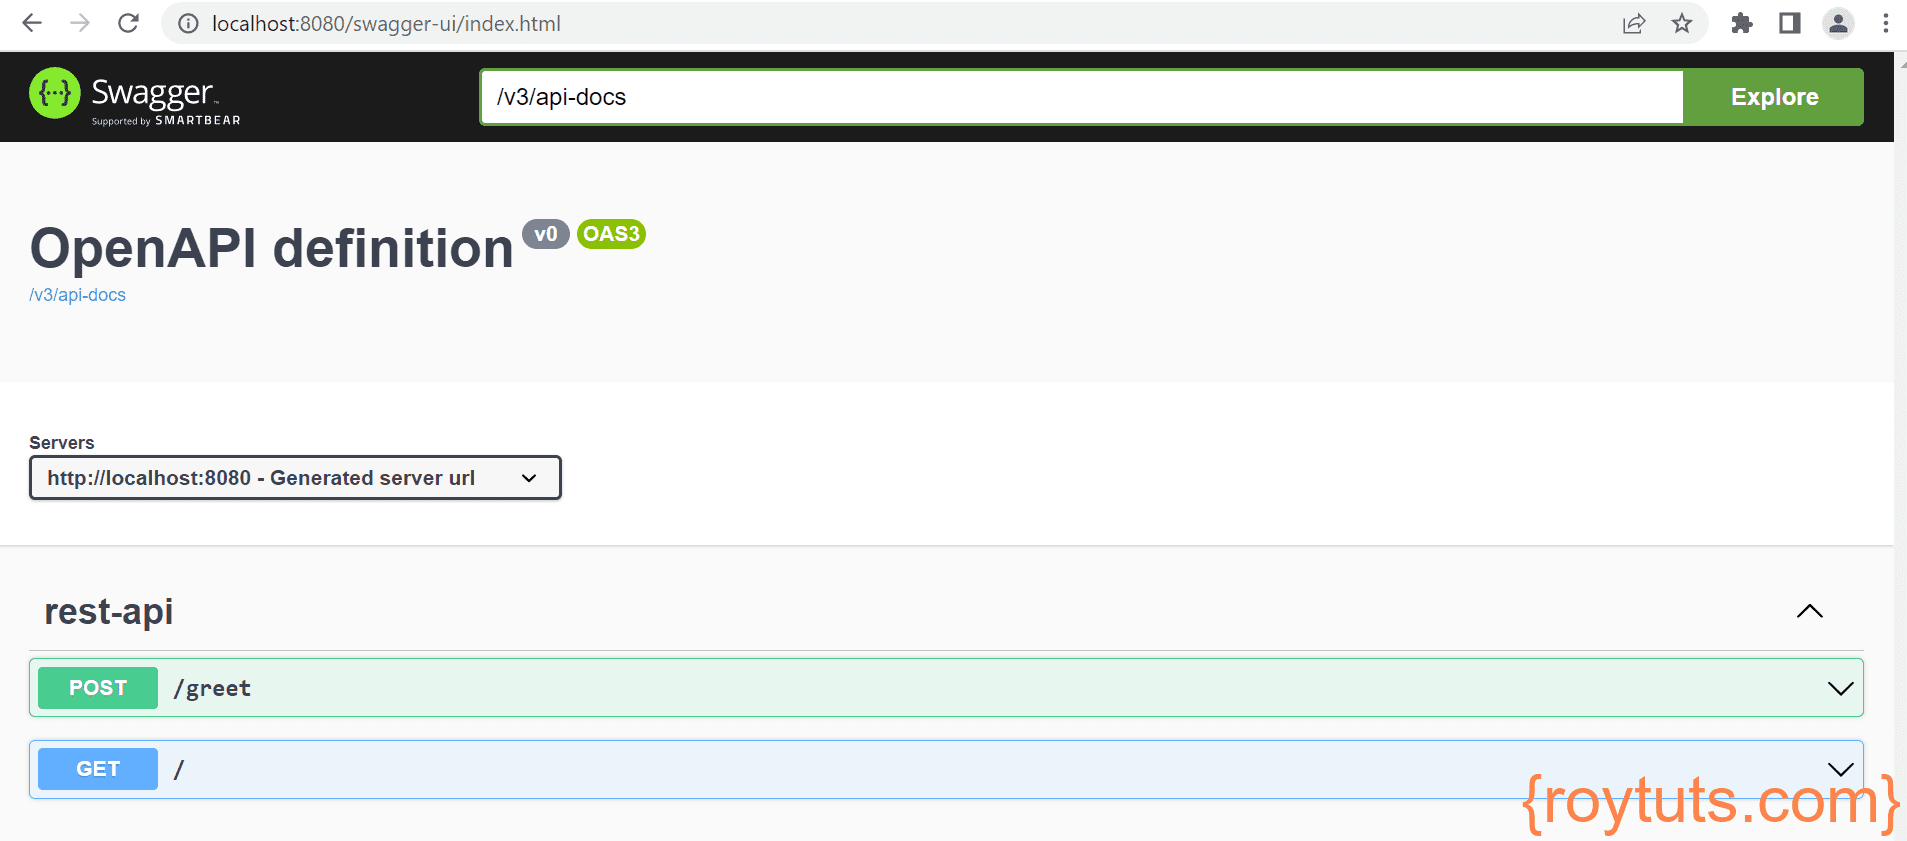
You can click GET or POST to expand it and click on Try it out. Next click on Execute button once it appears.
For GET request you will see output as Hello World!
For POST request you have to set Request body after clicking on Try it out button. For example, I set Soumitra to the Request body. Therefore I get the output as Hello, Soumitra once I click on Execute button.