Introduction
Here in this tutorial, PHP REST API authentication using JWT, you will see how to use JWT (JSON Web Token) to authorize users and allow them to continue their works once they are logged in using their regular credentials (usernames and passwords). Users use their credentials to get the JWTs and continue their work until JWTs expire. In this example, I will not use any third party library to generate JWT.
You might have seen how to generate and validate JWT using PHP language without using any third party library. Here I will use the same concept to generate the JWT for individual user and allow him/her continue his/her work until JWT expires.
I will create REST APIs in PHP for individual functionality, such as, for login I will create a separate REST API, for registration I will craete a separate REST API.

Prerequisites
PHP 7.3.5 – 7.4.23, Apache 2.4 (Optional), MySQL 8.0.17 – 8.0.26, REST Client – Talend, Postman, Firefox, etc.
MySQL Table
Create a table user in MySQL server under roytuts database.
CREATE TABLE `user` (
  `id` int NOT NULL AUTO_INCREMENT,
  `username` varchar(45) DEFAULT NULL,
  `password` varchar(255) DEFAULT NULL,
  PRIMARY KEY (`id`)
) ENGINE=InnoDB AUTO_INCREMENT=1 DEFAULT CHARSET=utf8mb4 COLLATE=utf8mb4_unicode_ci;
I insert one row with sample data into the database to test the application right away:
insert into user(`username`, `password`) value(‘roy’, ‘roy’);Project Directory
It’s assumed that you have setup Apache (Optional, you can use built-in PHP development server), PHP and MySQL in Windows system.
Now I will create a project root directory called php-jwt-rest-authentication under the Apache server’s htdocs folder. I may not mention the project root directory in subsequent sections and I will assume that I am talking with respect to the project root directory.
Database Configuration
Create db.php file for various database operations, such as, inserting data into MySQL database, selecting data from MySQL database, etc. Please do not forget to change the database credentials as per your database.
<?php

/**
* Author : https://roytuts.com
*/

$dbConn = mysqli_connect('localhost', 'root', 'root', 'roytuts') or die('MySQL connect failed. ' . mysqli_connect_error());

function dbQuery($sql) {
	global $dbConn;
	$result = mysqli_query($dbConn, $sql) or die(mysqli_error($dbConn));
	return $result;
}

function dbFetchAssoc($result) {
	return mysqli_fetch_assoc($result);
}

function dbNumRows($result) {
    return mysqli_num_rows($result);
}

function closeConn() {
	global $dbConn;
	mysqli_close($dbConn);
}

//End of file
User Registration
In order to gain access to the system, user has to first get himself/herself registered by creating username and password. The real application will capture much more data about a user but for simplicity I am capturing little information.
I did not use any encryption technology and storing password as a plain text but ideally you should never do this for your real application.
The below REST API allows any origin to be accessible for http method POST only. JSON parameter will be used in the request body for creating new resource, i.e., for registering the new user.
I will create a PHP file called register.php with the following code:
<?php

/**
* Author : https://roytuts.com
*/

require_once 'db.php';

header("Access-Control-Allow-Origin: *");
header("Access-Control-Allow-Methods: POST");

if ($_SERVER['REQUEST_METHOD'] === 'POST') {
	// get posted data
	$data = json_decode(file_get_contents("php://input", true));

	$sql = "INSERT INTO user(username, password) VALUES('" . mysqli_real_escape_string($dbConn, $data->username) . "', '" . mysqli_real_escape_string($dbConn, $data->password) . "')";

	$result = dbQuery($sql);

	if($result) {
		echo json_encode(array('success' => 'You registered successfully'));
	} else {
		echo json_encode(array('error' => 'Something went wrong, please contact administrator'));
	}
}

//End of file
In PHP I have retrieved the JSON body parameter using the following code.
file_get_contents("php://input", true)Finally I have decoded the JSON parameters to access as an object using the function json_decode().
Here is an example on how to register a new user. You can use any REST client to register or create a new user.
Http Method - POST
URL - http://localhost/php-jwt-rest-authentication/register.php
Request Body - {"username":"roy", "password":"roy"}
Header - Content-Type:application/json
Response - {"success":"You registered successfully"}
User Login
The registered user will be able to login to the application and will get the generated JWT. Then this generated JWT will be used to access designated REST APIs over http protocol.
The JWT is valid only for 60 seconds or 1 minute, please change to suit your requirements.
Create a file login.php with the following source code:
<?php
/**
* Author : https://roytuts.com
*/
require_once 'db.php';
require_once 'jwt_utils.php';
header("Access-Control-Allow-Origin: *");
header("Access-Control-Allow-Methods: POST");
if ($_SERVER['REQUEST_METHOD'] === 'POST') {
// get posted data
$data = json_decode(file_get_contents("php://input", true));
$sql = "SELECT * FROM user WHERE username = '" . mysqli_real_escape_string($dbConn, $data->username) . "' AND password = '" . mysqli_real_escape_string($dbConn, $data->password) . "' LIMIT 1";
$result = dbQuery($sql);
if(dbNumRows($result) < 1) {
echo json_encode(array('error' => 'Invalid User'));
} else {
$row = dbFetchAssoc($result);
$username = $row['username'];
$headers = array('alg'=>'HS256','typ'=>'JWT');
$payload = array('username'=>$username, 'exp'=>(time() + 60));
$jwt = generate_jwt($headers, $payload);
echo json_encode(array('token' => $jwt));
}
}
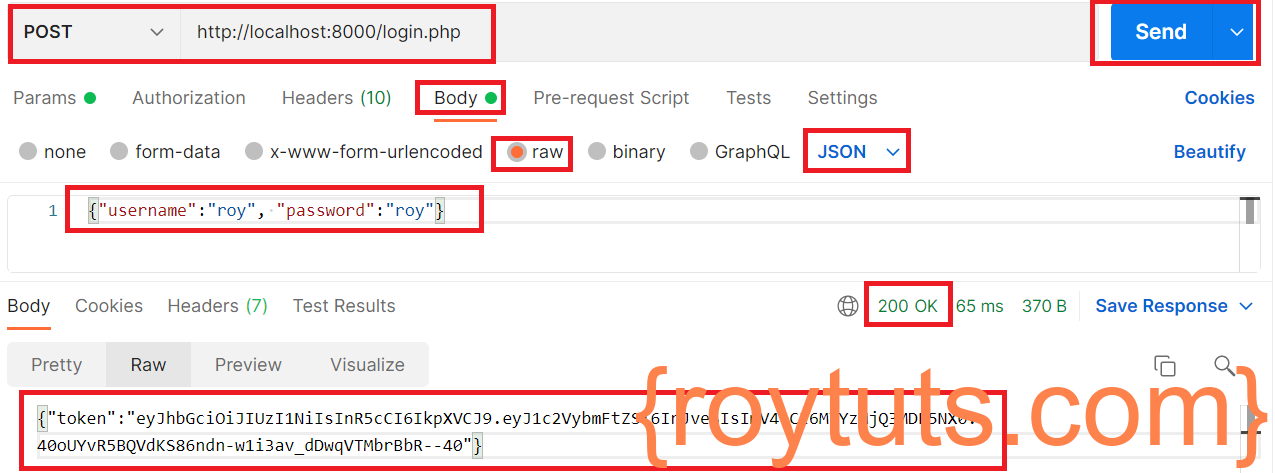
//End of fileHere is an example on how to login and get the generated JWT:
Http Method - POST
URL - http://localhost/php-jwt-rest-authentication/login.php
Request Body - {"username":"roy", "password":"roy"}
Header - Content-Type:application/json
Response - {"token":"eyJhbGciOiJIUzI1NiIsInR5cCI6IkpXVCJ9.eyJ1c2VybmFtZSI6InJveSIsImV4cCI6MTU4MjYyMDY1OX0.EMTwnke-M5PXV3LEEUveZLcvvi7pQmGUbWMAj2KeR94"}
Access REST API
Now I will use the generated JWT to access the REST API that list all users from the MySQL database table to the user who is having valid JWT.
I accept HTTP method GET and allow access to anyone.
Create a file users.php with the following source code:
<?php
/**
* Author : https://roytuts.com
*/
require_once 'db.php';
require_once 'jwt_utils.php';
header("Access-Control-Allow-Origin: *");
header("Access-Control-Allow-Methods: GET");
$bearer_token = get_bearer_token();
#echo $bearer_token;
$is_jwt_valid = is_jwt_valid($bearer_token);
if($is_jwt_valid) {
$sql = "SELECT * FROM user";
$results = dbQuery($sql);
$rows = array();
while($row = dbFetchAssoc($results)) {
$rows[] = $row;
}
echo json_encode($rows);
} else {
echo json_encode(array('error' => 'Access denied'));
}
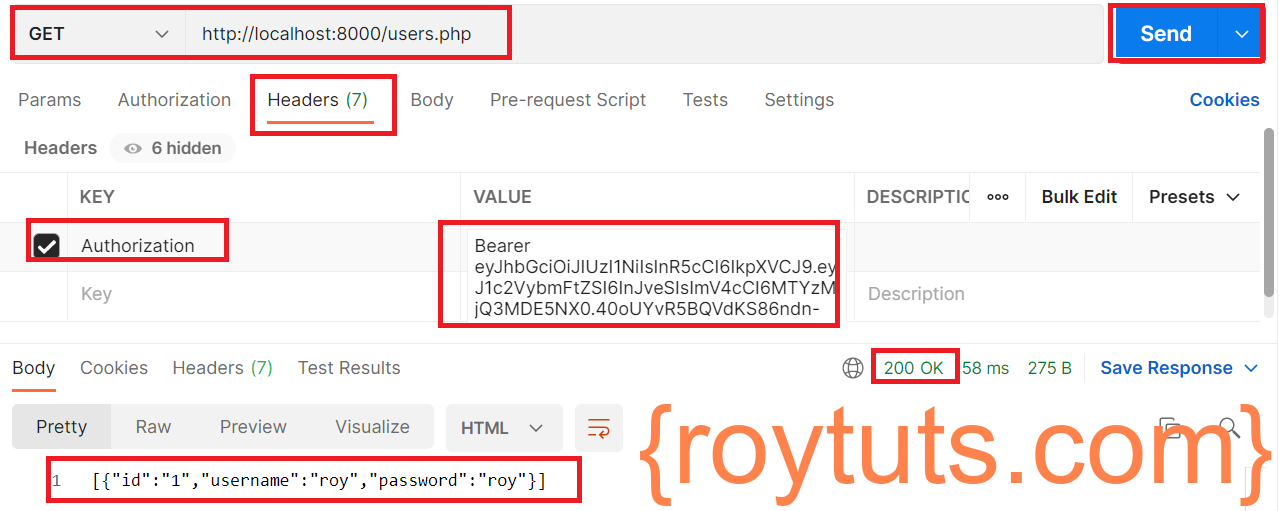
//End of fileHere is an example on how to access the REST API:
Http Method - GET
URL - http://localhost/php-jwt-rest-authentication/users.php
Request Body - {"username":"roy", "password":"roy"}
Header - Authorization:Bearer eyJhbGciOiJIUzI1NiIsInR5cCI6IkpXVCJ9.eyJ1c2VybmFtZSI6InJveSIsImV4cCI6MTU4MjYyMDY1OX0.EMTwnke-M5PXV3LEEUveZLcvvi7pQmGUbWMAj2KeR94
Response - [{"id":"1","username":"roy","password":"roy"},{"id":"2","username":"soumitra","password":"roy"}]
In the above response you see two users because I have registered two users but I had shown only one user during registration process.
JWT Generation and Validation
The below PHP script defines the required functions to generate, validate JWT and extract the Bearer token from Authorization header of http request.
<?php

function generate_jwt($headers, $payload, $secret = 'secret') {
	$headers_encoded = base64url_encode(json_encode($headers));

	$payload_encoded = base64url_encode(json_encode($payload));

	$signature = hash_hmac('SHA256', "$headers_encoded.$payload_encoded", $secret, true);
	$signature_encoded = base64url_encode($signature);

	$jwt = "$headers_encoded.$payload_encoded.$signature_encoded";

	return $jwt;
}

function is_jwt_valid($jwt, $secret = 'secret') {
	// split the jwt
	$tokenParts = explode('.', $jwt);
	$header = base64_decode($tokenParts[0]);
	$payload = base64_decode($tokenParts[1]);
	$signature_provided = $tokenParts[2];

	// check the expiration time - note this will cause an error if there is no 'exp' claim in the jwt
	$expiration = json_decode($payload)->exp;
	$is_token_expired = ($expiration - time()) < 0;

	// build a signature based on the header and payload using the secret
	$base64_url_header = base64url_encode($header);
	$base64_url_payload = base64url_encode($payload);
	$signature = hash_hmac('SHA256', $base64_url_header . "." . $base64_url_payload, $secret, true);
	$base64_url_signature = base64url_encode($signature);

	// verify it matches the signature provided in the jwt
	$is_signature_valid = ($base64_url_signature === $signature_provided);

	if ($is_token_expired || !$is_signature_valid) {
		return FALSE;
	} else {
		return TRUE;
	}
}

function base64url_encode($data) {
    return rtrim(strtr(base64_encode($data), '+/', '-_'), '=');
}

function get_authorization_header(){
	$headers = null;

	if (isset($_SERVER['Authorization'])) {
		$headers = trim($_SERVER["Authorization"]);
	} else if (isset($_SERVER['HTTP_AUTHORIZATION'])) { //Nginx or fast CGI
		$headers = trim($_SERVER["HTTP_AUTHORIZATION"]);
	} else if (function_exists('apache_request_headers')) {
		$requestHeaders = apache_request_headers();
		// Server-side fix for bug in old Android versions (a nice side-effect of this fix means we don't care about capitalization for Authorization)
		$requestHeaders = array_combine(array_map('ucwords', array_keys($requestHeaders)), array_values($requestHeaders));
		//print_r($requestHeaders);
		if (isset($requestHeaders['Authorization'])) {
			$headers = trim($requestHeaders['Authorization']);
		}
	}

	return $headers;
}

function get_bearer_token() {
    $headers = get_authorization_header();

    // HEADER: Get the access token from the header
    if (!empty($headers)) {
        if (preg_match('/Bearer\s(\S+)/', $headers, $matches)) {
            return $matches[1];
        }
    }
    return null;
}
In the above code snippets the most important functions are get_authorization_header() and get_bearer_token(). These functions are used to get the required Bearer token from Authorization header.
Start Development Server
Now to start the development server, navigate to the root folder of your project from the command line tool and execute the command: php -S localhost:8000.
Your development server will start and listen to port 8000.
Testing JWT Authentication
Use the following details as highlighed in the screen-shot to generate the JWT using REST client tool:
Use the above generated JWT token in the HTTP header under Authorization key with the values as Bearer <JWT>.
Never mind, I found this https://stackoverflow.com/questions/40225826/can-apache-prevent-bearer-authentication-header
I added some rows to my .htaccess and now we’re back in business.
Also, in the beginning of this tutorual “insert into user(`username`, `password`) value(‘roy’, ‘roy’);” needs to be “insert into user(`username`, `password`) value(‘roy’, ‘roy’);” for it to work for me.
Hi.
I am running this on https on my hosting service, I am stuck on trying to get the users list on users.php.
I only get {“error”:”Access denied”}.
I use the token I get from login.php and I have changed the time from 60 to 3600.
I don’t know but it’s like the Bearer token is not getting through to the users.php.
Any advice?
Dear sir please help me to solve the problem
Login is success but when i try access users,php it gives following error
Warning: Undefined array key 1 in C:\xampp\htdocs\mylogin\jwt_utils.php on line 22
Warning: Undefined array key 2 in C:\xampp\htdocs\mylogin\jwt_utils.php on line 24
Warning: Attempt to read property “exp” on null in C:\xampp\htdocs\mylogin\jwt_utils.php on line 28
{“error”:”Access denied”}
what should i do please help me to solve
Exactly found what I was looking for to-the-pont
please share client side implementation. Thanks
No library, this is for me the most important thing !!!! Really thank you for sharing this code !!!
Thanks a lot.
Got what I actually wanted.
Thank you very much. It’s what exactly that i need.
You’re great !!!
after going through many sites, found the useful stuff finally
thanks for the code
Sir i would like to thank you for your effort and to help me very much with your article.
Nice article. Will try it. Please can you bulid another one in codeigniter 3. All the ones i see online are full of errors when i run them.
Thank
You’re welcome. Will try to publish.
what i found here is what i want a lot ……………………
thank you Brother
Welcome