How to install PostgreSQL Zip Archive in Windows
In this example I will show you how to install PostgreSQL zip archive in Windows operating system.
I will also show you how to setup username and password for your PostgreSQL database server.I am also going to list down some basic commands for listing all database, switching to another database, creating a new database, showing all tables, creating a new table, database backup, and database import.
The advantage of installing zip version of the PostgreSQL is that your operating system’s registry does not get modified and you do not need to restart your system (if required).
You do not need to worry about anything that goes wrong during the uninstallation of your PostgreSQL server. You do not need to worry about updating the PostgreSQL.
You can just delete the folders and you can again setup the new version of PostgreSQL anytime. You do not need to check in the registry for any uninstalled or unremoved files, in the system, that might exist if you install exe or msi version of PostgreSQL server.
Prerequisites
PostgreSQL 13.1/17.6, Windows 10/11 64 bit
Install PostgreSQL
Go through the following steps in order to install PostgreSQL server.
- Download zip version of PostgreSQL
- Extract the zip into physical drive location. Let’s say under drive C. So the PostgreSQL root directory is C:\pgsql.
- You need to create a folder where your server’s configurations such as data, user, etc. will be stored. I have created a folder or directory pgsql_data under C drive. So the folder is C:\pgsql_data.
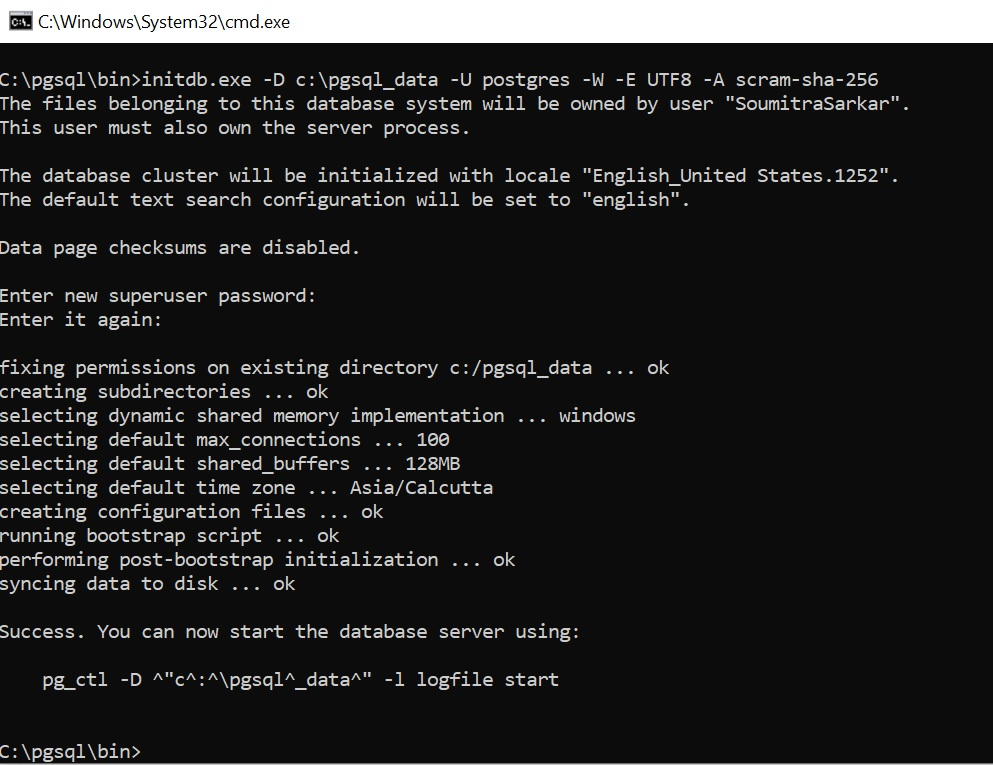
- Now setup user, password with encryption type, encoding for database using the command along with initdb.exe. The initdb.exe will be found under C:\pgsql\bin folder.
C:\pgsql\bin>initdb.exe -D C:\pgsql_data -U postgres -W -E UTF8 -A scram-sha-256The -U postgres creates the superuser as postgres, -W prompts for the password of the superuser, -E UTF8 creates the database with UTF-8 encoding and -A scram-sha-256 enables password authentication.

So you are done with the PostgreSQL installation.
Start and Stop PostgreSQL
- To start PostgreSQL, execute the command:
C:\pgsql\bin>pg_ctl.exe -D C:\pgsql_data -l logfile start - To shutdown PostgreSQL, execute the command:
C:\pgsql\bin>pg_ctl.exe -D C:\pgsql_data stop

Login to PostgreSQL Server
Now I will show you how to connect to PostgreSQL server using psql client and perform some basic commands.
Use the following command to login to connect to your database server:
C:\pgsql\bin>psql.exe -U postgresWhen prompted for password, enter the password which you set during the installation.
You are successfully connected and you can perform SQL statements, commands, etc.
Queries or Operations in PostgreSQL
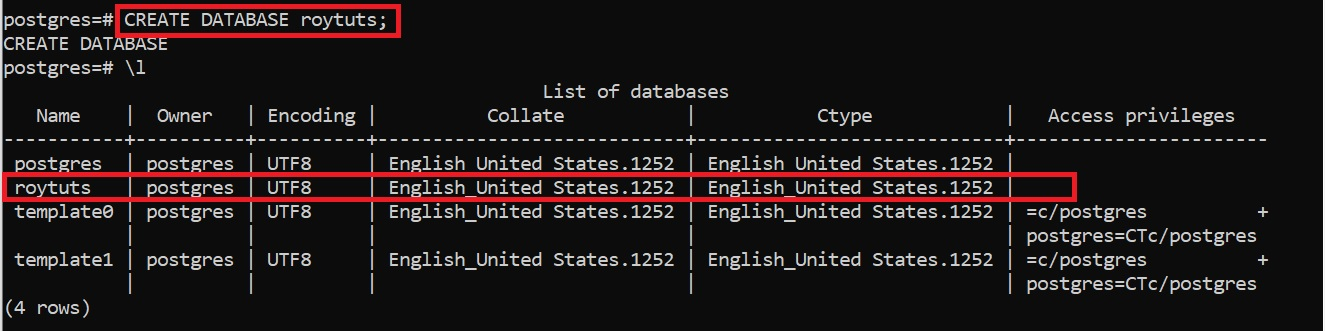
To list all databases use command: \list or \l, as shown in the below image:

To create a new database, use command: CREATE DATABASE <database name>;
To switch to a new database, use command \connect <database name> or \c <database name>,

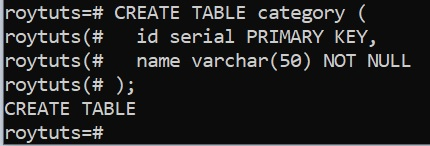
You can also create a table using command line, for example, I am creating the below table:
CREATE TABLE category (
  id serial PRIMARY KEY,
  name varchar(50) NOT NULL
);
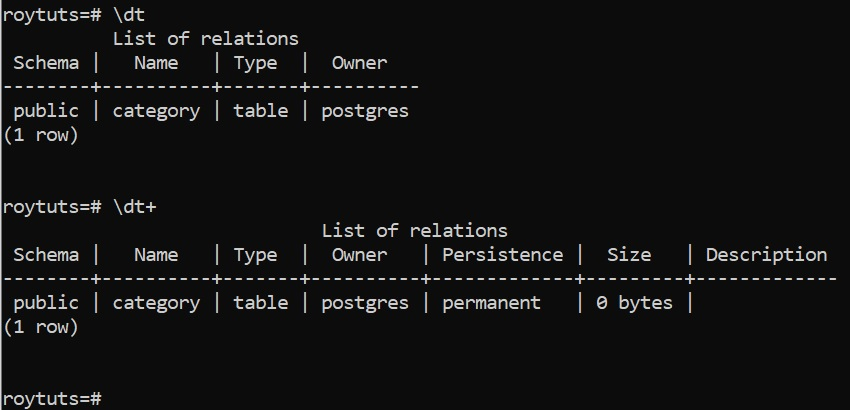
To show tables from a database, use the command \dt or \dt+,
To take backup or database dump, use the following command:
C:\pgsql\bin>pg_dump.exe -U postgres -d roytuts -f <path where backup will be stored>\backup.sqlWhere, -U followed by database username, -d followed by database name, -f followed by full path with .sql or .pgsql file name.
To import existing .pgsql or .sql file into database server, use the following command:
C:\pgsql\bin>psql.exe -h ec2-75-101-212-64.compute-1.amazonaws.com -U ilfndedxuwxhxu d8lhnd1pla9162 < <directory path>\backup.sqlWhere, -h followed by host name (I used here Heroku cloud), -U followed by database username, followed by database name and backup file name. You can also use -p followed by port if you are not using default port 5431.
That’s all about how to install zip version of PostgreSQL database server in Windows Operating System.
Appreciated.
Thanks for your great contribution.
Thanks! Excellent to get started with zip archive..
great!