Spring Boot and H2 Database
This tutorial will show you how to integrate in-memory H2 database with Spring Boot and build using Gradle/Maven tools. You will see here simple Spring Boot Data JPA example with Spring REST API to understand how it works.
H2 is in-memory database, so it does not have persistence capability once your Spring Boot application is closed. But you can check data in H2 database by accessing the console in the browser as long as your Spring Boot application is running.
What is an in-memory database?
An in memory database is created when an application starts up and destroyed when the application is stopped.
Using in memory database has lots of advantages such as:
- No need to setup the database
- Almost zero configuration
- Almost zero maintenance
- It is very easy to use for learning, proof of concepts and unit testing
H2 is one of the popular in memory database and Spring Boot provides very easy configuration for an in memory database like H2.
Why is in memory database required?
Let’s consider a cenario when you want to do a quick proof of concept(POC) and using a traditional database involves a lot of overhead.
Another scenario, on your unit tests:
- You don’t want them to fail when some data/schema get changed in the database.
- Multiple developers might be running the tests in parallel.
Remember you should not replace the more robust database servers, such as, MySQL, Oracle, PostgreSQL, etc. by H2 database for your actual applications.
Prerequisites
Spring Boot 2.1 – 2.5.4/3.1.5, H2 1.3.176 – 1.4.200/1.4.214, Gradle 4.x/5.x, Maven 3.8.2/3.8.5, Java 1.8/19
Project Setup
Create a gradle or maven based project in your favorite IDE or tool.
If you are using maven based project then you can use the following pom.xml file:
<?xml version="1.0" encoding="UTF-8"?>

<project xmlns="http://maven.apache.org/POM/4.0.0"
	xmlns:xsi="http://www.w3.org/2001/XMLSchema-instance"
	xsi:schemaLocation="http://maven.apache.org/POM/4.0.0 http://maven.apache.org/xsd/maven-4.0.0.xsd">
	<modelVersion>4.0.0</modelVersion>

	<groupId>com.roytuts</groupId>
	<artifactId>spring-boot-h2-integration</artifactId>
	<version>0.0.1-SNAPSHOT</version>

	<properties>
		<project.build.sourceEncoding>UTF-8</project.build.sourceEncoding>
		<maven.compiler.source>19</maven.compiler.source>
		<maven.compiler.target>19</maven.compiler.target>
	</properties>

	<parent>
		<groupId>org.springframework.boot</groupId>
		<artifactId>spring-boot-starter-parent</artifactId>
		<version>3.1.5</version>
	</parent>

	<dependencies>
		<dependency>
			<groupId>org.springframework.boot</groupId>
			<artifactId>spring-boot-starter-web</artifactId>
		</dependency>

		<dependency>
			<groupId>org.springframework.boot</groupId>
			<artifactId>spring-boot-starter-data-jpa</artifactId>
		</dependency>

		<dependency>
			<groupId>com.h2database</groupId>
			<artifactId>h2</artifactId>
		</dependency>
	</dependencies>

	<build>
		<plugins>
			<plugin>
				<groupId>org.springframework.boot</groupId>
				<artifactId>spring-boot-maven-plugin</artifactId>
			</plugin>
		</plugins>
	</build>
</project>
If you are using gradle based project then you can use the following build.gradle script.
buildscript {
	ext {
		springBootVersion = '2.1.3.RELEASE'
	}
    repositories {
    	mavenLocal()
    	mavenCentral()
    }
    dependencies {
    	classpath("org.springframework.boot:spring-boot-gradle-plugin:${springBootVersion}")
    }
}
apply plugin: 'java'
apply plugin: 'org.springframework.boot'
sourceCompatibility = 1.8
targetCompatibility = 1.8
repositories {
	mavenLocal()
    mavenCentral()
}
dependencies {
	compile("org.springframework.boot:spring-boot-starter-web:${springBootVersion}")
	compile("org.springframework.boot:spring-boot-starter-data-jpa:${springBootVersion}")
	runtime("com.h2database:h2:1.3.176")
}
As you see in the above build script I have just included the required dependencies for Spring Data JPA, H2 in memory database and Web module to perform REST operations with H2 database.
Entity Class
Create below entity class in order to define employee object.
package com.roytuts.spring.boot.h2.integration.entity;

@Entity
// @Table(name = "employee")
public class Employee {

	@Id
	@GeneratedValue(strategy = GenerationType.IDENTITY)
	private Integer id;

	private String name;

	@Column(name = "email_address")
	private String email;

	public Integer getId() {
		return id;
	}

	public void setId(Integer id) {
		this.id = id;
	}

	public String getName() {
		return name;
	}

	public void setName(String name) {
		this.name = name;
	}

	public String getEmail() {
		return email;
	}

	public void setEmail(String email) {
		this.email = email;
	}

}
In the above class, I have annotated the Employee class with @Entity to map the Employee object with H2 database table employee. Table name is optional and Hibernate will create the same table name as the Entity class name.
I have denoted primary column with @Id and I am also generating the auto-increment values for primary column using @GeneratedValue annotation with generation type specification. Generation strategy is optional and Hibernate will automatically generate sequence for the id field in the table.
If your column name and Java class’s attribute name is same then you don’t need to specify the corresponding table column name @Column annotation. For example, in the above Employee class the corresponding table will have same name with id and name but email as a Java attribute, whereas the corresponding column name in table will be email_address.
application.properties
You may not need to put any database configuration into application.properties file as I will use the default database configuration for H2 database. The database configuration for H2 is set by Spring Boot given below.
spring.datasource.url=jdbc:h2:mem:testdb
spring.datasource.driverClassName=org.h2.Driver
spring.datasource.username=sa
spring.datasource.password=
spring.h2.console.enabled=false
But here I am going to access the H2 database console using the browser to perform query on the database table, so I will override the above default configurations so that I can see the similar kind of database operations as we se for MySQL, PostgreSQL, etc.
I am going to use the following configurations for H2 database in this Spring Boot application:
spring.datasource.url=jdbc:h2:mem:roytuts
spring.datasource.driverClassName=org.h2.Driver
spring.datasource.username=sa
spring.datasource.password=


spring.jpa.show-sql = true

spring.h2.console.enabled = true
spring.h2.console.path=/h2console/

spring.jpa.hibernate.ddl-auto = create

spring.jpa.defer-datasource-initialization=true
In the above configuration, in the datasource URL, notice that I have put mem because it is an in-memory database.
The default username is sa and there is no need to input password for connecting to the database.
spring.jpa.show-sql = true tells to log the executed query in the console.
spring.h2.console.enabled = true tells to enable the H2 console so that you can access it through browser. If this value is false you won’t be able to access the H2 console.
spring.jpa.hibernate.ddl-auto = create tells to create the table in the in-memory roytuts database.
spring.h2.console.path=/h2console/ tells that your H2 database console is accessible at path /h2console. So if your Spring Boot application is running at port 8080 then your H2 console is accessible at http://localhost:8080/h2console. If you are using Spring Security then make sure to exclude this path (/h2console) from your security configuration.
data.sql
The data.sql file is required in order to insert some initial data to show employee data to the end users when they call the REST service.
This file is put under classpath directory src/main/resources.
insert into employee(name,email_address)
values('Soumitra','soumitra@email.com');
insert into employee(name,email_address)
values('Liton','liton@email.com');
insert into employee(name,email_address)
values('Suman','suman@email.com');
insert into employee(name,email_address)
values('Debabrata','debabrata@email.com');
spring.jpa.defer-datasource-initialization=true in the application.properties file is required for the following error:
org.springframework.beans.factory.BeanCreationException: Error creating bean with name 'dataSourceScriptDatabaseInitializer' defined in class path resource [org/springframework/boot/autoconfigure/sql/init/DataSourceInitializationConfiguration.class]: Invocation of init method failed; nested exception is org.springframework.jdbc.datasource.init.ScriptStatementFailedException: Failed to execute SQL script statement #1 of URL [file:/C:/eclipse-workspace/spring-boot-h2-integration/target/classes/data.sql]: insert into employee(id,name,email_address) values(1,'Soumitra','soumitra@email.com'); nested exception is org.h2.jdbc.JdbcSQLSyntaxErrorException: Table "EMPLOYEE" not found; SQL statement:So when your application starts the database table does not exist but the data.sql file is in the class path folder so spring tries to execute the data.sql file and insert statements fail to execute.
Repository Interface
Create repository interface that will extend Spring Data JPA’s JpaRepository interface to get the default functionalities from the Spring API.
package com.roytuts.spring.boot.h2.integration.repository;

public interface EmployeeRepository extends JpaRepository<Employee, Integer> {

	Employee findByName(String name);

	Employee findByEmail(String email);

}
In the above repository interface, I have declared two methods for finding the employee either by name or email.
REST Controller
Create Spring REST controller class to retrieve the data from H2 database – employee table.
package com.roytuts.spring.boot.h2.integration.rest.controller;

@RestController
public class EmployeeRestController {

	@Autowired
	private EmployeeRepository employeeRepository;

	@GetMapping("/employee/name/{name}")
	public ResponseEntity<Employee> getEmployeeByName(@PathVariable String name) {
		Employee employee = employeeRepository.findByName(name);
		return new ResponseEntity<Employee>(employee, HttpStatus.OK);
	}

	@GetMapping("/employee/email/{email}")
	public ResponseEntity<Employee> getEmployeeByEmail(@PathVariable String email) {
		Employee employee = employeeRepository.findByEmail(email);
		return new ResponseEntity<Employee>(employee, HttpStatus.OK);
	}

}
In the above class I have defined two methods to find the employee when name or email is passed to the path parameter of the URI.
Main Class
Create the main class in order to start up and deploy the Spring Boot application into embedded Tomcat server.
package com.roytuts.spring.boot.h2.integration;

@SpringBootApplication
@EntityScan(basePackages = "com.roytuts.spring.boot.h2.integration.entity")
@EnableJpaRepositories(basePackages = "com.roytuts.spring.boot.h2.integration.repository")
public class SpringH2App {

	public static void main(String[] args) {
		SpringApplication.run(SpringH2App.class, args);
	}

}
In the above class I have let the Spring Boot application know where to look for Entity class and Repository interface.
Testing the Spring Boot H2 Integration
Run the main class and your application will be started and deployed into Tomcat server. You will find some important messages in the console, such as:
...
Finished Spring Data repository scanning in 113ms. Found 1 repository interfaces.
...
Hibernate: drop table employee if exists
Hibernate: create table employee (id integer generated by default as identity, email_address varchar(255), name varchar(255), primary key (id))
...
Tomcat started on port(s): 8080 (http) with context path ''
...
When you hit the URL – http://localhost:8080/employee/name/Soumitra, the corresponding response is:
{"id":1,"name":"Soumitra","email":"soumitra@email.com"}The corresponding output in the console will be something similar to the below:
Hibernate: select employee0_.id as id1_0_, employee0_.email_address as email_ad2_0_, employee0_.name as name3_0_ from employee employee0_ where employee0_.name=?When you hit the URL – http://localhost:8080/employee/email/liton@email.com, the corresponding response you get as:
{"id":2,"name":"Liton","email":"liton@email.com"}The corresponding output in the console will be something similar to the below:
Hibernate: select employee0_.id as id1_0_, employee0_.email_address as email_ad2_0_, employee0_.name as name3_0_ from employee employee0_ where employee0_.email_address=?H2 Database
Now if you hit the URL http://localhost:8080/h2console in the browser then you will see the following page as shown in the image:
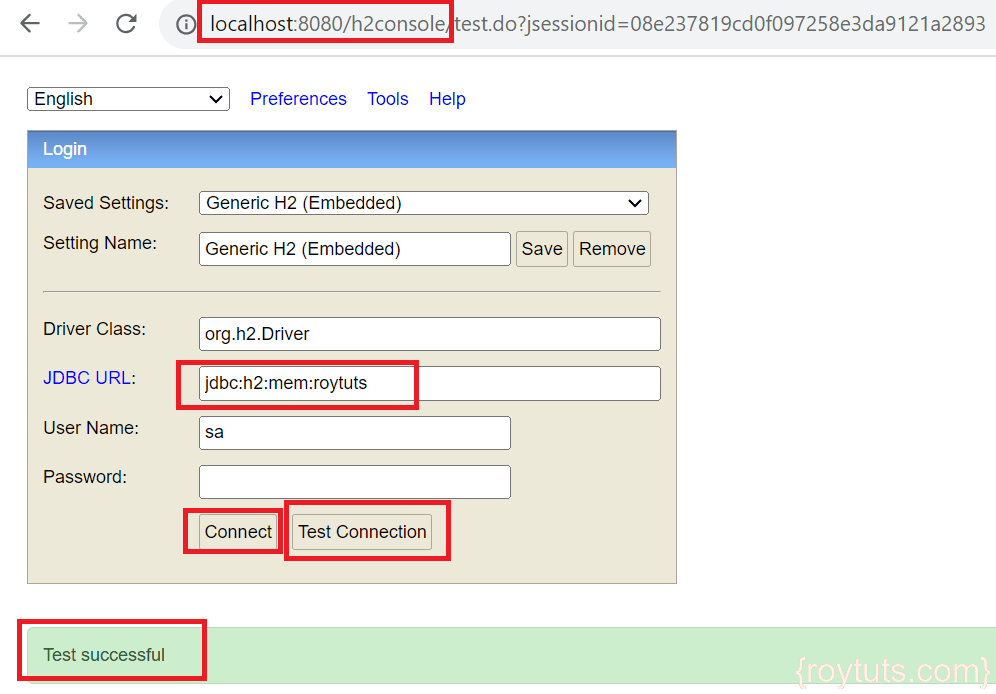
If you see jdbc:h2:~/test in the JDBC URL: section then change it to jdbc:h2:mem:roytuts.
Click on Connect button to connect to the database server. Even you can test the connectivity using Test Connection button before you click on the Connect button.
You will see the following page:
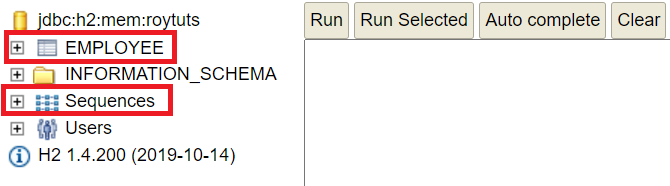
So the employee table has been created and sequences has also been created for auto generated id field.
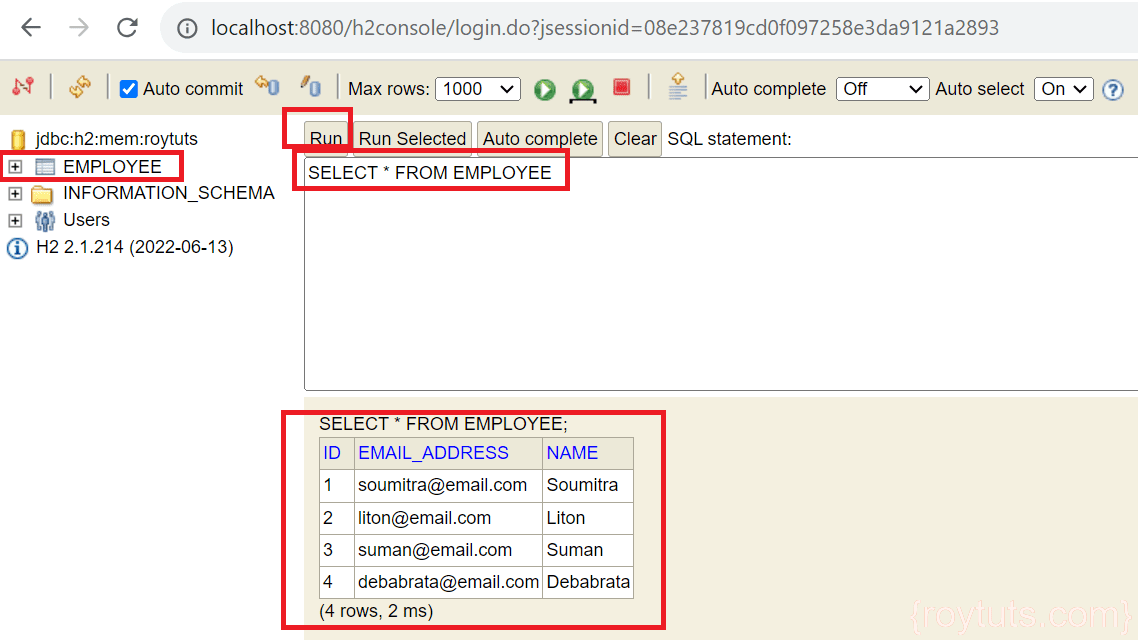
Now you can verify data which were inserted through data.sql file:
Hi Soumitra ,
Thanks for the excellent post .
i would like to know where you did put your data.sql ? which location ? any setting , props to let spring know we want to load data.sql file ?