React Spring Security
Here in this example I am going to integrate React JS front-end with Spring Boot Security framework. When user will try to access the home page the user will be redirected to the login page if the user has not been authenticated already.
Spring Boot’s default security mechanism asks for username and password when a user tries to access the REST GET API from browser. The default username is user and password is generated in the console of the Spring Boot application during start up.
You can also configure the password which is easy to remember in the application.properties or application.yml/yaml file. In this example I will configure both username and password in the application.properties file.
In the frontend using React I will consume the REST API to authenticate the user and if the user is successfully authenticated then the user will be able to consume other REST API, in other words I will show greeting message with random generated string on the UI (user interface).
At the beginning when React application starts, the UI will render the login page. Once user is successfully logged in then user will be redirected to the home page where he/she will see greeting message with a random string.
Prerequisites
Maven 3.8.5, Java 19, React 18.2.0, Spring Boot 3.1.5
Server Application
The server application is implemented using Spring Boot framework.
Project Setup
The following pom.xml file can be used for the server application:
<?xml version="1.0" encoding="UTF-8"?>

<project xmlns="http://maven.apache.org/POM/4.0.0"
	xmlns:xsi="http://www.w3.org/2001/XMLSchema-instance"
	xsi:schemaLocation="http://maven.apache.org/POM/4.0.0 http://maven.apache.org/xsd/maven-4.0.0.xsd">
	<modelVersion>4.0.0</modelVersion>

	<groupId>com.roytuts</groupId>
	<artifactId>springboot-react-security</artifactId>
	<version>0.0.1-SNAPSHOT</version>

	<properties>
		<project.build.sourceEncoding>UTF-8</project.build.sourceEncoding>
		<maven.compiler.source>19</maven.compiler.source>
		<maven.compiler.target>19</maven.compiler.target>
	</properties>

	<parent>
		<groupId>org.springframework.boot</groupId>
		<artifactId>spring-boot-starter-parent</artifactId>
		<version>3.1.5</version>
	</parent>

	<dependencies>
		<dependency>
			<groupId>org.springframework.boot</groupId>
			<artifactId>spring-boot-starter-web</artifactId>
		</dependency>

		<dependency>
			<groupId>org.springframework.boot</groupId>
			<artifactId>spring-boot-starter-security</artifactId>
		</dependency>
	</dependencies>

	<build>
		<plugins>
			<plugin>
				<groupId>org.springframework.boot</groupId>
				<artifactId>spring-boot-maven-plugin</artifactId>
			</plugin>
		</plugins>
	</build>
</project>
Security Configuration
I will configure security using Spring Security mechanism as shown below.
For spring boot 3 version you don’t need to extend any class or you don’t need to annotate the class with security related annotation. Also you need to create an instance of SecurityFilterChain for security configuration.
@Configuration
public class SpringSecurityConfig {

	@Bean
	public SecurityFilterChain securityFilterChain(HttpSecurity http) throws Exception {
		http.csrf(csrf -> csrf.disable());

		http.authorizeHttpRequests(
				auth -> auth.requestMatchers(HttpMethod.OPTIONS, "/**").permitAll().anyRequest().authenticated());

		http.httpBasic(Customizer.withDefaults());

		return http.build();
	}

}
I have overridden the configure() method, I have disabled csrf token, I have applied the basic authentication.
User Credentials
I configured username and password in the src/main/resources/application.properties file. The username is user and password is user.
spring.security.user.name=user
spring.security.user.password=user
REST Endpoints
I have published two REST endpoints – one is for authenticating user and another is for fetching greeting message.
I allow URL http://localhost:3000 to avoid any cross origin issues.
@RestController
@CrossOrigin(origins = "http://localhost:3000")
public class UiRestController {

	@GetMapping("/auth")
	public Principal user(Principal user) {
		return user;
	}

	@GetMapping("/resource")
	public Map<String, Object> home() {
		Map<String, Object> model = new HashMap<String, Object>();

		model.put("id", UUID.randomUUID().toString());
		model.put("content", "Hello World");

		return model;
	}

}
Main Class
A class with main method and @SpringBootAnnotation is enough to deploy the Spring Boot application into embedded Tomcat server.
@SpringBootApplication
public class SpringBootReactSecurityApp {

	public static void main(String[] args) {
		SpringApplication.run(SpringBootReactSecurityApp.class, args);
	}

}
That’s all about server application. After deploying the application by running the above main class you will be able to access the endpoint /resource by authenticating the user using user/user when asked for the credentials.
Client Application
Make sure to create React project. The name of the project is spring-boot-react-security.
Authentication Service
The authentication service which provides some common functionalities such as authenticating user, whether user is logged in, the logged in user name etc.
Create a file AuthenticationService.js under src/service folder with the following content.
import axios from 'axios'

export const KEY_USER = 'auth_user'
export const KEY_PWD = 'auth_pwd'

class AuthenticationService {

	authenticate(username, password) {
		/*return fetch(`http://localhost:8080/auth`, {
			method: 'get',
			headers: {
				authorization: this.createBasicAuthToken(username, password)
			}
		}).then(function(res) {
			return res.json();
		}).then(res => {
			return res;
		});*/

		return axios.get(`http://localhost:8080/auth`,
            { headers: { authorization: this.createBasicAuthToken(username, password) } });
	}

	getAxiosConfig() {
        return {
            headers: {
				authorization: this.createBasicAuthToken(sessionStorage.getItem(this.KEY_USER), sessionStorage.getItem(this.KEY_PWD))
            }
		}
    }

	createBasicAuthToken(username, password) {
		return 'Basic ' + window.btoa(username + ":" + password)
	}

	registerUserInSession(username, password) {
		sessionStorage.setItem(this.KEY_USER, username);
		sessionStorage.setItem(this.KEY_PWD, password);
		this.setupAxiosInterceptors(this.createBasicAuthToken(username, password));
	}

	logout() {
		sessionStorage.removeItem(this.KEY_USER);
		sessionStorage.removeItem(this.KEY_PWD);
	}

	isUserLoggedin() {
		let user = sessionStorage.getItem(this.KEY_USER)
		if (user === null) return false
		return true
	}

	getLoggedinUser() {
		let user = sessionStorage.getItem(this.KEY_USER)
		if (user === null) return ''
		return user
	}

	setupAxiosInterceptors(token) {
		axios.interceptors.request.use(request => {

			if (this.isUserLoggedIn()) {
				request.headers.authorization = token
			}

			return request;
		}, error => {
			return Promise.reject(error);
		});
    }

}

export default new AuthenticationService()
As shown in the above commented code the REST API can also be called through fetch(), so you can comment the axios.get() and try to run the fetch() function to invoke the REST API.
Login
The login component is used for letting user login to the application.
Create a file Login.js under src/components folder with the following content.
import React from 'react';
import AuthenticationService from '../service/AuthenticationService';

class Login extends React.Component {

	constructor(props) {
		super(props);
		this.state = {username: '', password:'', isLoginFailed: false};
		this.handleChange = this.handleChange.bind(this);
		this.handleSubmit = this.handleSubmit.bind(this);
	}

	handleChange(event) {
		const state = this.state
		state[event.target.name] = event.target.value
		this.setState(state);
	}

	handleSubmit(event) {
		event.preventDefault();
		AuthenticationService
		.authenticate(this.state.username, this.state.password)
		.then(() => {
			AuthenticationService.registerUserInSession(this.state.username, this.state.password);
			window.location.href = '/';
		})
		.catch( () => this.setState({ isLoginFailed: true }) );
	}

	render() {
		return (
			<div id="container">
				<h2>Login Here</h2>
				<p/>
				{this.state.isLoginFailed && <div style={{ color: "red" }}>Invalid Credentials</div>}
				<form onSubmit={this.handleSubmit}>
					<p>
						<label>Username:</label>
						<input type="text" name="username" value={this.state.username} onChange={this.handleChange} placeholder="Username" required/>
					</p>
					<p>
						<label>Password:</label>
						<input type="password" name="password" value={this.state.password} onChange={this.handleChange} placeholder="Password" required/>
					</p>
					<p>
						<input type="submit" value="Submit" />
					</p>
				</form>
			</div>
		);
	}

}

export default Login;
Home
The home page is displayed once the user gets successfully authenticated. The Home.js file is created with the following content in the folder src/components.
import React from 'react';
//import axios from 'axios';
import AuthenticationService from '../service/AuthenticationService';

class Home extends React.Component {

	constructor(props) {
		super(props);
		this.state = {loggedinUser: '', greetId: '', greetMsg: ''};
		this.logout = this.logout.bind(this);
	}

	componentDidMount() {
		/*axios.get(`http://localhost:8080/resource`, AuthenticationService.getAxiosConfig())
		.then(response => {
			//console.log(response.data);
			this.setState({
				loggedinUser:AuthenticationService.getLoggedinUser(),
				greetId: response.data.id,
				greetMsg: response.data.content
			});
		})
		.catch((error) => {
			console.log('error in home ' + error);
		});*/

		fetch(`http://localhost:8080/resource`, AuthenticationService.getAxiosConfig())
		.then(response => {
			return response.json();
		}).then(result => {
			this.setState({
				loggedinUser:AuthenticationService.getLoggedinUser(),
				greetId: result.id,
				greetMsg: result.content
			});
		});
	}

	logout() {
		if(window.confirm("Are you sure want to Logout?")) {
			AuthenticationService.logout();
			window.location.href = '/';
		}
	}

	render() {
		return (
			<div id="container">
				<p>Welcome back, { this.state.loggedinUser }!</p>
				<p>The ID is { this.state.greetId }</p>
				<p>The content is { this.state.greetMsg }</p>

				<p><button onClick={this.logout.bind(this)}>Logout</button></p>
			</div>
		);
	}

}

export default Home;
Index
The index.js file is updated with the following content. The route configuration is done in this file. The route is navigated based on whether the user is logged in or not.
import React from 'react';
import { Navigate } from "react-router";
import ReactDOM from 'react-dom/client';
import { BrowserRouter as Router, Routes, Route } from 'react-router-dom';
import Login from './components/Login';
import Home from './components/Home';
import AuthenticationService from './service/AuthenticationService';
import reportWebVitals from './reportWebVitals';

const root = ReactDOM.createRoot(document.getElementById('root'));
root.render(
  <React.StrictMode>
    <Router>
		<Routes>
			<Route exact path='/' element={ AuthenticationService.isUserLoggedin() ? <Home/> : <Navigate replace to={"/login"}/> } />
			<Route exact path='/login' element={ <Login/> } />
		</Routes>
	</Router>
  </React.StrictMode>
);

// If you want to start measuring performance in your app, pass a function
// to log results (for example: reportWebVitals(console.log))
// or send to an analytics endpoint. Learn more: https://bit.ly/CRA-vitals
reportWebVitals();
Testing React Spring Boot Security
Make sure your Spring Boot Security application is running on Tomcat server at port 8080.
Then run your React application on port 3000 by executing command npm start from the command line while you are on the project’s root directory.
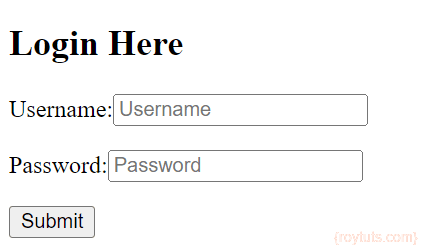
Hit URL http://locahost:3000 in the browser or this URL will be opened automatically on the default browser on your system. The below page is displayed. The user is not authenticated so the login page is displayed.
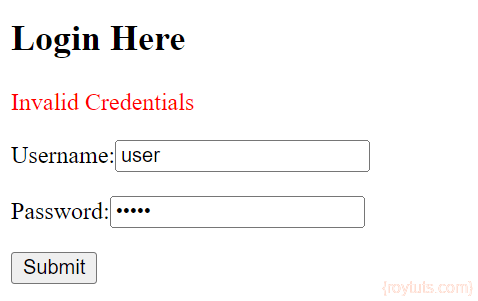
For invalid username or password you will see the error message on the login page:
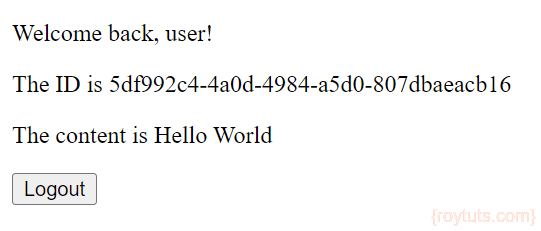
Login to the application using credentials user/user and you will see below greeting message with random generated string.
That’s all. Hope you got an idea how to authenticate user using React and Spring Boot security.