Microservices And Load Balancer
Microservice, also known as, microservice architecture is an architectural style with an approach for developing a single application as a suite of small services, each running in its own process and communicating with a lightweight resource API that has the following characteristics:
- Loosely coupled
- Highly maintainable
- Easily testable
- Independently deployable
- Built around business capabilities or single responsibilities
- Fault isolation
- Resilient
- Scalable
- Easy to integrate with third party APIs
- Small and smart end-point
You need to distribute the load of requests from multiple clients across several instances of the service, hence you need the LoadBalancer to be configured for your services. Using load balancing on microservices will reduce the burden of the requests coming from multiple clients.
To know more about the microservice you can read tutorial on microservices.
In this tutorial example I am going to use Spring Cloud LoadBalancer and you can check if you still want to use Spring Boot 2.2.x to create micro services and Ribbon to use load balancing.
In this example I am going to create two microservices – forex service and currency conversion service. The forex service will provide currency exchange values for different currencies. The currency conversion service will provide the calculated amount from one currency to another currency using forex service and it’s a consumer to the forex service.
Prerequisites
Java 19, Spring Boot 3.1.5, Spring Cloud 2022.0.4, MySQL 8.1.0, Maven 3.8.5
Microservice – Forex Service
Project Build
The following pom.xml file can be used for the forex service:
<?xml version="1.0" encoding="UTF-8"?>

<project xmlns="http://maven.apache.org/POM/4.0.0"
	xmlns:xsi="http://www.w3.org/2001/XMLSchema-instance"
	xsi:schemaLocation="http://maven.apache.org/POM/4.0.0 http://maven.apache.org/xsd/maven-4.0.0.xsd">
	<modelVersion>4.0.0</modelVersion>

	<groupId>com.roytuts</groupId>
	<artifactId>forex-service</artifactId>
	<version>0.0.1-SNAPSHOT</version>

	<properties>
		<project.build.sourceEncoding>UTF-8</project.build.sourceEncoding>
		<maven.compiler.source>19</maven.compiler.source>
		<maven.compiler.target>19</maven.compiler.target>
	</properties>

	<parent>
		<groupId>org.springframework.boot</groupId>
		<artifactId>spring-boot-starter-parent</artifactId>
		<version>3.1.5</version>
	</parent>

	<dependencyManagement>
		<dependencies>
			<dependency>
				<groupId>org.springframework.cloud</groupId>
				<artifactId>spring-cloud-dependencies</artifactId>
				<version>2022.0.4</version>
				<type>pom</type>
				<scope>import</scope>
			</dependency>
		</dependencies>
	</dependencyManagement>

	<dependencies>
		<dependency>
			<groupId>org.springframework.boot</groupId>
			<artifactId>spring-boot-starter-web</artifactId>
		</dependency>

		<dependency>
			<groupId>org.springframework.boot</groupId>
			<artifactId>spring-boot-starter-data-jpa</artifactId>
		</dependency>

		<dependency>
			<groupId>com.mysql</groupId>
			<artifactId>mysql-connector-j</artifactId>
		</dependency>
	</dependencies>

	<build>
		<plugins>
			<plugin>
				<groupId>org.springframework.boot</groupId>
				<artifactId>spring-boot-maven-plugin</artifactId>
			</plugin>
		</plugins>
	</build>
</project>
MySQL Table And Data
The following table can be created in the MySQL database server:
CREATE TABLE `forex_value` (
	`id` INT(10) NOT NULL AUTO_INCREMENT,
	`from_curr` VARCHAR(255) NULL DEFAULT NULL COLLATE 'utf8mb4_unicode_ci',
	`rate` DOUBLE NULL DEFAULT NULL,
	`to_curr` VARCHAR(255) NULL DEFAULT NULL COLLATE 'utf8mb4_unicode_ci',
	PRIMARY KEY (`id`) USING BTREE
)
COLLATE='utf8mb4_unicode_ci'
ENGINE=InnoDB
AUTO_INCREMENT=41;
The sample data can be inserted into the above table:
insert into forex_value(from_curr,to_curr,rate)
values('USD','INR',71);
insert into forex_value(from_curr,to_curr,rate)
values('EUR','INR',85);
insert into forex_value(from_curr,to_curr,rate)
values('AUD','INR',39);
Entity Class
The following entity class will be mapped to the above table.
@Entity
public class ForexValue {

	@Id
	@GeneratedValue(strategy = GenerationType.IDENTITY)
	private Integer id;

	@Column(name = "from_curr")
	private String from;

	@Column(name = "to_curr")
	private String to;

	private Double rate;

	public ForexValue() {
	}

	public ForexValue(String from, String to, Double rate) {
		this.from = from;
		this.to = to;
		this.rate = rate;
	}

	// getters and setters

}
In the above class, the annotation @Entity specifies that the class is entity class. @Id annotation specifies the primary key of the entity class.
I want the auto-increment values for the corresponding primary key into table column, so I am using @GeneratedValue(strategy = GenerationType.IDENTITY).
Further I have not annotated all class attributes with @Column but only those columns which are different from class attribute name.
Repository
The following repository interface that extends Spring Data JPA’s interface JpaRepository will get the advantages of built-in methods.
I find the conversion value from one currency to another currency using the method findByFromAndTo().
public interface ForexRepository extends JpaRepository<ForexValue, Integer> {

	ForexValue findByFromAndTo(String from, String to);

}
REST Controller
The spring REST controller class publishes endpoints for the forex service.
@RestController
public class ForexRestController {

	@Autowired
	private ForexRepository forexRepository;

	@GetMapping("/forex-exchange/from/{from}/to/{to}")
	public ResponseEntity<ForexValue> getCurrencyExchange(@PathVariable String from, @PathVariable String to) {
		ForexValue forexValue = forexRepository.findByFromAndTo(from, to);

		return new ResponseEntity<ForexValue>(forexValue, HttpStatus.OK);
	}

}
The end-point is published as /forex-exchange/from/{from}/to/{to} for converting one currency to another currency value.
The repository interface method queries the database and find the appropriate conversion rate from the table.
Main Class
A class having main method and @SpringBootApplication annotation is enough to deploy the application into embedded Tomcat server.
@SpringBootApplication
public class ForexApplication {

	public static void main(String[] args) {
		SpringApplication.run(ForexApplication.class, args);
	}

}
Application Config
The application.yml file is created under class path folder src/main/resources with the following content.
spring:
   application:
      name: forex-service
   datasource:
      driverClassName: com.mysql.cj.jdbc.Driver
      url: jdbc:mysql://localhost:3306/roytuts
      username: root
      password: root
   jpa:
      hibernate.ddl-auto: update
      generate-ddl: true
      show-sql: true
server:
   port: 9000
I have configured spring.jpa.generate-ddl=true to generate the required table from the entity class if you do not create the table manually.
Testing forex service
So once you execute the forex service main method you can access the forex service endpoint in the browser or any REST client.
GET request URL: http://localhost:9000/forex-exchange/from/USD/to/INR
Output: {"id":1,"from":"USD","to":"INR","rate":71.0}
Let’s start with currency conversion micro service.
Micro Service – Currency Conversion Service
The currency conversion service will provide you the calculated amount using the forex service.
Project Build
The following pom.xml file can be used for your project:
<?xml version="1.0" encoding="UTF-8"?>

<project xmlns="http://maven.apache.org/POM/4.0.0"
	xmlns:xsi="http://www.w3.org/2001/XMLSchema-instance"
	xsi:schemaLocation="http://maven.apache.org/POM/4.0.0 http://maven.apache.org/xsd/maven-4.0.0.xsd">
	<modelVersion>4.0.0</modelVersion>

	<groupId>com.roytuts</groupId>
	<artifactId>currency-conversion-service</artifactId>
	<version>0.0.1-SNAPSHOT</version>

	<parent>
		<groupId>org.springframework.boot</groupId>
		<artifactId>spring-boot-starter-parent</artifactId>
		<version>3.1.5</version>
	</parent>

	<dependencyManagement>
		<dependencies>
			<dependency>
				<groupId>org.springframework.cloud</groupId>
				<artifactId>spring-cloud-dependencies</artifactId>
				<version>2022.0.4</version>
				<type>pom</type>
				<scope>import</scope>
			</dependency>
		</dependencies>
	</dependencyManagement>

	<dependencies>
		<dependency>
			<groupId>org.springframework.boot</groupId>
			<artifactId>spring-boot-starter-webflux</artifactId>
		</dependency>

		<dependency>
			<groupId>org.springframework.cloud</groupId>
			<artifactId>spring-cloud-starter-loadbalancer</artifactId>
		</dependency>
	</dependencies>

	<build>
		<plugins>
			<plugin>
				<groupId>org.springframework.boot</groupId>
				<artifactId>spring-boot-maven-plugin</artifactId>
			</plugin>
		</plugins>
	</build>
</project>
VO Class
This VO class is used as a response bean for the client.
public class CurrencyConversion {

	private Integer id;
	private String from;
	private String to;
	private Double rate;
	private Integer quantity;
	private Double totalAmount;

	public CurrencyConversion() {
	}

	public CurrencyConversion(Integer id, String from, String to, Double rate, Integer quantity, Double totalAmount) {
		this.id = id;
		this.from = from;
		this.to = to;
		this.rate = rate;
		this.quantity = quantity;
		this.totalAmount = totalAmount;
	}

        // getters and setters

}
Load Balancer
Here I am using Spring Cloud Load Balancer for client side load balancing. I am using WebClient instance to access the external service for example, HTTP URL requests.
Load balancer config class is given below:
@Configuration
@LoadBalancerClient(name = "forex-service", configuration = ForexConfiguration.class)
public class WebClientConfig {

	@Bean
	@LoadBalanced
	WebClient.Builder webClientBuilder() {
		return WebClient.builder();
	}

}
In WebClientConfig.java, I pass a custom configuration for the LoadBalancer by using the @LoadBalancerClient annotation. This means that, whenever a service named forex-service is contacted, instead of running with the default setup, Spring Cloud LoadBalancer uses the configuration provided in ForexConfiguration.java.
The corresponding ForexConfiguration class is given below:
public class ForexConfiguration {

	@Bean
	@Primary
	ServiceInstanceListSupplier serviceInstanceListSupplier() {
		return new ForexServiceInstanceListSuppler("forex-service");
	}

}

class ForexServiceInstanceListSuppler implements ServiceInstanceListSupplier {

	private final String serviceId;

	ForexServiceInstanceListSuppler(String serviceId) {
		this.serviceId = serviceId;
	}

	@Override
	public String getServiceId() {
		return serviceId;
	}

	@Override
	public Flux<List<ServiceInstance>> get() {
		return Flux.just(Arrays.asList(new DefaultServiceInstance(serviceId + "1", serviceId, "localhost", 9000, false),
				new DefaultServiceInstance(serviceId + "2", serviceId, "localhost", 9001, false)));
	}

}
In the above class, I provide a custom ServiceInstanceListSupplier with two hard-coded instances that Spring Cloud LoadBalancer chooses from while making the calls to the Forex service.
Please note that you run two instances (port 9000 and 9001) of the forex service before you run the currency conversion service.
REST Controller
In the REST controller you will see how I am going to make the call to forex service from the currency conversion service.
@RestController
public class CurrencyConversionRestController {

	private final WebClient.Builder loadBalancedWebClientBuilder;
	private final ReactorLoadBalancerExchangeFilterFunction lbFunction;

	public CurrencyConversionRestController(WebClient.Builder webClientBuilder,
			ReactorLoadBalancerExchangeFilterFunction lbFunction) {
		this.loadBalancedWebClientBuilder = webClientBuilder;
		this.lbFunction = lbFunction;
	}

	@GetMapping("currency-converter/from/{from}/to/{to}/quantity/{quantity}")
	public Mono<CurrencyConversion> getCurrencyExchange(@PathVariable String from, @PathVariable String to,
			@PathVariable Integer quantity) {

		Mono<CurrencyConversion> response = WebClient.builder().filter(lbFunction).build().get()
				// Mono<CurrencyConversion> response =
				// loadBalancedWebClientBuilder.build().get()
				.uri("http://forex-service/forex-exchange/from/{from}/to/{to}", from, to).retrieve()
				.bodyToMono(CurrencyConversion.class)
				.map(r -> new CurrencyConversion(quantity, from, to, r.getRate(), quantity, quantity * r.getRate()));

		return response;
	}

}
Application Config
Application configuration is given below for the currency conversion service in the application.yml file under class path folder src/main/resources.
spring:
   application:
      name: currency-conversion-service
server:
   port: 9100
Main Class
A class having main method and @SpringBootApplication annotation is given below for deploying the application:
@SpringBootApplication
public class CurrencyConversionApplication {

	public static void main(String[] args) {
		SpringApplication.run(CurrencyConversionApplication.class, args);
	}

}
Testing currency conversion service
Make sure you run the main class before you access the URL in the browser or in any REST client.
GET request: http://localhost:9100/currency-converter/from/USD/to/INR/quantity/100
Output: {"id":100,"from":"USD","to":"INR","rate":71.0,"quantity":100,"totalAmount":7100.0}
You will also see the following log in one instance of forex service, so the request goes to the one of two instances of the forex service:
Hibernate: select f1_0.id,f1_0.from_curr,f1_0.rate,f1_0.to_curr from forex_value f1_0 where f1_0.from_curr=? and f1_0.to_curr=?
Now make another HTTP request to currency conversion service:
GET request: http://localhost:9100/currency-converter/from/USD/to/INR/quantity/1000
Output: {"id":1000,"from":"USD","to":"INR","rate":71.0,"quantity":1000,"totalAmount":71000.0}
Now you may find the request goes to the other instance of the forex service. So you will find the log in the other forex service as follows:
Hibernate: select f1_0.id,f1_0.from_curr,f1_0.rate,f1_0.to_curr from forex_value f1_0 where f1_0.from_curr=? and f1_0.to_curr=?Therefore this shows how load balancing is working in the microservices.
Eureka Server
Now I will show how to register your microservices using Eureka server in Spring Cloud.
Build File
The following pom.xml is used to configure the eureka sever project:
<?xml version="1.0" encoding="UTF-8"?>

<project xmlns="http://maven.apache.org/POM/4.0.0"
	xmlns:xsi="http://www.w3.org/2001/XMLSchema-instance"
	xsi:schemaLocation="http://maven.apache.org/POM/4.0.0 http://maven.apache.org/xsd/maven-4.0.0.xsd">
	<modelVersion>4.0.0</modelVersion>

	<groupId>com.roytuts</groupId>
	<artifactId>eureka-server-config</artifactId>
	<version>0.0.1-SNAPSHOT</version>

	<properties>
		<project.build.sourceEncoding>UTF-8</project.build.sourceEncoding>
		<maven.compiler.source>19</maven.compiler.source>
		<maven.compiler.target>19</maven.compiler.target>
	</properties>

	<parent>
		<groupId>org.springframework.boot</groupId>
		<artifactId>spring-boot-starter-parent</artifactId>
		<version>3.1.5</version>
	</parent>

	<dependencyManagement>
		<dependencies>
			<dependency>
				<groupId>org.springframework.cloud</groupId>
				<artifactId>spring-cloud-dependencies</artifactId>
				<version>2022.0.4</version>
				<type>pom</type>
				<scope>import</scope>
			</dependency>
		</dependencies>
	</dependencyManagement>

	<dependencies>
		<dependency>
			<groupId>org.springframework.cloud</groupId>
			<artifactId>spring-cloud-starter-netflix-eureka-server</artifactId>
		</dependency>
	</dependencies>

	<build>
		<plugins>
			<plugin>
				<groupId>org.springframework.boot</groupId>
				<artifactId>spring-boot-maven-plugin</artifactId>
			</plugin>
		</plugins>
	</build>
</project>
Application Config
The following application configuration is required for the eureka server project:
spring:
   application:
      name: eureka-server-config
server:
   port: 8761
eureka:
   client:
      register-with-eureka: false
      fetch-registry: false
Notice I have added two properties with false value. If you do not make them false (as by default they are true), you may face following exception while running Eureka server:
com.netflix.discovery.shared.transport.TransportException: Cannot execute request on any known servereureka.client.register-with-eureka=false: if I make this property true then while the server starts the inbuilt client will try to register itself with the Eureka server.
eureka.client.fetch-registry=false: if I make this property true then the inbuilt client will try to fetch the Eureka registry, which is not yet available. As a result, I would get TransportException.
Main Class
The following main class will deploy the eureka server app.
@EnableEurekaServer
@SpringBootApplication
public class EurekaServerConfigApplication {

	public static void main(String[] args) {
		SpringApplication.run(EurekaServerConfigApplication.class, args);
	}

}
Now when you run the main class to deploy eureka-server-config application. Your eureka server starts on port 8761.
If you hit the URL http://localhost:8761 in the browser, you will get a page but you won’t find any instance on the page.
Now I will connect forex-service and currency-conversion-service microservices using eureka server.
Now add below dependency to both of the build scripts – forex-service and currency-conversion-service.
<dependency>
	<groupId>org.springframework.cloud</groupId>
	<artifactId>spring-cloud-starter-netflix-eureka-client</artifactId>
</dependency>
Make sure you stop the microservices before you add to build script and later build the microservices.
Next you need to configure eureka URL into application.yml file of both microservices – forex-service and currency-conversion-service:
eureka:
   client:
      service-url:
         default-zone: http://localhost:8761/eureka
Now add @EnableDiscoveryClient annotation to the ForexApplication main class. You need this annotation to register with eureka server. The @EnableDiscoveryClient activates the Netflix Eureka Discovery Client implementation.
Now run two instances of forex-service and one instance of currency-conversion-service.
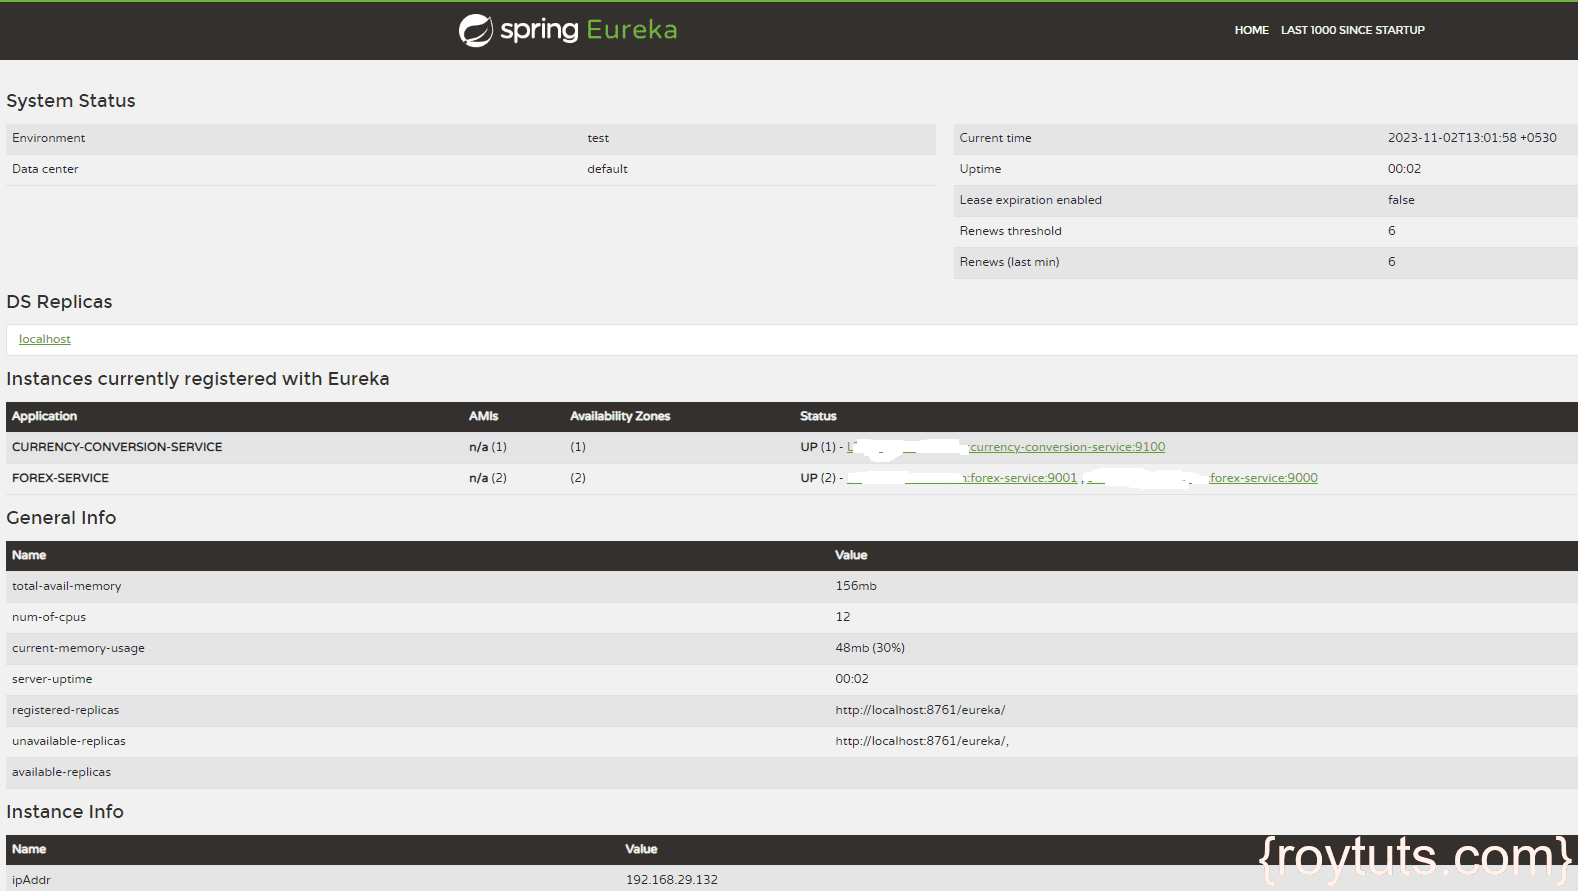
Now refresh the eureka server page URL – http://localhost:8761, you will see one instance of currency-conversion-service and two instances of forex-service are up as shown below in the image:
Now you can continue the same tests you performed before you created the eureka-server-config application.
MySQL Table and Data
The following table structure is given below with sample data:
CREATE TABLE `forex_value` (
	`id` INT(10) NOT NULL AUTO_INCREMENT,
	`from_curr` VARCHAR(255) NULL DEFAULT NULL COLLATE 'utf8mb4_unicode_ci',
	`rate` DOUBLE NULL DEFAULT NULL,
	`to_curr` VARCHAR(255) NULL DEFAULT NULL COLLATE 'utf8mb4_unicode_ci',
	PRIMARY KEY (`id`) USING BTREE
)
COLLATE='utf8mb4_unicode_ci'
ENGINE=InnoDB
AUTO_INCREMENT=4;

insert into forex_value(from_curr,to_curr,rate)
values('USD','INR',71);
insert into forex_value(from_curr,to_curr,rate)
values('EUR','INR',85);
insert into forex_value(from_curr,to_curr,rate)
values('AUD','INR',39);
That’s all on how to create microservices using Spring Boot and how to use load balancer using Spring Cloud Load Balancer.