Spring Boot JPA Join Queries: INNER, LEFT, RIGHT, CROSS with Examples
Introduction
This tutorial demonstrates how to perform SQL joins using Spring Boot and Spring Data JPA.
I will cover INNER JOIN, LEFT JOIN, RIGHT JOIN, and CROSS JOIN with examples using MySQL and annotated entity classes.Entity Relationship Diagram
Below is a UML-style diagram showing the relationship between Employee and Department entities:

MySQL Tables
Create two tables – employee and department under roytuts database in MySQL server.
If you do not want to create tables manually and want to create from entity classes then include the property spring.jpa.hibernate.ddl-auto=create in the src/main/resources/application.properties file.
Table – department
The table department has the following structure in MySQL server under roytuts database. I am also storing some sample data for testing the application right away.
CREATE TABLE IF NOT EXISTS `department` (
  `id` int(10) unsigned NOT NULL AUTO_INCREMENT,
  `name` varchar(40) COLLATE utf8mb4_unicode_ci NOT NULL,
  `description` varchar(150) COLLATE utf8mb4_unicode_ci NOT NULL,
  PRIMARY KEY (`id`)
) ENGINE=InnoDB AUTO_INCREMENT=5 DEFAULT CHARSET=utf8mb4 COLLATE=utf8mb4_unicode_ci;


INSERT INTO `department` (`id`, `name`, `description`) VALUES
	(1, 'IT', 'Information Technology'),
	(2, 'TelComm', 'Telecommunication'),
	(3, 'Ins', 'Insurance'),
	(4, 'HR', 'Human Resources');
Table – employee
The table employee table under roytuts database has the following structure. In this table also I am storing some data for testing the application right away.
CREATE TABLE IF NOT EXISTS `employee` (
  `id` int(10) unsigned NOT NULL AUTO_INCREMENT,
  `name` varchar(40) COLLATE utf8mb4_unicode_ci NOT NULL,
  `email` varchar(150) COLLATE utf8mb4_unicode_ci NOT NULL,
  `address` varchar(250) COLLATE utf8mb4_unicode_ci DEFAULT NULL,
  `dept_id` int(10) unsigned DEFAULT NULL,
  PRIMARY KEY (`id`),
  KEY `dept_id` (`dept_id`),
  CONSTRAINT `employee_ibfk_1` FOREIGN KEY (`dept_id`) REFERENCES `department` (`id`)
) ENGINE=InnoDB AUTO_INCREMENT=4 DEFAULT CHARSET=utf8mb4 COLLATE=utf8mb4_unicode_ci;

INSERT INTO `employee` (`id`, `name`, `email`, `address`, `dept_id`) VALUES
	(1, 'Soumitra', 'soumitra@gmail.com', NULL, 1),
	(2, 'Suman', 'suman@gmail.com', NULL, 2),
	(3, 'Avisek', 'avisek@gmail.com', NULL, 3);
Definitions of Joins
A JOIN clause is used to combine rows from two or more tables, based on a related columns between them. Let’s look at the definitions of various joins in database.
INNER JOIN: Returns only matching rows from both tables.
LEFT JOIN: Returns all rows from the left table and matched rows from the right.
RIGHT JOIN: Returns all rows from the right table and matched rows from the left.
CROSS JOIN: Returns the Cartesian product of both tables.
(INNER) JOIN
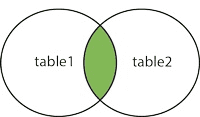
Returns records that have matching values in both tables. This means that the common rows between table 1 and table 2 will be returned based on a condition when an inner join is performed between table 1 and table 2.
Pictorial representation of the inner join is given below:
LEFT (OUTER) JOIN
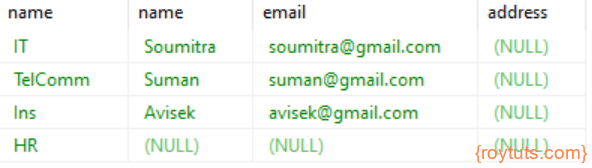
Returns all records from the left table, and the matched records from the right table. So, all rows from table 1 and the matching rows from table 2 based on a condition will be returned.
Pictorial representation of left outer join is given below:

RIGHT (OUTER) JOIN
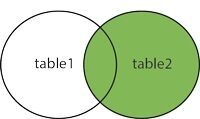
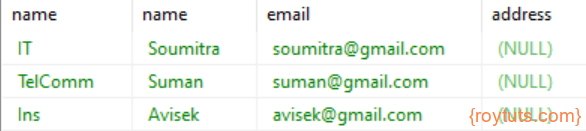
Returns all records from the right table, and the matched records from the left table. So, all rows from table 2 and matching rows from table 1 based on a condition will be returned when right outer join is performed between table 1 and table 2.
Pictorial representation of the right outer join is given below:
CROSS JOIN
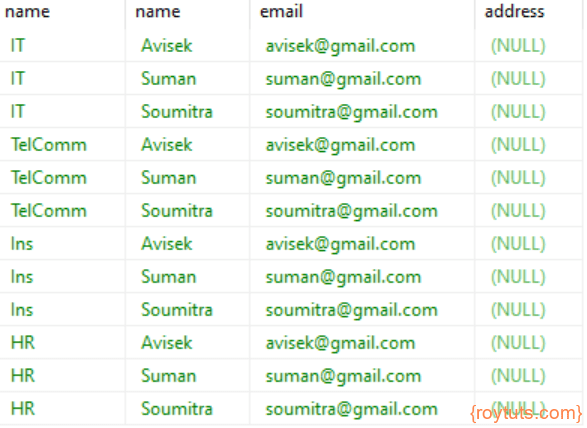
Returns a record set in which the number of rows in the left table multiplied by the number of rows in the right table. If WHERE clause is used with CROSS JOIN, it functions like an INNER JOIN.
Pictorial representation of the cross join is given below:

SQL Join Examples
Now you have two tables – department and employee, in you MySQL database with the following data.
-- INNER JOIN
SELECT d.name, e.name, e.email, e.address
FROM department d
INNER JOIN employee e ON d.id = e.dept_id;

-- LEFT JOIN
SELECT d.name, e.name, e.email, e.address
FROM department d
LEFT JOIN employee e ON d.id = e.dept_id;

-- RIGHT JOIN
SELECT d.name, e.name, e.email, e.address
FROM department d
RIGHT JOIN employee e ON d.id = e.dept_id;

-- CROSS JOIN
SELECT d.name, e.name, e.email, e.address
FROM department d
CROSS JOIN employee e;
Table – department
The table department has the following data or rows in the database.
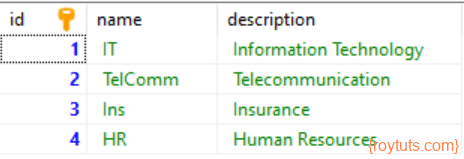
Table – employee
The table employee has the following data:

Now I will perform each type of join query on the above two tables.
INNER JOIN
The following SQL Statement performs the inner join. Let’s perform the inner join between two tables.
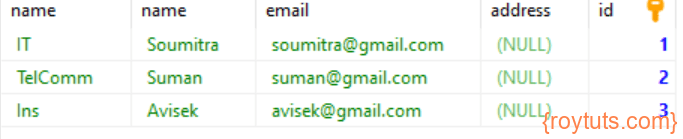
SELECT d.name, e.name, e.email, e.address, d.id FROM department d INNER JOIN employee e ON d.id = e.dept_id;The above SQL query for inner join gives the following result:
LEFT JOIN or LEFT OUTER JOIN
SQL Statement:
SELECT d.name, e.name, e.email, e.address FROM department d LEFT JOIN employee e ON d.id = e.dept_id;Result:
RIGHT JOIN or RIGHT OUTER JOIN
SQLStatement for performing right or right our join:
SELECT d.name, e.name, e.email, e.address FROM department d RIGHT JOIN employee e ON d.id = e.dept_id;Result:
CROSS JOIN
SQL Statement:
SELECT d.name, e.name, e.email, e.address FROM department d CROSS JOIN employee e;Result:
If you use where clause in cross join, such as:
SELECT d.name, e.name, e.email, e.address FROM department d CROSS JOIN employee e ON d.id = e.dept_id;The above SQL statement will give you the same result as you have seen in INNER JOIN.
Database Configuration
I am using MySQL database, so I will show you how to configure the database settings.
Create src/main/resources/application.properties file to put database settings.
#datasource
spring.datasource.driverClassName=com.mysql.cj.jdbc.Driver
spring.datasource.url=jdbc:mysql://localhost:3306/roytuts
#spring.datasource.jdbcUrl=jdbc:mysql://localhost/roytuts
spring.datasource.username=root
spring.datasource.password=root

#disable schema generation from Hibernate
#spring.jpa.hibernate.ddl-auto=none
spring.jpa.hibernate.ddl-auto=create
You need to enable JPA repository by setting the full package of the Entity classes.
Entity Classes
A JPA entity class is a POJO (Plain Old Java Object) class, marked with annotation @Entity and having the ability to represent object in the database.
Entity classes here implement Serializable interface in order to store the data into database directly.
Let’s say you have following entity classes – Employee and Department – for our database tables employee and department, respectively.
If you see the following error in spring boot 3.x.y then you can check the download section to download the code for spring boot 3 also.
Caused by: java.lang.ClassCastException: class org.hibernate.mapping.BasicValue cannot be cast to class org.hibernate.mapping.ToOneThe below entity class – Employee – maps Java object to corresponding table employee.
@Entity
@Table(name = "employee")
public class Employee implements Serializable {

	private static final long serialVersionUID = 1L;

	@Id
	@Column(name = "id")
	@GeneratedValue(strategy = GenerationType.IDENTITY)
	private long id;

	@Column(name = "name")
	private String name;


	@Column(name = "email")
	private String email;

	@Column(name = "address")
	private String address;

	@ManyToOne(fetch = FetchType.LAZY)
	@JoinColumn(name = "dept_id", insertable = false, updatable = false)
	@Fetch(FetchMode.JOIN)
	private Department department;

//getters and setters
The below entity class – Department – maps Java object to corresponding table department.
@Entity
@Table(name = "department")
public class Department implements Serializable {

	private static final long serialVersionUID = 1L;

	@Id
	@Column(name = "id")
	@GeneratedValue(strategy = GenerationType.IDENTITY)
	private long id;

	@Column(name = "name")
	private String name;

	@Column(name = "description")
	private String description;

	@OneToMany(targetEntity = Employee.class, mappedBy = "id", orphanRemoval = false, fetch = FetchType.LAZY)
	private Set<Employee> employees;

//getters and setters
Spring Data JPA Repository
You may know that Spring Data JPA provides repository support for the Java Persistence API (JPA) and it eases development of applications that need to access JPA data sources.
Spring Data JPA is an abstraction over JPA, which is an abstraction over JDBC. Using Spring Data JPA Repository API has many advantages:
- Spring Data JPA provides find methods out of the box. So based on naming conventions findBy will be provided by Spring Data JPA dynamically and will result to an entity result where all the entities will have for their field the corresponding parameter value.
- Other useful features like pagination, sorting, Criteria API that is required for your search screens.
Repository Interfaces
You have following Spring Data JPA Repositories where you need to write your JOIN queries using @Query annotation. I have written queries in both repository interfaces. If you want, you may also write in any one of the repositories. I am returning data as a custom DTO object because I cannot return entity object due to I am fetching selected columns from database tables.
I have defined INNER, LEFT (OUTER), RIGHT (OUTER) and CROSS JOIN in the below repositories.
I have defined two repositories – DepartmentRepository and EmployeeRepository. As I am performing join operations to fetch data from two tables, so it is also possible to use any one of the below repositories to fetch the data from the database.
Department Repository
The following Spring Data JPA Repository defines LEFT and RIGHT joins.
public interface DepartmentRepository extends JpaRepository<Department, Integer> {

	@Query("SELECT new com.roytuts.spring.data.jpa.left.right.inner.cross.join.dto.DeptEmpDto(d.name, e.name, e.email, e.address) "
			+ "FROM Department d LEFT JOIN d.employees e")
	List<DeptEmpDto> fetchEmpDeptDataLeftJoin();

	@Query("SELECT new com.roytuts.spring.data.jpa.left.right.inner.cross.join.dto.DeptEmpDto(d.name, e.name, e.email, e.address) "
			+ "FROM Department d RIGHT JOIN d.employees e")
	List<DeptEmpDto> fetchEmpDeptDataRightJoin();

}
Employee Repository
The following Spring Data JPA Repository defines INNER and CROSS joins.
public interface EmployeeRepository extends JpaRepository<Employee, Integer> {

	@Query("...")
	List<DeptEmpDto> fetchEmpDeptDataInnerJoin();

	@Query("...")
	List<DeptEmpDto> fetchEmpDeptDataCrossJoin();

}
Data Transfer Object
A data transfer object (DTO) is an object that carries data between processes. I am using DTO object to represent data or send data to the remote call. It is not a good idea to return the entity object to the client side or remote call.
A DTO does not have any behavior except for storage, retrieval, serialization and deserialization of its own data.
In other words, DTOs are simple objects that should not contain any business logic but may contain serialization and deserialization mechanisms for transferring data over the wire.
The below is the DTO class, DeptEmpDto, which was used in the above repositories.
public class DeptEmpDto {

	private String empDept;
	private String empName;
	private String empEmail;
	private String empAddress;

	public DeptEmpDto(String empDept, String empName, String empEmail, String empAddress) {
		this.empDept = empDept;
		this.empName = empName;
		this.empEmail = empEmail;
		this.empAddress = empAddress;
	}

	//getters and setters


	@Override
	public String toString() {
		return "DeptEmpDto [empDept=" + empDept + ", empName=" + empName + ", empEmail=" + empEmail + ", empAddress="
				+ empAddress + "]";
	}

}
Now when you call your queries from your service class, you would receive the same results as I have shown using MySQL SQL queries.
Service Class
A Service class is used by a client to interact with some functionality in your application. Usually it is public, and has some business meaning.
Example is given below how to call query methods from service class
@Service
public class JoinQueryService {

	@Resource
	private DepartmentRepository departmentRepository;

	@Resource
	private EmployeeRepository employeeRepository;

	public List<DeptEmpDto> getDeptEmployeesLeftJoin() {
		List<DeptEmpDto> list = departmentRepository.fetchEmpDeptDataLeftJoin();
		list.forEach(l -> System.out.println(l));
		return list;
	}

	public List<DeptEmpDto> getDeptEmployeesRightJoin() {
		List<DeptEmpDto> list = departmentRepository.fetchEmpDeptDataRightJoin();
		list.forEach(l -> System.out.println(l));
		return list;
	}

	public List<DeptEmpDto> getDeptEmployeesInnerJoin() {
		List<DeptEmpDto> list = employeeRepository.fetchEmpDeptDataInnerJoin();
		list.forEach(l -> System.out.println(l));
		return list;
	}

	public List<DeptEmpDto> getDeptEmployeesCrossJoin() {
		List<DeptEmpDto> list = employeeRepository.fetchEmpDeptDataCrossJoin();
		list.forEach(l -> System.out.println(l));
		return list;
	}

}
Spring REST Controller
I will create REST controller class to show how to invoke the service class method to get the results on different join queries.
@RestController
public class JoinQueryController {

	@Autowired
	private JoinQueryService joinQueryService;

	@GetMapping("/dept/employees/left")
	public ResponseEntity<List<DeptEmpDto>> getDeptEmployeesLeftJoin() {
		return new ResponseEntity<List<DeptEmpDto>>(joinQueryService.getDeptEmployeesLeftJoin(), HttpStatus.OK);
	}

	@GetMapping("/dept/employees/right")
	public ResponseEntity<List<DeptEmpDto>> getDeptEmployeesRightJoin() {
		return new ResponseEntity<List<DeptEmpDto>>(joinQueryService.getDeptEmployeesRightJoin(), HttpStatus.OK);
	}

	@GetMapping("/dept/employees/inner")
	public ResponseEntity<List<DeptEmpDto>> getDeptEmployeesInnerJoin() {
		return new ResponseEntity<List<DeptEmpDto>>(joinQueryService.getDeptEmployeesInnerJoin(), HttpStatus.OK);
	}

	@GetMapping("/dept/employees/cross")
	public ResponseEntity<List<DeptEmpDto>> getDeptEmployeesCrossJoin() {
		return new ResponseEntity<List<DeptEmpDto>>(joinQueryService.getDeptEmployeesCrossJoin(), HttpStatus.OK);
	}

}
Spring Boot Main Class
A class with main method and @SpringBootApplication annotation is enough to deploy the application into embedded Tomcat server.
@SpringBootApplication
@EntityScan("com.roytuts.spring.data.jpa.left.right.inner.cross.join.entity")
@EnableJpaRepositories("com.roytuts.spring.data.jpa.left.right.inner.cross.join.repository")
public class Application {

	public static void main(String[] args) {
		SpringApplication.run(Application.class, args);
	}

}
Testing the Left Right Inner Cross Joins
Left Join
Hit the URL http://localhost:8080/dept/employees/left in browser or any REST client tool (Postman).to test left join. You will see the following output:
[
    {
        "empDept": "IT",
        "empName": "Soumitra",
        "empEmail": "soumitra@gmail.com",
        "empAddress": null
    },
    {
        "empDept": "TelComm",
        "empName": "Suman",
        "empEmail": "suman@gmail.com",
        "empAddress": null
    },
    {
        "empDept": "Ins",
        "empName": "Avisek",
        "empEmail": "avisek@gmail.com",
        "empAddress": null
    },
    {
        "empDept": "HR",
        "empName": null,
        "empEmail": null,
        "empAddress": null
    }
]
Right Join
To test right outer join, use the URL http://localhost:8080/dept/employees/right:
[
    {
        "empDept": "IT",
        "empName": "Soumitra",
        "empEmail": "soumitra@gmail.com",
        "empAddress": null
    },
    {
        "empDept": "TelComm",
        "empName": "Suman",
        "empEmail": "suman@gmail.com",
        "empAddress": null
    },
    {
        "empDept": "Ins",
        "empName": "Avisek",
        "empEmail": "avisek@gmail.com",
        "empAddress": null
    }
]
Inner Join
For inner join, use the URL http://localhost:8080/dept/employees/inner:
[
    {
        "empDept": "IT",
        "empName": "Soumitra",
        "empEmail": "soumitra@gmail.com",
        "empAddress": null
    },
    {
        "empDept": "TelComm",
        "empName": "Suman",
        "empEmail": "suman@gmail.com",
        "empAddress": null
    },
    {
        "empDept": "Ins",
        "empName": "Avisek",
        "empEmail": "avisek@gmail.com",
        "empAddress": null
    }
]
Cross Join
For cross join use the URL http://localhost:8080/dept/employees/cross:
[
    {
        "empDept": "IT",
        "empName": "Soumitra",
        "empEmail": "soumitra@gmail.com",
        "empAddress": null
    },
    {
        "empDept": "IT",
        "empName": "Suman",
        "empEmail": "suman@gmail.com",
        "empAddress": null
    },
    {
        "empDept": "IT",
        "empName": "Avisek",
        "empEmail": "avisek@gmail.com",
        "empAddress": null
    },
    {
        "empDept": "TelComm",
        "empName": "Soumitra",
        "empEmail": "soumitra@gmail.com",
        "empAddress": null
    },
    {
        "empDept": "TelComm",
        "empName": "Suman",
        "empEmail": "suman@gmail.com",
        "empAddress": null
    },
    {
        "empDept": "TelComm",
        "empName": "Avisek",
        "empEmail": "avisek@gmail.com",
        "empAddress": null
    },
    {
        "empDept": "Ins",
        "empName": "Soumitra",
        "empEmail": "soumitra@gmail.com",
        "empAddress": null
    },
    {
        "empDept": "Ins",
        "empName": "Suman",
        "empEmail": "suman@gmail.com",
        "empAddress": null
    },
    {
        "empDept": "Ins",
        "empName": "Avisek",
        "empEmail": "avisek@gmail.com",
        "empAddress": null
    },
    {
        "empDept": "HR",
        "empName": "Soumitra",
        "empEmail": "soumitra@gmail.com",
        "empAddress": null
    },
    {
        "empDept": "HR",
        "empName": "Suman",
        "empEmail": "suman@gmail.com",
        "empAddress": null
    },
    {
        "empDept": "HR",
        "empName": "Avisek",
        "empEmail": "avisek@gmail.com",
        "empAddress": null
    }
]
Source Code
Conclusion
This guide covered SQL joins and their implementation in Spring Boot using Spring Data JPA. I have explored entity relationships, query examples, DTOs, JPQL.
I will do of your knowledge that was tried to use your example in order to be used as reference to create a similar solution. But does not work, at least for me. Can help, the difference may be the versión of Java and MySql.
Here my Pom.xml
UTF-8
17
org.springframework.boot
spring-boot-starter-data-jpa
org.springframework.boot
spring-boot-starter-web
org.springframework.boot
spring-boot-devtools
runtime
true
com.mysql
mysql-connector-j
runtime
org.springframework.boot
spring-boot-starter-test
test
javax.xml.bind
jaxb-api
2.3.1
org.springframework.boot
spring-boot-maven-plugin
ERRORs throwed;
Error creating bean with name ‘entityManagerFactory’ defined in class path resource [org/springframework/boot/autoconfigure/orm/jpa/HibernateJpaConfiguration.class]: class org.hibernate.mapping.BasicValue cannot be cast to class org.hibernate.mapping.ToOne (org.hibernate.mapping.BasicValue and org.hibernate.mapping.ToOne are in unnamed module of loader ‘app’)
Caused by: java.lang.ClassCastException: class org.hibernate.mapping.BasicValue cannot be cast to class org.hibernate.mapping.ToOne (org.hibernate.mapping.BasicValue and org.hibernate.mapping.ToOne are in unnamed module of loader ‘app’)
Thanks
https://stackoverflow.com/questions/76490128/class-org-hibernate-mapping-basicvalue-cannot-be-cast-to-class-org-hibernate-map
Thanks, nice tips
This is a very good tutorial with step by step detailed instructions. Thanks.
it wooooorks thank uuu a lot
Really Thanks Buddy. Working nice.
Thankyou ! It was very helpful.