JPA Entity Auditing
The tutorial Spring Data JPA Entity Auditing using EntityListeners will show you how you persist the audit log using JPA’s built-in functionality. Spring Data JPA provides sophisticated support to transparently keep track of who created or changed an entity and at what time. To benefit from this functionality you have to equip your entity classes with auditing metadata that can be defined either using annotations or by implementing an interface.
Spring Data JPA provides @CreatedBy, @LastModifiedBy to capture the user who created or modified the entity as well as @CreatedDate and @LastModifiedDate to capture at what time the data was created or updated.
I will be using here annotation based auditing meta-data to implement the example on Spring Data JPA Entity Auditing using EntityListeners.
Prerequisites
Knowledge of Spring, Java 8/19, Spring Boot 2.0.3/3.2.2, MySQL 8.0.11/8.1.0
Project Setup
Create a gradle or maven based project in your favorite tool or IDE called spring-data-jpa-audit with the following build file.
In the below build file I am using Spring Boot version 2.0.3.RELEASE/3.2.2. You may use other version of Spring Boot as well to suite your requirements.
I have added repositories from where the required jars will be downloaded. I have added plugins to use for the project and also specified the compile and runtime Java version for the project.
I have added required dependencies for Web, Spring Data JPA and MySQL connector.
For maven based project you may use the following pom.xml file:
<?xml version="1.0" encoding="UTF-8"?>

<project xmlns="http://maven.apache.org/POM/4.0.0"
	xmlns:xsi="http://www.w3.org/2001/XMLSchema-instance"
	xsi:schemaLocation="http://maven.apache.org/POM/4.0.0 http://maven.apache.org/xsd/maven-4.0.0.xsd">
	<modelVersion>4.0.0</modelVersion>

	<groupId>com.roytuts</groupId>
	<artifactId>spring-data-jpa-audit</artifactId>
	<version>0.0.1-SNAPSHOT</version>

	<properties>
		<project.build.sourceEncoding>UTF-8</project.build.sourceEncoding>
		<maven.compiler.source>19</maven.compiler.source>
		<maven.compiler.target>19</maven.compiler.target>
	</properties>

	<parent>
		<groupId>org.springframework.boot</groupId>
		<artifactId>spring-boot-starter-parent</artifactId>
		<version>3.2.2</version>
	</parent>

	<dependencies>
		<dependency>
			<groupId>org.springframework.boot</groupId>
			<artifactId>spring-boot-starter-web</artifactId>
		</dependency>

		<dependency>
			<groupId>org.springframework.boot</groupId>
			<artifactId>spring-boot-starter-data-jpa</artifactId>
		</dependency>

		<dependency>
			<groupId>com.mysql</groupId>
			<artifactId>mysql-connector-j</artifactId>
		</dependency>
	</dependencies>

	<build>
		<plugins>
			<plugin>
				<groupId>org.springframework.boot</groupId>
				<artifactId>spring-boot-maven-plugin</artifactId>
			</plugin>
		</plugins>
	</build>
</project>
For gradle based project you may use the following build.gradle script:
buildscript {
    ext {
	springBootVersion = '2.0.3.RELEASE';
    }
    repositories {
        mavenLocal()
        mavenCentral()
    }
    dependencies {
        classpath("org.springframework.boot:spring-boot-gradle-plugin:${springBootVersion}")
    }
}
allprojects {
    apply plugin: 'java'
	apply plugin: 'org.springframework.boot'
}
sourceCompatibility = 1.8
targetCompatibility = 1.8
repositories {
    mavenLocal()
	mavenCentral()
}
dependencies {
    compile("org.springframework.boot:spring-boot-starter-web:${springBootVersion}")
    compile("org.springframework.boot:spring-boot-starter-data-jpa:${springBootVersion}")
    compile("mysql:mysql-connector-java:8.0.11")
}
Related Posts:
- Spring Data batch Insertion
- Spring EnableEncryptableProperties with Jasypt
- Hibernate UserType using Spring Data JPA
- Spring Data JPA Entity Graph
- Spring Data JPA CRUD Example
Application Config
I need to create application.properties for any configurable variables such as datasource connection details, server port or any other configurations.
Put the below application.properties file under src/main/resources directory.
#datasource
spring.datasource.driverClassName=com.mysql.cj.jdbc.Driver
spring.datasource.url=jdbc:mysql://localhost:3306/roytuts
spring.datasource.username=root
spring.datasource.password=root

#disable schema generation from Hibernate
spring.jpa.hibernate.ddl-auto=none
AuditorAware Class
This class is required in order to insert or update value for fields created by and updated by into the database. The class should implement AuditorAware interface to provide the created by or updated by values.
To give an idea I am returning the value Admin, but ideally you should use logged in user information to store the value for created by or updated by.
package com.roytuts.spring.data.jpa.audit.domain;

@Component
public class AuditorAwareImpl implements AuditorAware<String> {

	@Override
	public Optional<String> getCurrentAuditor() {
		return Optional.of("Admin");
	}

}
MySQL Table
Finally, I store data into database table and for this I need to create a table in database for working on example Spring Data JPA Entity Auditing using EntityListeners.
I have created a table called employee with the below columns and four columns – created_by, created_date, updated_by, updated_date – will be inserted or updated through Spring Data JPA Auditing functionality.
CREATE TABLE `employee` (
  `id` int unsigned NOT NULL AUTO_INCREMENT,
  `name` varchar(50) NOT NULL,
  `email` varchar(150) NOT NULL,
  `address` varchar(255) NOT NULL,
  `created_by` varchar(50) NOT NULL,
  `created_date` timestamp NOT NULL DEFAULT CURRENT_TIMESTAMP ON UPDATE CURRENT_TIMESTAMP,
  `updated_by` varchar(50) DEFAULT NULL,
  `updated_date` timestamp NULL DEFAULT NULL,
  PRIMARY KEY (`id`)
) ENGINE=InnoDB AUTO_INCREMENT=7 COLLATE='utf8mb4_unicode_ci' DEFAULT CHARSET=utf8mb4;
Entity Class
I have created below entity class to represent the database table row and each attribute represents the column in table.
Notice here/, in the following entity class I have used @CreatedBy, @CreatedDate, @LastModifiedBy and @LastModifiedDate to automatically insert the appropriate values into those columns into database table.
The @CreatedBy and @LastModifiedBy will be populated by AuditorAwareImpl class and @CreatedDate and @LastModifiedDate will be populated by current date time.
Note the @CreatedBy and @CreatedDate will be populated only once when the object or row is created first time, but @LastModifiedBy and @LastModifiedDate will be updated every time when an object or row gets modified. Remember if an object or row has no change then @LastModifiedBy and @LastModifiedDate will not be updated.
Notice how I have used @EntityListeners annotation for example on Spring Data JPA Entity Auditing using EntityListeners.
If you have exactly the same name both in Java class field and table column then you may omit the @Column annotation from the Java class field.
package com.roytuts.spring.data.jpa.audit.entity;

@Entity
@Table(name = "employee")
@EntityListeners(AuditingEntityListener.class)
public class Employee implements Serializable {

	private static final long serialVersionUID = 1L;

	@Id
	@Column(name = "id")
	@GeneratedValue(strategy = GenerationType.IDENTITY)
	private Integer empId;

	// @Column(name = "name")
	private String name;

	// @Column(name = "email")
	private String email;

	// @Column(name = "address")
	private String address;

	@CreatedBy
	@Column(name = "created_by")
	private String createdBy;

	@CreatedDate
	@Column(name = "created_date")
	private LocalDateTime createdDate;

	@LastModifiedBy
	@Column(name = "updated_by")
	private String updatedBy;

	@LastModifiedDate
	@Column(name = "updated_date")
	private LocalDateTime updatedDate;

	public Integer getEmpId() {
		return empId;
	}

	public void setEmpId(Integer empId) {
		this.empId = empId;
	}

	public String getName() {
		return name;
	}

	public void setName(String name) {
		this.name = name;
	}

	public String getEmail() {
		return email;
	}

	public void setEmail(String email) {
		this.email = email;
	}

	public String getAddress() {
		return address;
	}

	public void setAddress(String address) {
		this.address = address;
	}

	public String getCreatedBy() {
		return createdBy;
	}

	public void setCreatedBy(String createdBy) {
		this.createdBy = createdBy;
	}

	public LocalDateTime getCreatedDate() {
		return createdDate;
	}

	public void setCreatedDate(LocalDateTime createdDate) {
		this.createdDate = createdDate;
	}

	public String getUpdatedBy() {
		return updatedBy;
	}

	public void setUpdatedBy(String updatedBy) {
		this.updatedBy = updatedBy;
	}

	public LocalDateTime getUpdatedDate() {
		return updatedDate;
	}

	public void setUpdatedDate(LocalDateTime updatedDate) {
		this.updatedDate = updatedDate;
	}

}
Spring Data JPA Repository
This is Spring Data JPA Repository provided by Spring framework and it reduces efforts significantly by providing built-in functionalities.
You can use built-in functions or you can just specify queries in the form of methods or using @Query annotation and Spring will generate appropriate SQL for you.
package com.roytuts.spring.data.jpa.audit.repository;

public interface EmployeeJpaRepository extends JpaRepository<Employee, Integer> {

}
Value Object
It is always good idea to create DTO or VO object instead of using entity object beyond data layer.
This VO object is equivalent to the entity object.
package com.roytuts.spring.data.jpa.audit.vo;

public class EmployeeVo {

	private Integer id;
	private String name;
	private String email;
	private String address;

	public Integer getId() {
		return id;
	}

	public void setId(Integer id) {
		this.id = id;
	}

	public String getName() {
		return name;
	}

	public void setName(String name) {
		this.name = name;
	}

	public String getEmail() {
		return email;
	}

	public void setEmail(String email) {
		this.email = email;
	}

	public String getAddress() {
		return address;
	}

	public void setAddress(String address) {
		this.address = address;
	}

}
Service Class
In service layer code it is advisable always to do the business logic or conversion from VO or DTO to entity or vice-versa.
In this class either I save the employee object or update the existing object. I also provide a method for retrieving all employee objects.
Here for saving new employee or updating the existing employee I use the same method in order to minimize the line of codes and there is only one difference that when you update the existing employee object or row in the table you have to pass additional attribute id value to identify the existing employee.
Notice in the example Spring Data JPA Entity Auditing using EntityListeners, I never set auditor values and those are taken care by Spring itself.
package com.roytuts.spring.data.jpa.audit.service;

@Service
public class EmployeeService {

	@Autowired
	private EmployeeJpaRepository employeeJpaRepository;

	public void saveOrUpdateEmployee(EmployeeVo employee) {
		Employee emp = null;

		if (employee.getId() != null) {
			emp = employeeJpaRepository.findById(employee.getId()).get();

			if (emp == null) {
				return;
			}
		} else {
			emp = new Employee();
		}

		emp.setName(employee.getName());
		emp.setEmail(employee.getEmail());
		emp.setAddress(employee.getAddress());

		employeeJpaRepository.save(emp);
	}

	public List<EmployeeVo> getEmployees() {
		List<Employee> employees = employeeJpaRepository.findAll();

		return employees.stream().map(e -> {
			EmployeeVo employeeVo = new EmployeeVo();

			employeeVo.setId(e.getEmpId());
			employeeVo.setName(e.getName());
			employeeVo.setEmail(e.getEmail());
			employeeVo.setAddress(e.getAddress());

			return employeeVo;
		}).collect(Collectors.toList());
	}

}
Spring REST Controller
This is Spring REST Controller class that handles request and response from clients.
I specify the URI for REST resources. I also specify the http method for each method with @GetMapping, @PostMapping etc. We need to also specify the arguments as @PathVariable or @RequestBody or @QueryParam etc.
Here I have used @RequestBody parameter for saving or updating the employee object because it would not be possible to send JSON data into query or path parameter.
I use the save method for saving or updating the employee object or row in the table because for updating the employee we need to send id value of the table row whereas for new employee the id value is created automatically using the Generation strategy (IDENTITY).
package com.roytuts.spring.data.jpa.audit.rest.controller;


@RestController
public class EmployeeRestController {

	@Autowired
	private EmployeeService employeeService;

	@PostMapping("/employee/save")
	public ResponseEntity<Void> saveOrUpdateEmployee(@RequestBody EmployeeVo employee) {
		employeeService.saveOrUpdateEmployee(employee);

		return new ResponseEntity<>(HttpStatus.OK);
	}

	@GetMapping("/employees")
	public ResponseEntity<List<EmployeeVo>> getEmployees() {
		List<EmployeeVo> employees = employeeService.getEmployees();

		return new ResponseEntity<>(employees, HttpStatus.OK);
	}

}
Spring Boot Main Class
This main class starts up the embedded Tomcat server and deploys the application.
I have annotated the class with @SpringBootApplication in order to let Spring know that this application should be deployed in place and all required configurations should be done by Spring itself.
I have also put the base package so that any Spring bean that is annotated with @Component, @Controller, @RestController, @Service, @Repository etc. automatically picked up by Spring container from the base package or its children packages.
I have enabled the auditor class. I have also specified the packages for repository and entity class for scanning.
package com.roytuts.spring.data.jpa.audit;

@SpringBootApplication
@EnableJpaAuditing(auditorAwareRef = "auditorAwareImpl")
@EntityScan(basePackages = "com.roytuts.spring.data.jpa.audit.entity")
@EnableJpaRepositories(basePackages = "com.roytuts.spring.data.jpa.audit.repository")
public class App {

	public static void main(String[] args) {
		SpringApplication.run(App.class, args);
	}

}
Testing the Auditing Application
Now you will see how our example Spring Data JPA Entity Auditing using EntityListeners works by testing the application in the below process.
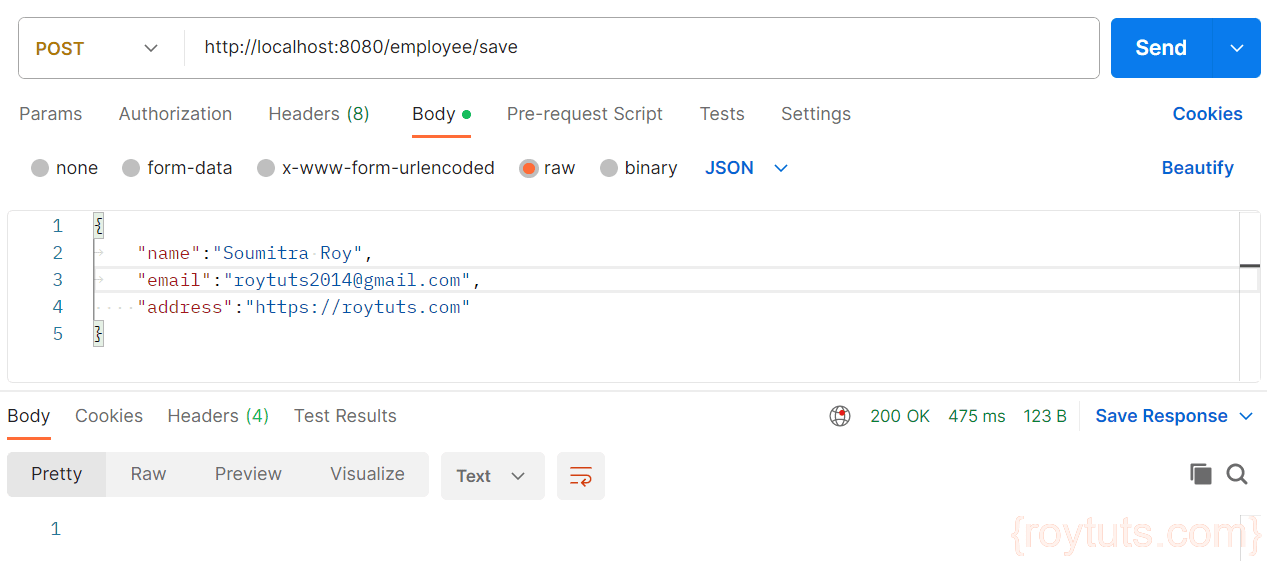
Saving Employee
Here is how I do testing for saving an employee object using REST client. Here I create a new employee with below information.
Now check the database table employee to verify whether created_by, created_date, updated_by and updated_date are populated with the appropriate values.
So from the below image it is clear that the values have been populated correctly into those two fields.
Therefore Spring Data JPA Entity Auditing using EntityListeners works as per the expectation.

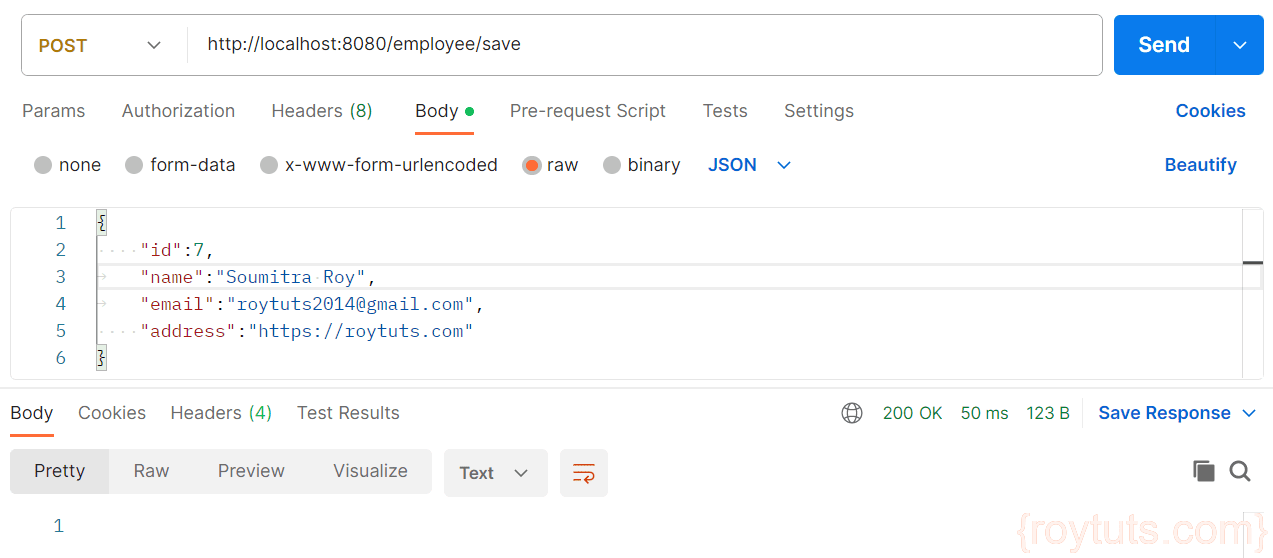
Updating Employee
Here is how I do testing for updating an existing employee object using REST client.
Here I update the employee which is having an id 7 with below information.
Now check the database table employee to verify whether updated_date is updated with the appropriate values.
So from the below image it is clear that as there is no change in the request data so updated_date has not been changed in employee table.

Now let’s try with different request data:
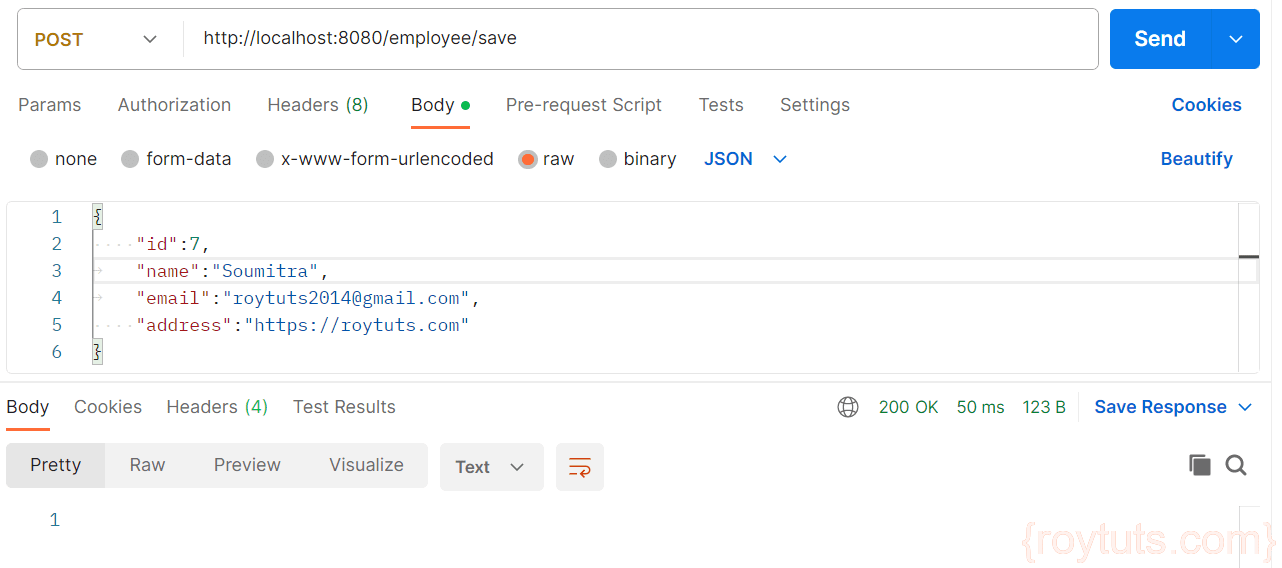
Now check the database table employee to verify whether updated_date is updated with the appropriate values.
So from the below image it is clear that updated_date has been changed in employee table with latest date time without updating created_date as expected.

That’s all. Hope you got an idea on Spring Data JPA Auditing using EntityListeners.
Related Posts:
- Spring Data batch Insertion
- Spring EnableEncryptableProperties with Jasypt
- Hibernate UserType using Spring Data JPA
- Spring Data JPA Entity Graph
- Spring Data JPA CRUD Example
Thank you so much for sharing !
Was looking for it and found exactly.