Spring JMS ActiveMQ Pub Sub
Spring JMS and ActiveMQ Integration tutorial will show you how you can send a message to Topic using publish/subscribe messaging system in Apache ActiveMQ. In the publish subscribe or pub sub communication mechanism the message is sent to the topic and the subscriber(s) get the message from the topic. A topic can have one or more subscribers.
For more information on publish/subscribe messaging system please read tutorial JMS Client Configuration in GlassFish 3
Prerequisites
Java 19, ActiveMQ 5.18.3, Spring Boot 3.1.5, Maven 3.8.5
Make sure you read how to configure ActiveMQ in Windows environment by reading the tutorial ActiveMQ Configuration In Windows.
Let’s move onto the following steps in order to implement publish/subscribe messaging system using Spring and ActiveMQ.
Project Setup
I am going to create a maven based project and the name of the project is spring-jms-activemq-publish-subscribe.
The following pom.xml file can be used for the project.
<?xml version="1.0" encoding="UTF-8"?>

<project xmlns="http://maven.apache.org/POM/4.0.0"
	xmlns:xsi="http://www.w3.org/2001/XMLSchema-instance"
	xsi:schemaLocation="http://maven.apache.org/POM/4.0.0 http://maven.apache.org/xsd/maven-4.0.0.xsd">
	<modelVersion>4.0.0</modelVersion>

	<groupId>com.roytuts</groupId>
	<artifactId>spring-jms-activemq-publish-subscribe</artifactId>
	<version>0.0.1-SNAPSHOT</version>

	<properties>
		<project.build.sourceEncoding>UTF-8</project.build.sourceEncoding>
		<maven.compiler.source>19</maven.compiler.source>
		<maven.compiler.target>19</maven.compiler.target>
	</properties>

	<parent>
		<groupId>org.springframework.boot</groupId>
		<artifactId>spring-boot-starter-parent</artifactId>
		<version>3.1.5</version>
	</parent>

	<dependencies>
		<dependency>
			<groupId>org.springframework.boot</groupId>
			<artifactId>spring-boot-starter-activemq</artifactId>
		</dependency>
	</dependencies>

	<build>
		<plugins>
			<plugin>
				<groupId>org.springframework.boot</groupId>
				<artifactId>spring-boot-maven-plugin</artifactId>
			</plugin>
		</plugins>
	</build>
</project>
Config File
I will create application.properties file under class path directory src/main/resources with the following content:
broker.url=tcp://localhost:61616
topic.name=IN_TOPIC
The property file just declares ActiveMQ broker URL and topic name as key/value pairs that will be used for messaging system.
Message Publisher
You need message publisher that will produce message and publish to the topic. From this topic the subscribers which are subscribed to this topic will receive message.
I am using here JmsTemplate API to send the message to the topic provided by Spring framework.
@Component
public class MessagePublisher {

	@Autowired
	private JmsTemplate jmsTemplate;

	public void sendMessage(final String message) {
		jmsTemplate.convertAndSend(message);
	}

}
Message Subscribers
I will create two subscribers to receive message from topic. Each subscriber will receive the same message from the topic.
I am just accepting text message from the topic and for all other message it will throw an exception.
I have marked each subscriber with @Component annotation to let container create instance from the bean class.
MessageSubscriberOne
The following class defines a subscriber for consuming the message from the topic.
@Component
public class MessageSubscriberOne implements MessageListener {

	@Override
	public void onMessage(Message message) {
		if (message instanceof TextMessage) {
			try {
				String msg = ((TextMessage) message).getText();
				System.out.println("Message consumed by MessageSubscriber1 : " + msg);
			} catch (JMSException ex) {
				throw new RuntimeException(ex);
			}
		} else {
			throw new IllegalArgumentException("Message must be of type TextMessage");
		}
	}

}
MessageSubscriberTwo
This is another subscriber that consumes message from the same topic.
@Component
public class MessageSubscriberTwo implements MessageListener {

	@Override
	public void onMessage(Message message) {
		if (message instanceof TextMessage) {
			try {
				String msg = ((TextMessage) message).getText();
				System.out.println("Message consumed by MessageSubscriber2 : " + msg);
			} catch (JMSException ex) {
				throw new RuntimeException(ex);
			}
		} else {
			throw new IllegalArgumentException("Message must be of type TextMessage");
		}
	}

}
Configuration
Next you need to configure our application to create various beans such as Connection Factory, Topic, Message Publisher etc.
@Configuration
public class JmsConfig {

	@Value("${broker.url}")
	private String brokerUrl;

	@Value("${topic.name}")
	private String topicName;

	@Autowired
	private MessageSubscriberOne messageSubscriberOne;

	@Autowired
	private MessageSubscriberTwo messageSubscriberTwo;

	@Bean
	public ConnectionFactory connectionFactory() {
		return new ActiveMQConnectionFactory(brokerUrl);
	}

	@Bean
	public CachingConnectionFactory cachingConnectionFactory(ConnectionFactory connectionFactory) {
		CachingConnectionFactory cachingConnectionFactory = new CachingConnectionFactory(connectionFactory);
		return cachingConnectionFactory;
	}

	@Bean
	public Topic topic() {
		Topic topic = new ActiveMQTopic(topicName);
		return topic;
	}

	@Bean
	public JmsTemplate jmsTemplate(CachingConnectionFactory cachingConnectionFactory, Topic topic) {
		JmsTemplate jmsTemplate = new JmsTemplate(cachingConnectionFactory);

		jmsTemplate.setDefaultDestination(topic);
		jmsTemplate.setPubSubDomain(true);

		return jmsTemplate;
	}

	@Bean(name = "messageListenerContainerOne")
	public MessageListenerContainer messageListenerContainerOne(CachingConnectionFactory cachingConnectionFactory,
			Topic topic) {
		DefaultMessageListenerContainer messageListenerContainer = new DefaultMessageListenerContainer();

		// messageListenerContainer.setPubSubDomain(true);
		messageListenerContainer.setDestination(topic);
		messageListenerContainer.setMessageListener(messageSubscriberOne);
		messageListenerContainer.setConnectionFactory(cachingConnectionFactory);

		return messageListenerContainer;
	}

	@Bean(name = "messageListenerContainerTwo")
	public MessageListenerContainer messageListenerContainerTwo(CachingConnectionFactory cachingConnectionFactory,
			Topic topic) {
		DefaultMessageListenerContainer messageListenerContainer = new DefaultMessageListenerContainer();

		// messageListenerContainer.setPubSubDomain(true);
		messageListenerContainer.setDestination(topic);
		messageListenerContainer.setMessageListener(messageSubscriberTwo);
		messageListenerContainer.setConnectionFactory(cachingConnectionFactory);

		return messageListenerContainer;
	}

}
Main Class
A class with main method and @SpringBootApplication annotation will deploy the app into the embedded Tomcat server.
@SpringBootApplication
public class SpringJmsActiveMqPubSubApp implements CommandLineRunner {

	@Autowired
	private MessagePublisher messagePublisher;

	public static void main(String[] args) {
		SpringApplication.run(SpringJmsActiveMqPubSubApp.class, args);
	}

	@Override
	public void run(String... args) throws Exception {
		messagePublisher.sendMessage("This is a message that will be posted into Topic.");
	}

}
Testing the Publish Subscribe Application
Running the main class you will get the following output in the console:
Message consumed by MessageSubscriber1 : This is a message that will be posted into Topic.
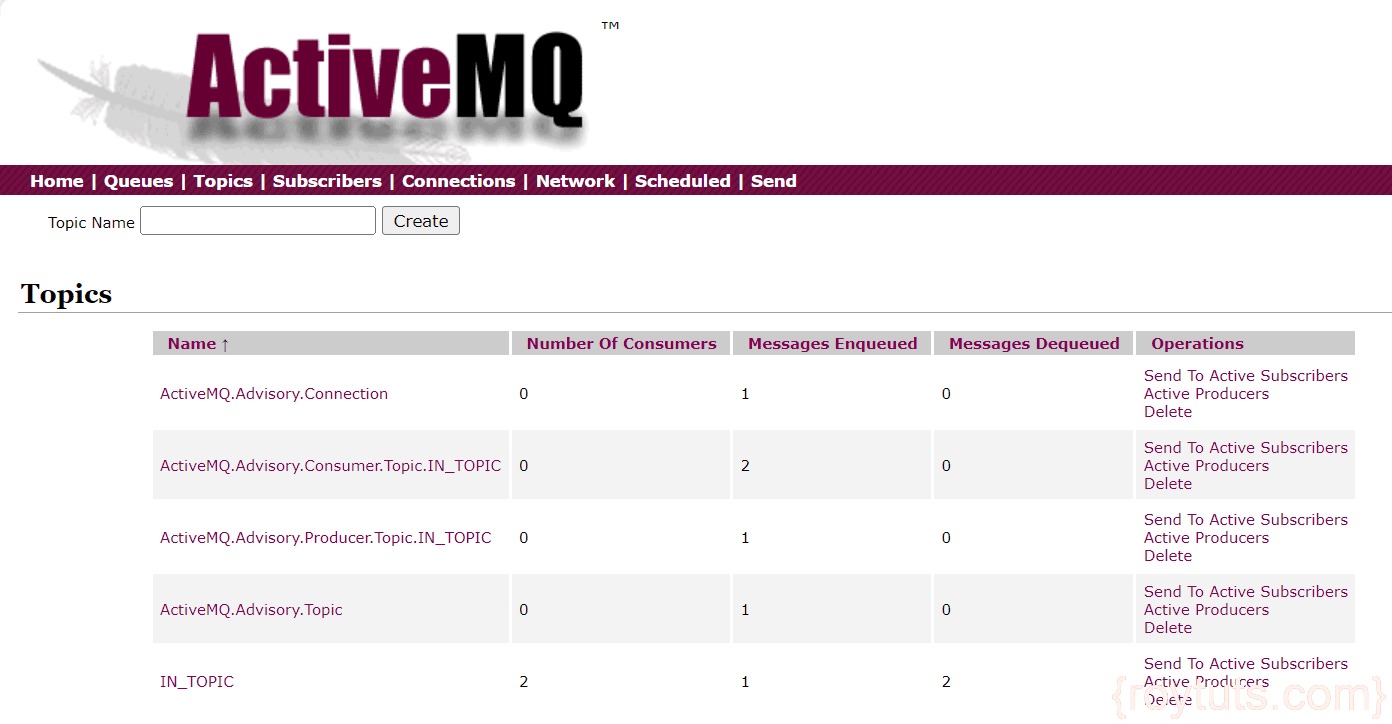
Message consumed by MessageSubscriber2 : This is a message that will be posted into Topic.Verify in ActiveMQ Web Console
Click on Topics in ActiveMQ Web Console. You will not see any message in the IN_TOPIC because as soon as you ran the MessagePublisher the message has been consumed by MessageSubscriberOne and MessageSubscriberTwo.
You will also notice one message was enqueued but two messages has been dequeued because there were two message subscribers.
You do not need to run the MessageSubscriberOne or MessageSubscriberTwo because it is an asynchronous messaging system and MessageSubscriberOne or MessageSubscriberTwo is already registered to the Spring’s DefaultMessageListenerContainer. So when a message arrives to the Topic, the message gets automatically consumed by the subscriber’s onMessage() method.
Subscribers are shown below:

I am using the maven based project, and when I run SpringJmsActiveMqPubSubApp.java, I get a NullPointerException. I tried to log jmsTemplate and it’s null. Any thoughts?
Are you using the same pom.xml file from the tutorial? Your JmsTemplate object has not been created, so you are getting Null.