Introduction
The tutorial, REST over HTTPS with client certificate authentication, will show you how we can use client certificate to handshake with server along with basic authentication for consuming the service. Even you can use header authentication along with client certificate to make more secure. I will create Spring Boot application on Spring REST API and build the application using both maven and gradle build tools.
I will show here both server side code and client side code using Spring Boot framework so that server expects client to establish communication through certificate authentication. Here to consume the service you will be given client certificate (extention might be .crt or .der or .p12 or anything else), password for this certificate and username/password for basic authentication (in case if you need also header authentication).
The certificate we are going to use is generated by ourselves using the Java’s built-in tool utility called keytool.
Prerequisites
Eclipse 2019-12, At least Java 8, Gradle 6.1.1, Maven 3.6.3, Spring Boot 2.2.4
We are going to create two separate Spring Boot applications, one is REST Server (server application) and another one is REST Client (client application).
REST Server
This the server project using Spring Boot framework which will expose REST API endpoint on http/https port and this endpoint will be called from the client application.
Create Project
First step is to create a project in Eclipse. The name of the project is spring-rest-https-server.
If you are creating a gradle based project then you can use the below build.gradle script.
buildscript {
	ext {
		springBootVersion = '2.2.4.RELEASE'
	}
    repositories {
        mavenCentral()
    }
    dependencies {
        classpath("org.springframework.boot:spring-boot-gradle-plugin:${springBootVersion}")
    }
}

plugins {
    id 'java-library'
    id 'org.springframework.boot' version '2.2.4.RELEASE'
}

sourceCompatibility = 12
targetCompatibility = 12

repositories {
    mavenCentral()
}

dependencies {
    implementation("org.springframework.boot:spring-boot-starter-web:${springBootVersion}")
}
If you are creating maven based project then you can use the below pom.xml file.
<project xmlns="http://maven.apache.org/POM/4.0.0"
	xmlns:xsi="http://www.w3.org/2001/XMLSchema-instance"
	xsi:schemaLocation="http://maven.apache.org/POM/4.0.0 http://maven.apache.org/xsd/maven-4.0.0.xsd">
	<modelVersion>4.0.0</modelVersion>

	<groupId>com.roytuts</groupId>
	<artifactId>spring-rest-https-server</artifactId>
	<version>0.0.1-SNAPSHOT</version>

	<parent>
		<groupId>org.springframework.boot</groupId>
		<artifactId>spring-boot-starter-parent</artifactId>
		<version>2.2.4.RELEASE</version>
	</parent>

	<properties>
		<project.build.sourceEncoding>UTF-8</project.build.sourceEncoding>
	</properties>

	<dependencies>
		<dependency>
			<groupId>org.springframework.boot</groupId>
			<artifactId>spring-boot-starter-web</artifactId>
		</dependency>
	</dependencies>

    <build>
        <plugins>
			<plugin>
				<groupId>org.apache.maven.plugins</groupId>
				<artifactId>maven-compiler-plugin</artifactId>
				<version>3.8.1</version>
				<configuration>
					<source>at least 8</source>
					<target>at least 8</target>
				</configuration>
			</plugin>
		</plugins>
	</build>
</project>
REST Controller
We will create a Spring REST Controller class that will expose an endpoint on http/https port. This endpoint returns the temperature after conversion into farenheit from celsius or vice versa.
package com.roytuts.spring.rest.https.rest.controller;

import org.springframework.http.HttpStatus;
import org.springframework.http.ResponseEntity;
import org.springframework.web.bind.annotation.PostMapping;
import org.springframework.web.bind.annotation.RequestBody;
import org.springframework.web.bind.annotation.RestController;

import com.roytuts.spring.rest.https.dto.Temperature;
import com.roytuts.spring.rest.https.enums.TemperatureUnit;

@RestController
public class TempConverterRestController {

	@PostMapping("/temperature")
	public ResponseEntity<Temperature> getTemperature(@RequestBody Temperature temperature) {
		Temperature temp = new Temperature();

		if (TemperatureUnit.CELSIUS == temperature.getUnit()) {
			double fahrenheit = (9.0 / 5.0) * temperature.getValue() + 32;

			temp.setValue(fahrenheit);
			temp.setUnit(TemperatureUnit.FAHRENHEIT);
		} else if (TemperatureUnit.FAHRENHEIT == temperature.getUnit()) {
			double celsius = (5.0 / 9.0) * (temperature.getValue() - 32);

			temp.setValue(celsius);
			temp.setUnit(TemperatureUnit.CELSIUS);
		} else {
			throw new IllegalArgumentException("Illegal Argument");
		}

		return new ResponseEntity<Temperature>(temp, HttpStatus.OK);
	}

}
The enum and DTO class which were used in the above Spring REST controller class are given below.
package com.roytuts.spring.rest.https.enums;

public enum TemperatureUnit {

	CELSIUS, FAHRENHEIT;

}
package com.roytuts.spring.rest.https.dto;
import com.roytuts.spring.rest.https.enums.TemperatureUnit;
public class Temperature {
private double value;
private TemperatureUnit unit;
//getters and setters
}Main Class
We need a class having main method with @SpringBootApplication annotation to deploy the application into embedded Tomcat server.
package com.roytuts.spring.rest.https;

import org.springframework.boot.SpringApplication;
import org.springframework.boot.autoconfigure.SpringBootApplication;

@SpringBootApplication
public class SpringRestHttpsServerApp {

	public static void main(String[] args) {
		SpringApplication.run(SpringRestHttpsServerApp.class, args);
	}

}
REST Client
This the client project using Spring Boot framework which will call the REST API endpoint on http/https port.
Create Project
Here also the first step is to create a project in Eclipse. The name of the project is spring-rest-https-server.
If you are creating a gradle based project then you can use the below build.gradle script. We have excluded the Tomcat server from the starter-web dependency as we don’t need to start the server to call the REST service using Spring RestTemplate API.
buildscript {
	ext {
		springBootVersion = '2.2.4.RELEASE'
	}
    repositories {
        mavenCentral()
    }
    dependencies {
        classpath("org.springframework.boot:spring-boot-gradle-plugin:${springBootVersion}")
    }
}

plugins {
    id 'java-library'
    id 'org.springframework.boot' version '2.2.4.RELEASE'
}

sourceCompatibility = 12
targetCompatibility = 12

repositories {
    mavenCentral()
}

dependencies {
    implementation("org.springframework.boot:spring-boot-starter-web:${springBootVersion}") {
    	exclude group:'org.springframework.boot', module:'spring-boot-starter-tomcat'
    }
}
If you are creating maven based project then you can use the below pom.xml file.
<project xmlns="http://maven.apache.org/POM/4.0.0"
	xmlns:xsi="http://www.w3.org/2001/XMLSchema-instance"
	xsi:schemaLocation="http://maven.apache.org/POM/4.0.0 http://maven.apache.org/xsd/maven-4.0.0.xsd">
	<modelVersion>4.0.0</modelVersion>

	<groupId>com.roytuts</groupId>
	<artifactId>spring-rest-https-client</artifactId>
	<version>0.0.1-SNAPSHOT</version>

	<parent>
		<groupId>org.springframework.boot</groupId>
		<artifactId>spring-boot-starter-parent</artifactId>
		<version>2.2.4.RELEASE</version>
	</parent>

	<properties>
		<project.build.sourceEncoding>UTF-8</project.build.sourceEncoding>
	</properties>

	<dependencies>
		<dependency>
			<groupId>org.springframework.boot</groupId>
			<artifactId>spring-boot-starter-web</artifactId>
			<exclusions>
				<exclusion>
					<groupId>org.springframework.boot</groupId>
					<artifactId>spring-boot-starter-tomcat</artifactId>
				</exclusion>
			</exclusions>
		</dependency>
	</dependencies>

    <build>
        <plugins>
			<plugin>
				<groupId>org.apache.maven.plugins</groupId>
				<artifactId>maven-compiler-plugin</artifactId>
				<version>3.8.1</version>
				<configuration>
					<source>at least 8</source>
					<target>at least 8</target>
				</configuration>
			</plugin>
		</plugins>
	</build>
</project>
REST Template
As we said that we will use Spring RestTemplate to invoke the REST service to get the desired result. Therefore we are going to create a client class with the below source code.
package com.roytuts.spring.rest.https.client;

import org.springframework.beans.factory.annotation.Autowired;
import org.springframework.stereotype.Component;
import org.springframework.web.client.RestTemplate;

import com.roytuts.spring.rest.https.dto.Temperature;
import com.roytuts.spring.rest.https.enums.TemperatureUnit;

@Component
public class TempConverterRestClient {

	@Autowired
	private RestTemplate restTemplate;

	public void temperature() {
		Temperature temperature = new Temperature();
		temperature.setValue(32.0);
		temperature.setUnit(TemperatureUnit.CELSIUS);

		final String url = "http://localhost:8080/temperature";

		Temperature temp = restTemplate.postForObject(url, temperature, Temperature.class);

		System.out.println(temp.getValue() + " " + temp.getUnit().name());

		temperature = new Temperature();
		temperature.setValue(89.6);
		temperature.setUnit(TemperatureUnit.FAHRENHEIT);

		temp = restTemplate.postForObject(url, temperature, Temperature.class);

		System.out.println(temp.getValue() + " " + temp.getUnit().name());
	}

}
RestTemplate Config
As we have used RestTemplate in our above client class, so we need to configure the RestTemplate as a bean.
package com.roytuts.spring.rest.https.config;

import org.springframework.boot.web.client.RestTemplateBuilder;
import org.springframework.context.annotation.Bean;
import org.springframework.context.annotation.Configuration;
import org.springframework.web.client.RestTemplate;

@Configuration
public class RestConfig {

	@Bean
	public RestTemplate restTemplate(RestTemplateBuilder builder) {
		return builder.build();
	}

}
Note that we have the same enum and DTO class in our client application.
Main Class
We need a class having main method with @SpringBootApplication annotation to run our application.
In this client application we are running the application as a standalone or non web application. Therefore we implement the interface CommandLineRunner.
package com.roytuts.spring.rest.https;

import org.springframework.beans.factory.annotation.Autowired;
import org.springframework.boot.CommandLineRunner;
import org.springframework.boot.SpringApplication;
import org.springframework.boot.autoconfigure.SpringBootApplication;

import com.roytuts.spring.rest.https.client.TempConverterRestClient;

@SpringBootApplication
public class SpringRestHttpsClientApp implements CommandLineRunner {

	@Autowired
	private TempConverterRestClient tempConverterRestClient;

	public static void main(String[] args) {
		SpringApplication.run(SpringRestHttpsClientApp.class, args);
	}

	@Override
	public void run(String... args) throws Exception {
		tempConverterRestClient.temperature();
	}

}
Testing the Application
Make sure you run the server application followed by client application.
On client application console you will get the below output:
89.6 FAHRENHEIT
32.0 CELSIUS
Server Certificate
So far so good… We were able to run our applications over http protocol. So the data passed over the network was not secured. Therefore I am going to tell you how to use https protocol (SSL connection) and authenticate using client certificate for establishing communication between server and client applications.
Related Posts:
Now to make our applications runnable on https protocol using certificate, we need certificate. We will generate our own SSL certificate using Java’s built-in keytool utility. In other cases you will get such certificate from certificate authority.
If you have already setup environment variable for Java then you may be able to generate from any path location or you may navigate to the jdk bin directory from cmd prompt and execute the following command. Please note that password must be at least six characters long in length.
C:\Java\jdk-12.0.2\bin\keytool -genkey -keyalg RSA -alias selfsigned -keystore certificate.jks -storepass changeit -validity 360When you type the above command you will be asked few questions and you may answer them similar to as shown in the below image:
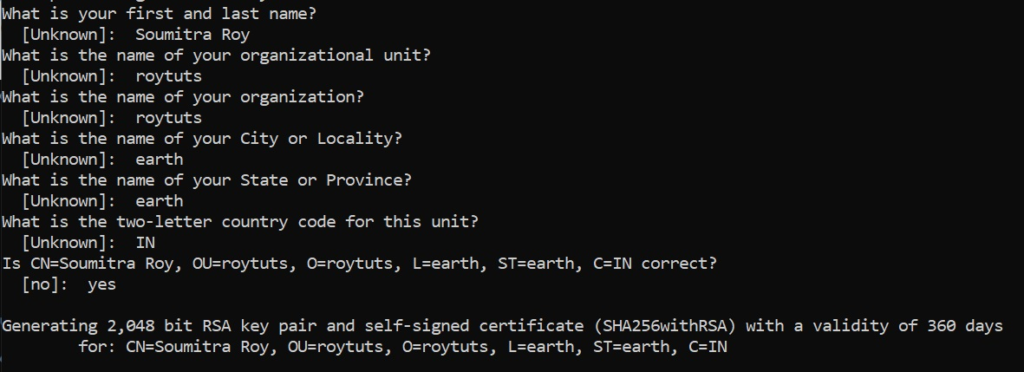
So you have successfully generated a keystore called certificate.jks with a newly generated certificate in it with certificate alias selfsigned and password changeit and validity for this certificate is 360 days.
Note your certificate is generated under the directory as you are executing the command currently on a directory in the cmd line tool.
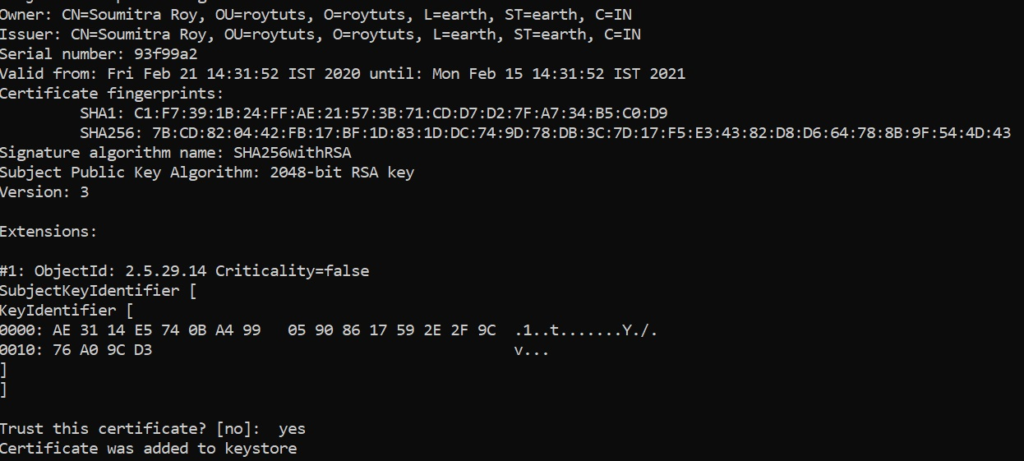
Check the generated certificate using the following command:
C:\Java\jdk-12.0.2\bin\keytool -list -keystore certificate.jks -storepass changeitYou will find similar to the below image:

Then we use this certificate in our server application by declaring the followings in the application.properties file in src/main/resources directory.
server.port=8443
server.ssl.key-store=classpath:certificate.jks
server.ssl.key-store-password=changeit
server.ssl.key-alias=selfsigned
Now you see we have updated default port from 8080 to 8443 to use https instead of http protocol.
Please make sure you have put the certificate.jks file under classpath src/main/resources directory.
Testing the Application
Now run the server application.
Next replace the line in class TempConverterRestClient in client application.
final String url = "http://localhost:8080/temperature";by
final String url = "https://localhost:8443/temperature";Now run the client application, you will get error similar to below (full stack trace removed):
Bad Request
This combination of host and port requires TLS
Client Certificate
Now we will create client certificate to handshake with server application.
Let’s create separate certificate for client. Here we will access the service from Java code, so we will create client certificate for Java client.
If you access the service from other clients as well, then create certificate for each client you are accessing from.
Use the following command in cmd prompt in order to generate client certificate for Java client:
C:\Java\jdk-12.0.2\bin\keytool -genkey -keyalg RSA -alias javaclient -keystore javaclient.jks -storepass changeit -validity 360So when prompt for several questions then give the same answers you had give while generating the server certificate.

Now we need to extract the certificate from truststore for Java client because we need to import this certificate for remote authentication using the following command:
C:\Java\jdk-12.0.2\bin\keytool -export -alias javaclient -file javaclient.crt -keystore javaclient.jks -storepass changeitSo the certificate file javaclient.crt gets generated.

Now we have to add the above generated certificate to keystore in order to establish the handshake between client and server.
C:\Java\jdk-12.0.2\bin\keytool -import -alias javaclient -file javaclient.crt -keystore truststore.jks -storepass changeitOnce prompted for Trust this certificate? [no]: . Type yes.
Now check the truststore should have javaclient certificate using below command:
C:\Java\jdk-12.0.2\bin\keytool -list -keystore truststore.jks -storepass changeitSo you will see output something similar to the below image:

Configure Server Application (REST Server)
Now we need to configure also javaclient truststore at server side so that server knows who is trying to establish connection among themselves.
So put the generated truststore.jks in the classpath directory src/main/resources.
So the whole application.properties file looks similar to below:
server.port=8443
server.ssl.key-store=classpath:certificate.jks
server.ssl.key-store-password=changeit
server.ssl.key-alias=selfsigned
server.ssl.trust-store=classpath:truststore.jks
server.ssl.trust-store-password=changeit
server.ssl.client-auth=need
It is mandatory to set the server.ssl.client-auth=need in order to make the client authentication mandatory.
So now you neither be able to view nor be able to connect to service from anywhere except Java client.
Configure Client Application (REST Client)
Next put the generated javaclient.jks (remember you generated this file during generating truststore) file under classpath directory src/main/resources. Put also the certificate.jks file (generated at the server side code) under classpath directory src/main/resources directory.
We need Apache httpclient library to produce the socket factory for establishing the TLS/SSL connection. Now we will update the RestTemplate bean to have a supplier of request factory instance.
Therefore first make an entry to the build.gradle or pom.xml file:
implementation("org.apache.httpcomponents:httpclient:4.5.11")or
<dependency>
	<groupId>org.apache.httpcomponents</groupId>
	<artifactId>httpclient</artifactId>
	<version>4.5.11</version>
</dependency>
Next we need to update the RestTemplate bean as given below:
package com.roytuts.spring.rest.https.config;

import java.io.InputStream;
import java.security.KeyStore;
import java.util.function.Supplier;

import javax.net.ssl.SSLContext;

import org.apache.http.conn.ssl.NoopHostnameVerifier;
import org.apache.http.conn.ssl.SSLConnectionSocketFactory;
import org.apache.http.impl.client.CloseableHttpClient;
import org.apache.http.impl.client.HttpClientBuilder;
import org.apache.http.ssl.SSLContextBuilder;
import org.springframework.boot.web.client.RestTemplateBuilder;
import org.springframework.context.annotation.Bean;
import org.springframework.context.annotation.Configuration;
import org.springframework.http.client.ClientHttpRequestFactory;
import org.springframework.http.client.HttpComponentsClientHttpRequestFactory;
import org.springframework.web.client.RestTemplate;

@Configuration
public class RestConfig {

	@Bean
	public RestTemplate restTemplate(RestTemplateBuilder builder) {
		return builder.requestFactory(myRequestFactorySupplier()).build();
	}

	@Bean
	public MyRequestFactorySupplier myRequestFactorySupplier() {
		return new MyRequestFactorySupplier();
	}

	class MyRequestFactorySupplier implements Supplier<ClientHttpRequestFactory> {

		@Override
		public ClientHttpRequestFactory get() {
			HttpComponentsClientHttpRequestFactory requestFactory = null;
			try {
				char[] password = "changeit".toCharArray();
				KeyStore ks = KeyStore.getInstance("JKS");
				InputStream ksStream = this.getClass().getClassLoader().getResourceAsStream("javaclient.jks");
				ks.load(ksStream, password);

				SSLContext sslContext = new SSLContextBuilder()
						.loadTrustMaterial(this.getClass().getClassLoader().getResource("certificate.jks"), password)
						.loadKeyMaterial(ks, password).build();

				SSLConnectionSocketFactory socketFactory = new SSLConnectionSocketFactory(sslContext,
						NoopHostnameVerifier.INSTANCE);

				CloseableHttpClient httpClient = HttpClientBuilder.create().setSSLSocketFactory(socketFactory).build();

				requestFactory = new HttpComponentsClientHttpRequestFactory(httpClient);
				requestFactory.setBufferRequestBody(false);
			} catch (Exception e) {
			}

			return requestFactory;
		}

	}
}
Testing the Application
Finally run the server application followed by client application. Eventually you will get the same output over https protocol as you got over http protocol.
89.6 FAHRENHEIT
32.0 CELSIUS
That’s all. Hope you got an idea how to authenticate client application using certificate.
Source Code
Thanks for reading.