This tutorial will show you how to configure Tomcat Load Balancing with Apache webserver (http server) using Mod Proxy. I have listed here the following steps on how to configure Apache with Tomcat to configure Load Balancer using Mod Proxy. Having load-balanced is always recommended in production environment for better availability and performance of your application resources.
Load balancing improves responsiveness and increases availability of applications. A load balancer sits between the client and the server farm accepting incoming network and application traffic and distributing the traffic across multiple backend servers using various methods.
Prerequisites
Java at least 1.8, Tomcat 8.0.36/9.0.38, Spring Boot 2.3.4
Spring Boot App
In order to show real working example I am also creating a simple Spring Boot application (spring-rest-hello) that exposes a REST endpoint.
The build.gradle script is given below. As I am going to deploy this app into external Tomcat server instead of embedded Tomcat server so I am creating war file out of it. Therefore I have added plugin war.
buildscript {
	ext {
		springBootVersion = '2.3.4.RELEASE'
	}

    repositories {
    	mavenCentral()
    }

    dependencies {
    	classpath("org.springframework.boot:spring-boot-gradle-plugin:${springBootVersion}")
    }
}

plugins {
	id 'war'
    id 'java-library'
    id 'org.springframework.boot' version "${springBootVersion}"
}

sourceCompatibility = 12
targetCompatibility = 12

repositories {
    mavenCentral()
}

dependencies {
	implementation("org.springframework.boot:spring-boot-starter-web:${springBootVersion}")
}
The main class with Spring REST controller is given below.
package com.roytuts.rest.hello;

import org.springframework.boot.SpringApplication;
import org.springframework.boot.autoconfigure.SpringBootApplication;
import org.springframework.boot.builder.SpringApplicationBuilder;
import org.springframework.boot.web.servlet.support.SpringBootServletInitializer;
import org.springframework.http.HttpStatus;
import org.springframework.http.ResponseEntity;
import org.springframework.web.bind.annotation.GetMapping;
import org.springframework.web.bind.annotation.PathVariable;
import org.springframework.web.bind.annotation.RestController;

@RestController
@SpringBootApplication
public class SpringRestHelloApp extends SpringBootServletInitializer {

    public static void main(String[] args) {
        SpringApplication.run(SpringRestHelloApp.class, args);
    }

    @Override
    protected SpringApplicationBuilder configure(SpringApplicationBuilder application) {
        return application.sources(SpringRestHelloApp.class);
    }

    @GetMapping("/hello/{name}")
    public ResponseEntity<String> hello(@PathVariable String name) {
        return new ResponseEntity<String>("Hello, " + name, HttpStatus.OK);
    }

}
I am extending SpringBootServletInitializer as I am deploying this war into external Tomcat server. But this app will run also on embedded Tomcat server without any change in the above class.
The output you will see once your app is up and hitting the URL http://localhost:8080/hello/Soumitra:
Hello, SoumitraIf you are running the above app into external Tomcat server, remember you need to add the context path in your URL, so it will be http://localhost:8080/spring-rest-hello/hello/Soumitra.
For load balancer you need to add balancer name instead of the context path.
Load Balance Configuration
Please follow the below steps for configuring Tomcat load balancing with Apache Tomcat and Apache http servers.
Step 1. Download Apache 2.4 http server from https://httpd.apache.org/download.cgi#apache24.
Step 2. Download Apache Tomcat Server version 8/9 from the download section of the page http://tomcat.apache.org/.
Step 3. Install Apache http server, let’s say in C drive. The root folder of the server is C:\Apache24.
Step 4. Install two instances of Apache Tomcat server, let’s say in C drive. Here I have used version apache-tomcat-8.0.36 or apache-tomcat-9.0.38. So I have put two instances of apache-tomcat-8.0.36 or apache-tomcat-9.0.38 server – C:\apache-tomcat-8.0.36 and C:\apache-tomcat-8.0.36-2 or C:\apache-tomcat-9.0.38 and C:\apache-tomcat-9.0.38-2.
Step 5. Change the ports in Tomcat server in server.xml file. Here I will use default ports in C:\apache-tomcat-8.0.36 or C:\apache-tomcat-9.0.38 and change ports in C:\ apache-tomcat-8.0.36-2 or C:\apache-tomcat-9.0.38-2. Now open the file C:\apache-tomcat-8.0.36-2\conf\server.xml or C:\apache-tomcat-9.0.38-2\conf\server.xml and update as following.
At the very beginning you will find shutdown port, so change it to 8006 from 8005 because the first instance will run on 8005 port.
<Server port="8005" shutdown="SHUTDOWN">Next change the connector port from 8080 to 8090 because the first instance will run on 8080 port.
<Connector port="8090" protocol="HTTP/1.1"
               connectionTimeout="20000"
               redirectPort="8443" />
Step 6. Add/Uncomment below lines into httpd.conf file in Apache http server. These lines are required to enable the mod proxy balancer for distributing loads.
LoadModule proxy_module modules/mod_proxy.so
LoadModule proxy_balancer_module modules/mod_proxy_balancer.so
LoadModule proxy_http_module modules/mod_proxy_http.so
LoadModule slotmem_shm_module modules/mod_slotmem_shm.so
LoadModule lbmethod_byrequests_module modules/mod_lbmethod_byrequests.so
Step 7. Add below load balancing configuration into configuration file httpd.conf in Apache http server. Add proxy pass along with balancer name for application context root, for example, here it is spring-rest.
In this example, I have proxy path as spring and balancer name as mycluster. It is important to include stickysession as not having this option will distribute same request to multiple tomcat servers and you will have session expiry issues in application.
Reverse Proxy
Reverse proxy is to provide Internet users access to a server that is behind a firewall. Reverse proxy is helpful when you want to access your internal application from internet.
The user does not know about your internal server, and looks to them that the response is coming from the proxy server itself.
Sticky Session
As you know load balancer send requests to the back-end servers as a round robin manner. You will have to use the sticky session feature which enables the load balancer to stick a user’s session to a specific back-end server. This would make sure all requests coming from the user during the session will be sent to the same server.
#Load Balancer Configuration - start
<IfModule proxy_module>
    <Location "/balancer-manager">
        SetHandler balancer-manager
        Require all granted
    </Location>

	ProxyRequests Off
	ProxyPass /spring balancer://mycluster stickysession=JSESSIONID
	ProxyPassReverse /spring balancer://mycluster stickysession=JSESSIONID

	<Proxy balancer://mycluster>
		BalancerMember http://localhost:8080/spring-rest-hello route=server1
		BalancerMember http://localhost:8090/spring-rest-hello route=server2
	</Proxy>
</IfModule>
#Load Balancer Configuration – end
As you can see in above configuration, I have added route in BalancerMember so route value can be added to jvmRoute parameter in server.xml of Tomcat.
Step 8. Now update the server.xml files in each instance of Tomcat server. Add jvmRoute parameter in server.xml of Tomcat. This must be added in Engine name tag.
For C:\apache-tomcat-8.0.36\conf\server.xml or C:\apache-tomcat-9.0.38\conf\server.xml:
<Engine name="Catalina" defaultHost="localhost" jvmRoute="server1">For C:\apache-tomcat-8.0.36-2\conf\server.xml or C:\apache-tomcat-9.0.38-2\conf\server.xml
<Engine name="Catalina" defaultHost="localhost" jvmRoute="server2">Step 9. Upadte the Logformat in httpd.conf to see which balancer was selected appended with the request URIs in log file. Add following in LogFormat directive under <IfModule log_config_module/> in httpd.conf file.
\"%{BALANCER_WORKER_ROUTE}e\The complete line would look like:
LogFormat "%h %l %u %t \"%r\" %>s %b \"%{Referer}i\" \"%{User-Agent}i\" \"%{BALANCER_WORKER_ROUTE}e\" " combinedYou need to also comment out the following line inside this directive:
CustomLog "logs/access.log" combinedYou need to comment the following line inside the same directive:
#CustomLog "logs/access.log" commonStep 10. Now put the each instance of spring-rest-hello.war files under C:\apache-tomcat-8.0.36\webapps or C:\apache-tomcat-9.0.38\webapps and C:\apache-tomcat-8.0.36-2\webapps or C:\apache-tomcat-9.0.38-2\webapps. Make sure you generated war file by executing the build on the Spring Boot app given in the above example.
Step 11. Now start each instance of the Tomcat server, for example, by executing startup.bat file from the command prompt C:\apache-tomcat-8.0.36-2\bin>startup.bat or C:\apache-tomcat-9.0.38\bin>startup.bat for all two instances.
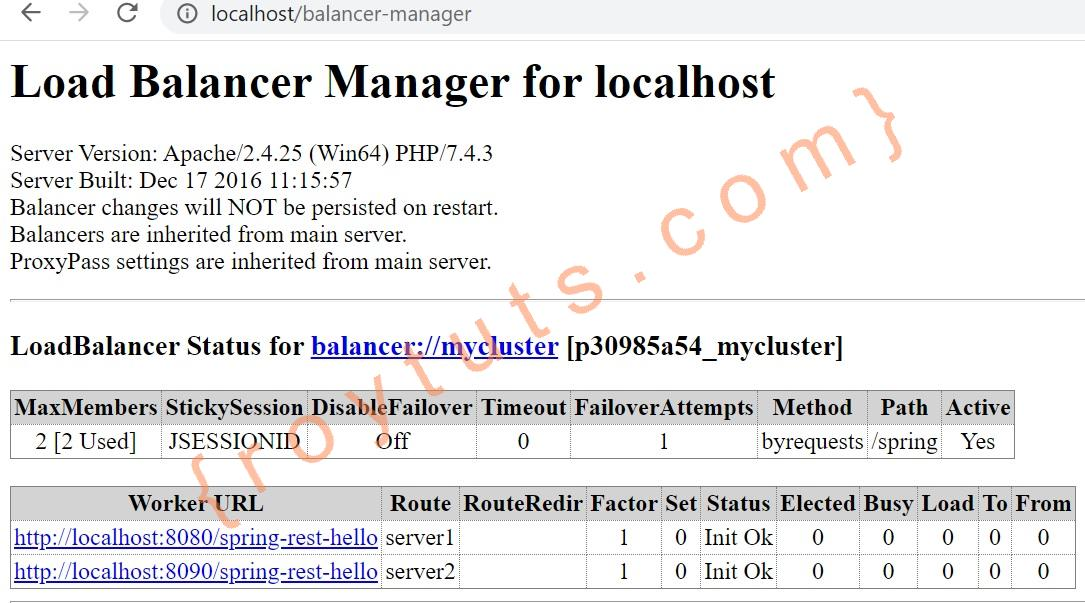
Step 12. Now start the http server by executing the command C:\Apache24\bin\httpd.exe and access the URL http://localhost/balancer-manager in browser. From the below figure you would be able to understand the specifications of tomcat load balancing with apache.
The below image is from Tomcat 9.0.38 version.
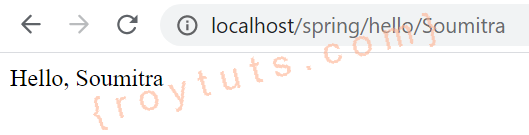
Step 13. Now access application URL by balancer path http://localhost/spring/hello/Soumitra. You will see output – “Hello Soumitra”
Verification
Check access log of apache server to ensure your request is getting routed to only one tomcat instance. You will also notice your route id is appended as shown in the below:
"GET /spring/hello/Soumitra HTTP/1.1" 200 15 "-" "Mozilla/5.0 (Windows NT 10.0; Win64; x64) AppleWebKit/537.36 (KHTML, like Gecko) Chrome/85.0.4183.121 Safari/537.36" "server1"

"GET /spring/hello/Soumitra HTTP/1.1" 200 15 "-" "Mozilla/5.0 (Windows NT 10.0; Win64; x64) AppleWebKit/537.36 (KHTML, like Gecko) Chrome/85.0.4183.121 Safari/537.36" "server2"
That’s all. Hope you have understood how to configure tomcat load balancing with apache Tomcat and HTTP servers.