Here in this tutorial I am going to show you how to use Swagger API with Django REST framework. Swagger API provides well structured documentation for REST API endpoints so a new person can say how to test a REST API without knowing its internal implementation.
Essentially, Swagger does a simple but very powerful thing: with a bit of additional annotations it generates the REST API descriptions such as HTTP methods, path / query / form parameters, responses, HTTP error codes etc) and even provides a simple web UI to play with REST calls to your APIs.
The Swagger specification is a powerful definition format to describe RESTful APIs and it creates a RESTful interface for easily developing and consuming an API by effectively mapping all the resources and operations associated with it. It’s easy-to-learn, language agnostic, and both human and machine readable.
Prerequisites
Python 3.8.5, Django 3.0.8, REST Framework (pip install djangorestframework), Swagger (pip install django-rest-swagger)
It is assumed that you have already installed and configured Python on your system.
Next task is to install Django. The preferred method would be to install using the command pip install Django. You can read more details on Django installation.
We are going to use MySQL database server as a persistent system for storing data, so you need to read tutorial how to setup MySQL with django for executing SQL statements.
Additionally you need to install Swagger module using the command pip install django-rest-swagger.
I would recommend you to read the tutorial Django MySQL REST CRUD API Example before going down further. Because this example is exactly follows that tutorial. In this example I have added Swagger API in addition to the REST API CRUD example.
I won’t show every part of the project in this example as I am going to work with the existing project but I will touch the important changes. You can always download the full project from my Github account later from the link given at the bottom of this tutorial.
Project Setup
The first thing we need to create project directory. The project name is djangomysqlrestcrudswagger which we will create using the following command.
django-admin startproject djangomysqlrestcrudswaggerNext step is to create an app inside the project to perform CRUD operations. Create an app called restcrudswagger using the following command.
django-admin startapp restcrudswaggerThe required project and app structures will be created.
Now we need to add this restcrudswagger app into the project. So edit the file djangomysqlrestcrudswagger/djangomysqlrestcrudswagger/settings.py and add the following line into INSTALLED_APPS section:
INSTALLED_APPS = [
    ...
    'rest_framework_swagger',
    'restcrudswagger.apps.RestcrudswaggerConfig',
]
The above line is formed using the file djangomysqlrestcrudswagger/restcrudswagger/apps.py. You will see the RestcrudswaggerConfig class in this file with the name = ‘restcrudswagger’.
You need to add the following line into the above file (settings.py) otherwise you will see an error “AttributeError at / ‘AutoSchema’ object has no attribute ‘get_link’“.
REST_FRAMEWORK = { 'DEFAULT_SCHEMA_CLASS': 'rest_framework.schemas.coreapi.AutoSchema' }URLs
Next I am going to change the URL scheme to add Swagger API for REST documentation. The following code is written into file djangomysqlrestcrudswagger/djangomysqlrestcrudswagger/urls.py.
from rest_framework_swagger.views import get_swagger_view

schema_view = get_swagger_view(title='User API')

urlpatterns = [
    url('^$', schema_view)
]
The entire file with source code is given below:
from django.urls import include, path
from rest_framework import routers
from restcrudswagger import views
from django.conf.urls import url
from rest_framework_swagger.views import get_swagger_view

router = routers.DefaultRouter()
router.register(r'users', views.UserViewSet)

schema_view = get_swagger_view(title='User API')

urlpatterns = [
    url('^$', schema_view),
    url(r'^', include(router.urls))
]
Swagger UI Template
Next you need to create Swagger template file that will be rendered while you access the URL.
The below content is written into djangomysqlrestcrudswagger/restcrudswagger/templates/rest_framework_swagger/index.html.
<!DOCTYPE html>
<html>
  <head>
    <title>Swagger</title>
    <meta charset="utf-8"/>
    <meta name="viewport" content="width=device-width, initial-scale=1">
    <link rel="stylesheet" type="text/css" href="//unpkg.com/swagger-ui-dist@3/swagger-ui.css" />
  </head>
  <body>
    <div id="swagger-ui"></div>
    <script src="//unpkg.com/swagger-ui-dist@3/swagger-ui-bundle.js"></script>
    <script>
    const ui = SwaggerUIBundle({
        url: "{% url schema_url %}",
        dom_id: '#swagger-ui',
        presets: [
          SwaggerUIBundle.presets.apis,
          SwaggerUIBundle.SwaggerUIStandalonePreset
        ],
        layout: "BaseLayout"
      })
    </script>
  </body>
</html>
Known Issue
If you see the following error while accessing URL http://localhost:8000, then you can edit the following file mentioned at the path as shown in the below image:
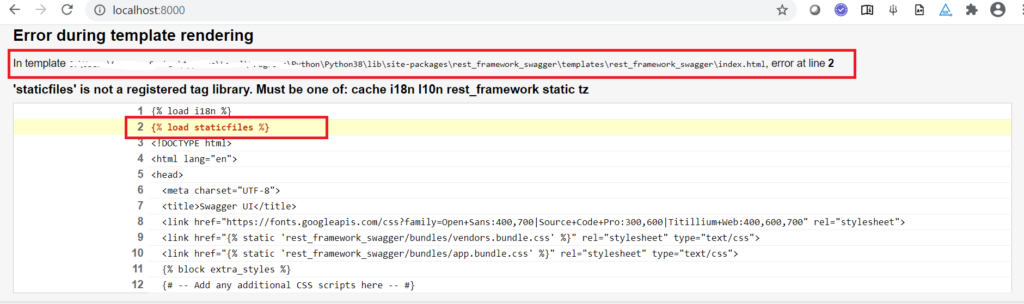
Replace the line {% load staticfiles %} by {% load static %} at line 2.
Deploying Application
Now I am ready to test the API I have built. Let’s fire up the server from the command line using manage.py runserver. The application will run on default port 8000. If you want to change the default host/port of the server then you can read tutorial here.
Testing the Application
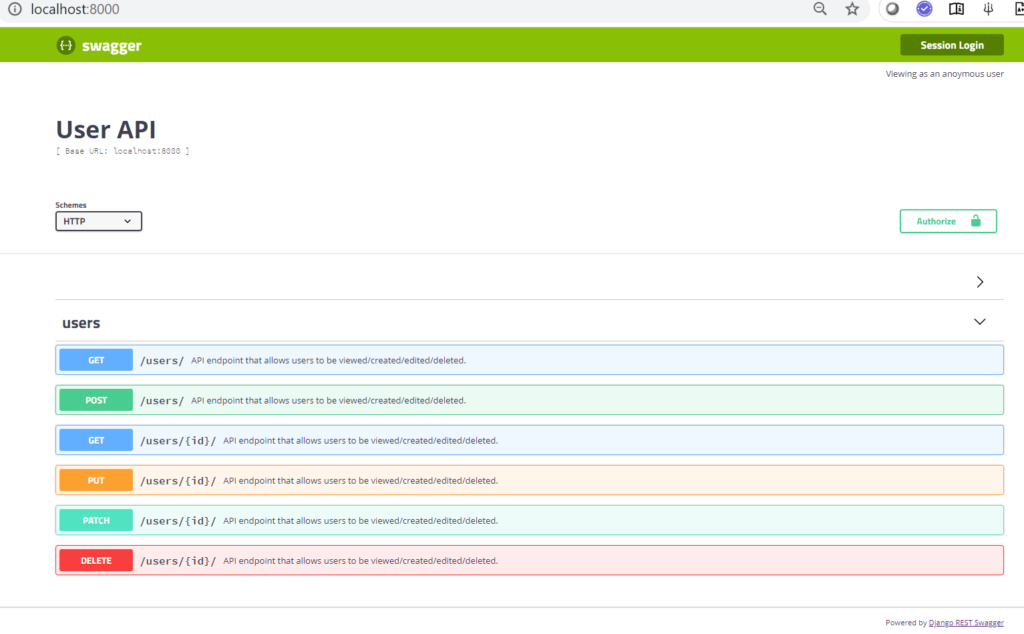
Now if you have followed the tutorial correctly then you will see the following screen on browser while you access URL http://localhost:8000:
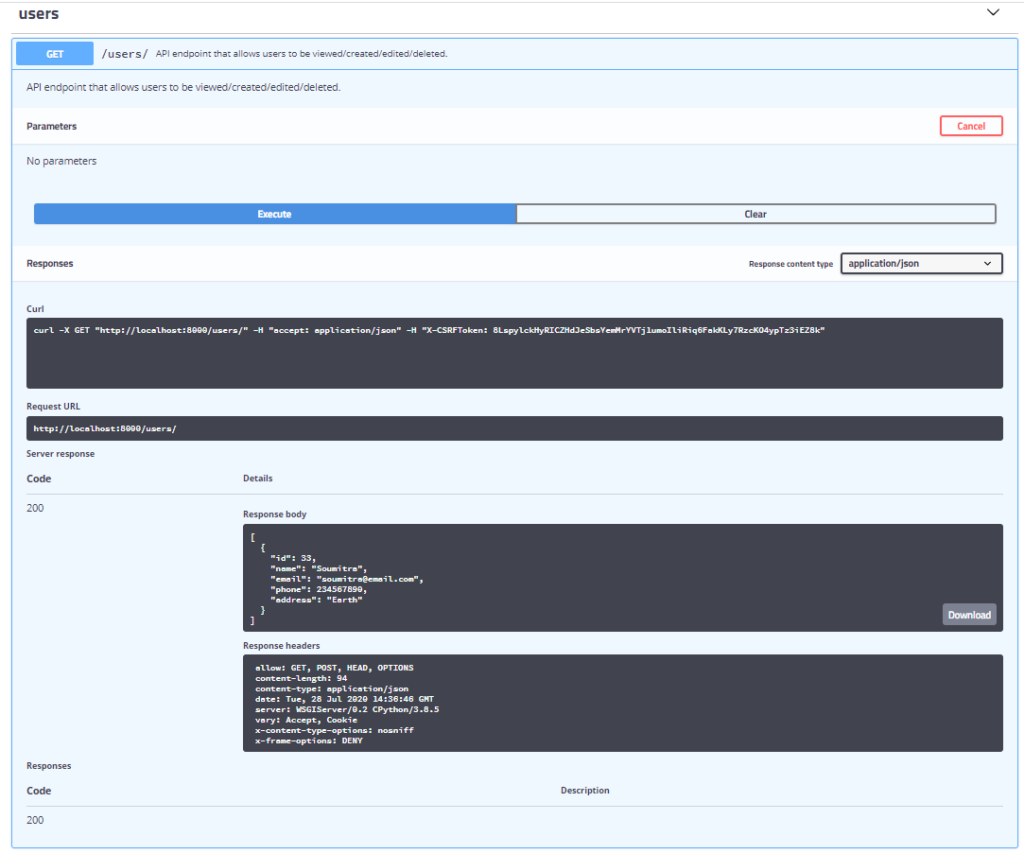
Now let’s say you want to fetch all users, so click on GET /users/ followed by Try it out button followed by Execute button. You will get similar output as shown in the below image. In my table currently I have only one user record.
You can also try with other endpoints in the swagger documentation.
Source Code
Thanks for reading.