Most of the applications require at least one file needs to be upload for a reason, such as, for uploading bulk data or processing file data for business requirement. This example will show you how to upload single or multiple files using Django REST framework. REST is an acronym that stands for Representation State Transfer which works on http/https protocol. It is light weight and delivers data very fast.
I am assuming you have a basic knowledge on Python and Django REST framework before you proceed further down. I am going to show you how to use Serializer for upload single or multiple files upload using REST API. I am also going to show you how to use ViewSet for creating views.
In Django framework the file data is placed into request.FILES. You need a FileField that a view will handle this and this will receive file data in request.FILES which is a dictionary containing a key for each FileField. I am going to use Serializer class to contain this FileField.
Prerequisites
Python 3.9.0 – 3.9.5, Django 3.1.2 – 3.2.5, djangorestframework 3.12.1 (pip install djangorestframework)
Project Setup
The first thing you need to create project directory. The project name is djangofilesupload which you will create using the following command.
django-admin startproject djangorestfilesuploadNext step is to create an app inside the above project directory to perform files upload operations. Create an app called restfilesupload using the following command. Make sure you execute the following command from the project’s root directory djangorestfilesupload, because you are going to create the following app directory under the project’s root directory.
django-admin startapp restfilesuploadThe required project and app structures will be created.

Now you need to add this restfilesupload app into the project settings. So edit the file djangorestfilesupload/djangorestfilesupload/settings.py and add the following line into INSTALLED_APPS section at the end:
INSTALLED_APPS = [
    ...
    'restfilesupload.apps.RestfilesuploadConfig',
]
The above line is formed using the file djangorestfilesupload/restfilesupload/apps.py. You will see the RestfilesuploadConfig class in this file with the name = ‘restfilesupload’.
In the first example, I am going to show you how to upload single file in the server followed by multiple files upload. I am going to use the Postman tool to test the file upload application. You can use any REST client that supports file upload functionality or CURL command to upload file or files.
Serializer
Serializers in Django allow complex data to be converted to native Python datatypes. Django provides a Serializer class which gives you a powerful, generic way to control the output of your responses.
Here I am going to create a Serializer class with a FileField that will store the file object. I have put validation for empty and no limit on file size. The below code is written into serializers.py file under folder djangorestfilesupload/djangorestfilesupload/restfilesupload.
The FileSerializer class is used here to serialize the request that has a field called file.
from rest_framework import serializers

class FileSerializer(serializers.Serializer):
    file = serializers.FileField(max_length=None, allow_empty_file=False)
Views
Here I will write code for views into djangorestfilesupload/djangorestfilesupload/restfilesupload/views.py file. Here I am going to use ViewSet which will allow me to write multiple views together. If you want you can also create individual view.
You must define the function create() in the ViewSet otherwise your API root will be blank. By default file will be uploaded into project’s root directory. If you want to change the destination for upload then you can pass as shown below:
file = serializers.FileField(upload_to='your directory name/')I am doing simple validation whether file field is there or not in the request as well as whether file has been passed or not in the FileSerializer. Here I am sending HTTP Status Code 400 (Bad Request) response for any validation fails otherwise I am sending HTTP Status Code 201 (Created).
from rest_framework import viewsets
from rest_framework import status
from rest_framework.response import Response

from restfilesupload.serializers import FileSerializer


class FileUploadViewSet(viewsets.ViewSet):

    def create(self, request):
        serializer_class = FileSerializer(data=request.data)
        if 'file' not in request.FILES or not serializer_class.is_valid():
            return Response(status=status.HTTP_400_BAD_REQUEST)
        else:
            handle_uploaded_file(request.FILES['file'])
            return Response(status=status.HTTP_201_CREATED)

def handle_uploaded_file(f):
    with open(f.name, 'wb+') as destination:
        for chunk in f.chunks():
            destination.write(chunk)
Looping over UploadedFile.chunks() instead of using read() ensures that large files don’t overwhelm your system’s memory.
Ideally the function handle_uploaded_file() should be put into common utility file, but just for the sake of this example I have kept into the view file.
URLs
Next step is to write API endpoint URL in the file djangorestfilesupload/djangorestfilesupload/urls.py.
As I am using viewsets instead of views, I can automatically generate the URL conf for REST API, by simply registering the viewsets with a router class. If you are using individual view then you can configure API URL explicitly.
You must provide basename for the router otherwise you will get an error basename argument not specified, and could ‘ \.
from django.urls import include, path
from rest_framework import routers
from restfilesupload import views

router = routers.DefaultRouter()
router.register(r'file', views.FileUploadViewSet, basename='file')

urlpatterns = [
    #path('admin/', admin.site.urls),
	path('upload/', include(router.urls)),
]
Deploying Application
Now I am ready to test the API I have built. Let’s fire up the server from the command line using manage.py runserver. The application will run on default port 8000. If you want to change the default host/port of the server then you can read tutorial Change default host and port in Django server.
Testing APIs
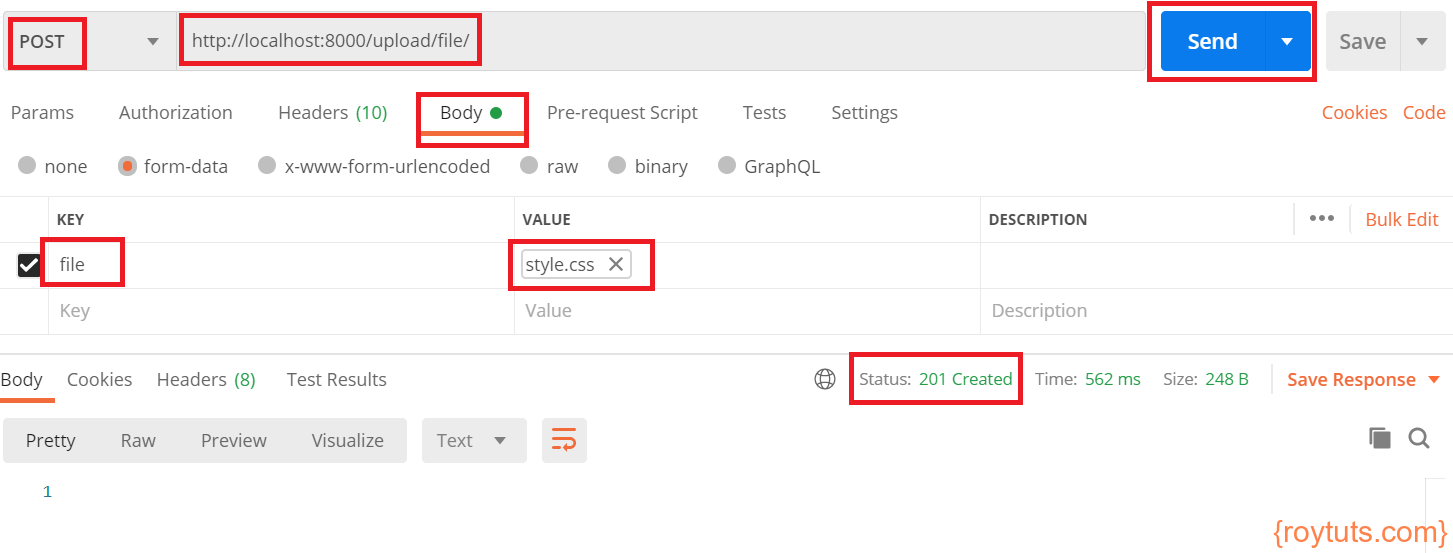
I am going to use Postman tool to test REST APIs here. Select the highlighted values as shown in the following image and click on Send button to upload the file:
You will find the file has been uploaded into the root directory (djangorestfilesupload) of the project.
Multiple Files Upload
For upload multiple files you have to do just one thing – get the list of files from the request and iterate each of them to upload. So use the below code snippets instead of request.FILES['file'] to get all files in the views file. You need to hold CTRL (Windows System) to select multiple files.
request.FILES.getlist('file')The whole source can be downloaded from the Source Code section later.
Now you can test the application by selecting multiple files. All files will be uploaded into the same project’s root directory.

That’s all about how to upload single and multiple files using Django REST API.
thank you for this post
I tried running your code when i upload a file/files its giving bad request all the time
Please check the request you are sending
do you have any idea if i store video using this then how to retrieve video and play on HTML media player?