This tutorial will show you how we configure Spring MVC, maven and Tomcat 7. For this tutorial we will create maven based web project in Eclipse.
If you already have an idea on how to create a maven project in Eclipse will be great otherwise I will tell you here how to create a maven project in Eclipse.
Prerequisites
The following configurations are required in order to run the application
Eclipse
JDK 1.7
Tomcat 7
Have maven installed and configured
Spring 4 and JSTL API dependencies in pom.xml
Now we will see the below steps how to create a maven based spring project in Eclipse
Final project structure would be
Step 1. Create a maven based web project in Eclipse
Go to File -> New -> Other. On popup window under Maven select Maven Project. Then click on Next. Select the workspace location – either default or browse the location. Click on Next. Now in next window select the row as highlighted from the below list of archtypes and click on Next button.
maven-arctype-webapp
Now enter the required fields (Group Id, Artifact Id) as shown below
Group Id : com.roytuts
Artifact Id : spring
Step 2. Modify the pom.xml file as shown below.
<project xmlns="http://maven.apache.org/POM/4.0.0" xmlns:xsi="http://www.w3.org/2001/XMLSchema-instance"
    xsi:schemaLocation="http://maven.apache.org/POM/4.0.0 http://maven.apache.org/maven-v4_0_0.xsd">
    <modelVersion>4.0.0</modelVersion>
    <groupId>com.roytuts</groupId>
    <artifactId>spring</artifactId>
    <packaging>war</packaging>
    <version>0.0.1-SNAPSHOT</version>
    <name>spring</name>
    <properties>
        <project.build.sourceEncoding>UTF-8</project.build.sourceEncoding>
        <jdk.version>1.7</jdk.version>
        <spring.version>4.1.6.RELEASE</spring.version>
    </properties>
    <dependencies>
        <!-- spring-context which provides core functionality -->
        <dependency>
            <groupId>org.springframework</groupId>
            <artifactId>spring-context</artifactId>
            <version>${spring.version}</version>
        </dependency>
        <!-- The spring-aop module provides an AOP(aspect-oriented programming)
            implementation -->
        <dependency>
            <groupId>org.springframework</groupId>
            <artifactId>spring-aop</artifactId>
            <version>${spring.version}</version>
        </dependency>
        <!-- The spring-webmvc module contains Spring’s model-view-controller (MVC)
            and REST Web Services implementation for web applications -->
        <dependency>
            <groupId>org.springframework</groupId>
            <artifactId>spring-webmvc</artifactId>
            <version>${spring.version}</version>
        </dependency>
        <!-- The spring-web module provides basic web-oriented integration features
            such as multipart file upload functionality and the initialization of the
            IoC container using Servlet listeners and a web-oriented application context -->
        <dependency>
            <groupId>org.springframework</groupId>
            <artifactId>spring-web</artifactId>
            <version>${spring.version}</version>
        </dependency>
        <!-- jstl -->
        <dependency>
            <groupId>javax.servlet</groupId>
            <artifactId>jstl</artifactId>
            <version>1.2</version>
        </dependency>
    </dependencies>
    <build>
        <finalName>spring</finalName>
        <plugins>
            <plugin>
                <groupId>org.apache.maven.plugins</groupId>
                <artifactId>maven-compiler-plugin</artifactId>
                <configuration>
                    <source>${jdk.version}</source>
                    <target>${jdk.version}</target>
                </configuration>
            </plugin>
        </plugins>
    </build>
</project>
Step 3. If you see JRE System Library[J2SE-1.4] then change the version by below process
Do right-click on the project and go to Build -> Configure build path, under Libraries tab click on JRE System Library[J2SE-1.4], click on Edit button and select the appropriate jdk 1.7 from the next window. Click on Finish then Ok.
Step 4. Create Spring XML configuration file controllers.xml under src/main/resources/spring directory
<?xml version="1.0" encoding="UTF-8"?>
<beans xmlns="http://www.springframework.org/schema/beans"
    xmlns:xsi="http://www.w3.org/2001/XMLSchema-instance" xmlns:p="http://www.springframework.org/schema/p"
    xmlns:context="http://www.springframework.org/schema/context"
    xsi:schemaLocation="
        http://www.springframework.org/schema/beans
        http://www.springframework.org/schema/beans/spring-beans.xsd
        http://www.springframework.org/schema/context
        http://www.springframework.org/schema/context/spring-context.xsd">
    <!-- Support annotation -->
    <context:annotation-config></context:annotation-config>
    <!-- Scan the package where Spring Controllers are placed -->
    <context:component-scan base-package="com.roytuts.spring.controllers" />
    <!-- Resolves logical String-based view names to actual View types -->
    <bean id="viewResolver"
        class="org.springframework.web.servlet.view.InternalResourceViewResolver">
        <property name="viewClass"
            value="org.springframework.web.servlet.view.JstlView" />
        <!-- Where pages are kept -->
        <property name="prefix" value="/" />
        <!-- What is the page extension -->
        <property name="suffix" value=".jsp" />
    </bean>
</beans>
Step 5. Create Controller class
package com.roytuts.spring.controllers;
import java.util.Date;
import org.springframework.stereotype.Controller;
import org.springframework.ui.Model;
import org.springframework.web.bind.annotation.RequestMapping;
@Controller //denotes it is a Controller class
public class HelloWorldController {
  @RequestMapping(value = "helloWorld") //which URL resource path should it use
  public String helloWorld(Model model) {
    model.addAttribute("today", new Date()); //the attribute 'today' is accessible from jsp page using jstl notation
    return "hello"; //return the view name
  }
}
Step 6. Now modify web.xml file
<?xml version="1.0" encoding="UTF-8"?>
<web-app xmlns="http://java.sun.com/xml/ns/javaee" xmlns:xsi="http://www.w3.org/2001/XMLSchema-instance"
    xsi:schemaLocation="http://java.sun.com/xml/ns/javaee http://java.sun.com/xml/ns/javaee/web-app_3_0.xsd"
    version="3.0">
    <display-name>Spring MVC</display-name>
    <!-- dispatcher servlet acts as a front controller for each request/response -->
    <servlet>
        <servlet-name>springmvc</servlet-name>
        <servlet-class>org.springframework.web.servlet.DispatcherServlet</servlet-class>
        <!-- load Spring controllers while dispatcher servlet loads -->
        <init-param>
            <param-name>contextConfigLocation</param-name>
            <param-value>classpath:spring/controllers.xml</param-value>
        </init-param>
        <load-on-startup>1</load-on-startup>
    </servlet>
    <!-- map URL suffix as .html -->
    <servlet-mapping>
        <servlet-name>springmvc</servlet-name>
        <url-pattern>*.html</url-pattern>
    </servlet-mapping>
    <!-- map welcome URL path -->
    <!-- here HelloWorldController's helloWorld method acts as an entry point -->
    <welcome-file-list>
        <welcome-file>helloWorld.html</welcome-file>
    </welcome-file-list>
</web-app>
Step 7. Create hello.jsp file under webapp folder
<%@ page language="java" contentType="text/html; charset=ISO-8859-1"
    pageEncoding="ISO-8859-1"%>
<html>
<body>
    <h2>Hello World!</h2>
    Today is ${today}
</body>
</html>
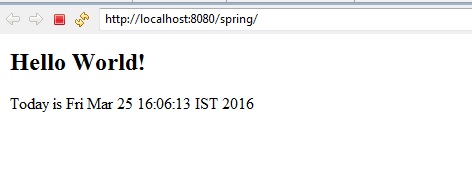
Step 8. Now run the application you will see the below output in the browser.
Thanks for reading.

